Manage Category Settings in Batoi CloudSpace
Manage Opportunity Category Setting
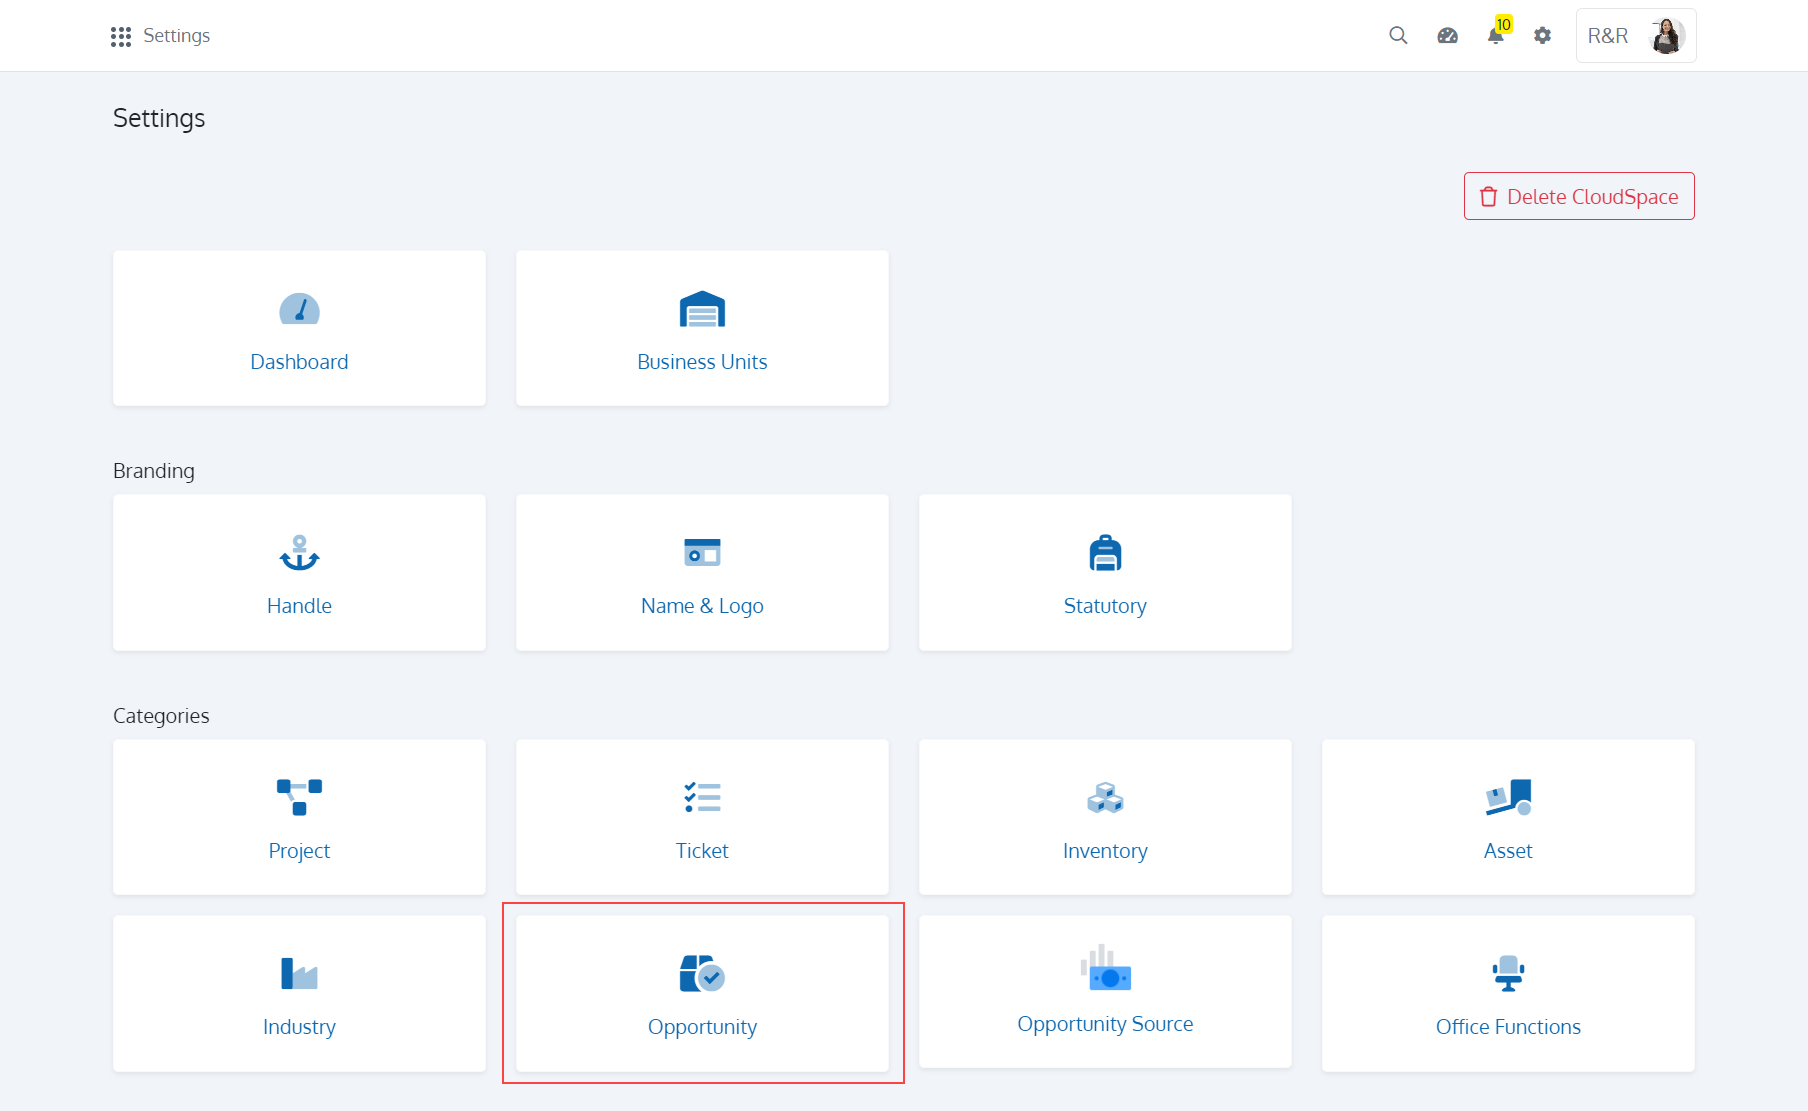
Click on 'Settings' and choose the 'Opportunity' card as shown in Figure 1.
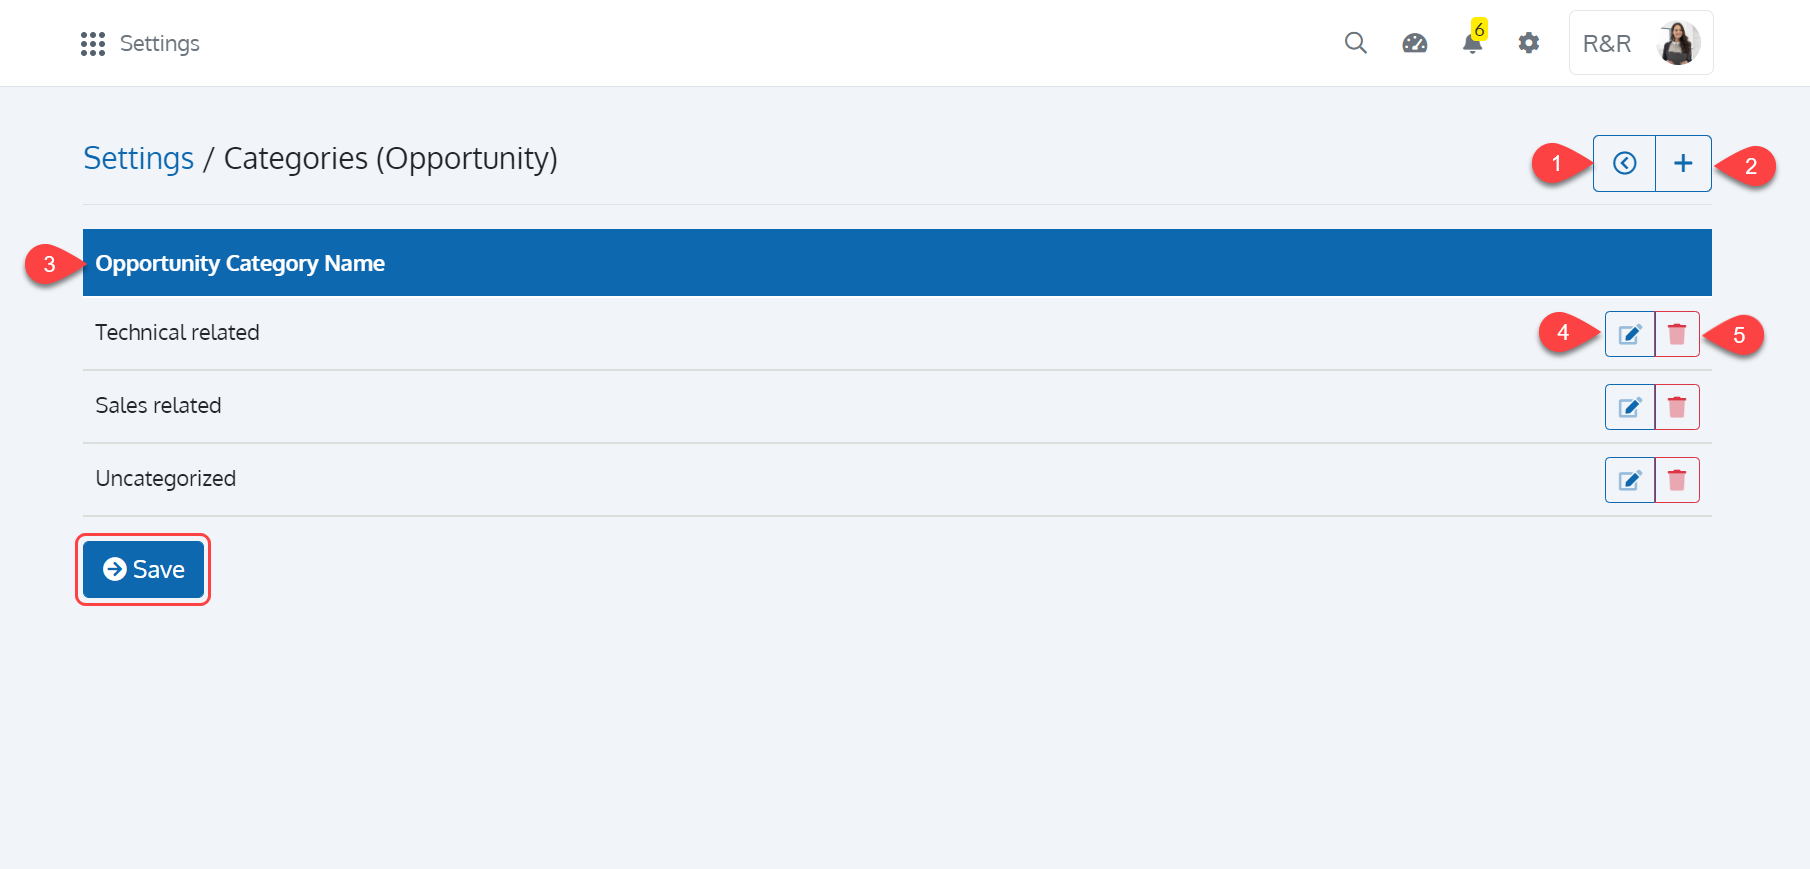
In the 'Opportunity - Categories' screen, you can see a set of buttons in the toolbar with the available categories (Uncategorized by default) as shown in Figure 2. Each step shown in Figure 2 is explained in the below table.
| Sl. No. | Name | Description |
|---|---|---|
| 1 | Back |
Use this button to return to the settings page |
| 2 | Add Category |
Click to add a category for Opportunities |
| 3 | Opportunity Category Name |
The list of available categories for Opportunities |
| 4 | Edit Category |
Click to edit the category |
| 5 | Archive Category |
Click to archive the category |
Add Category
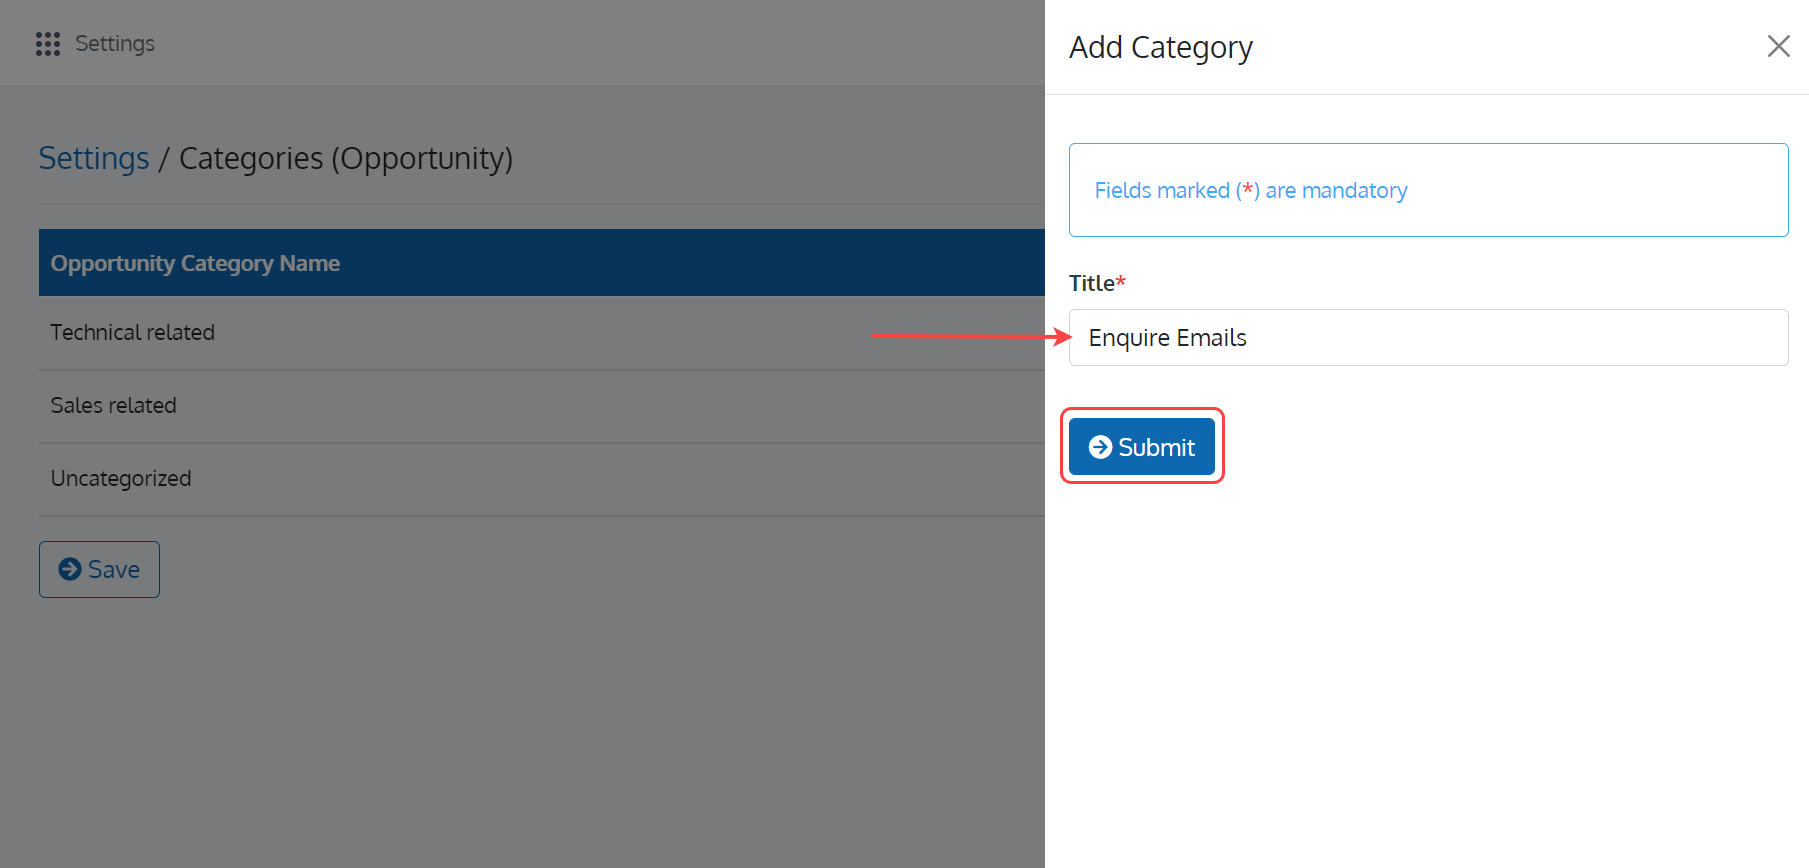
To add a Category for an Opportunity, click on the '+' button as shown in Figure 3.

In the 'Add Category' page, enter the Title of the Category. Once you are done with, click on the 'Submit' button to save your information as shown in Figure 4.
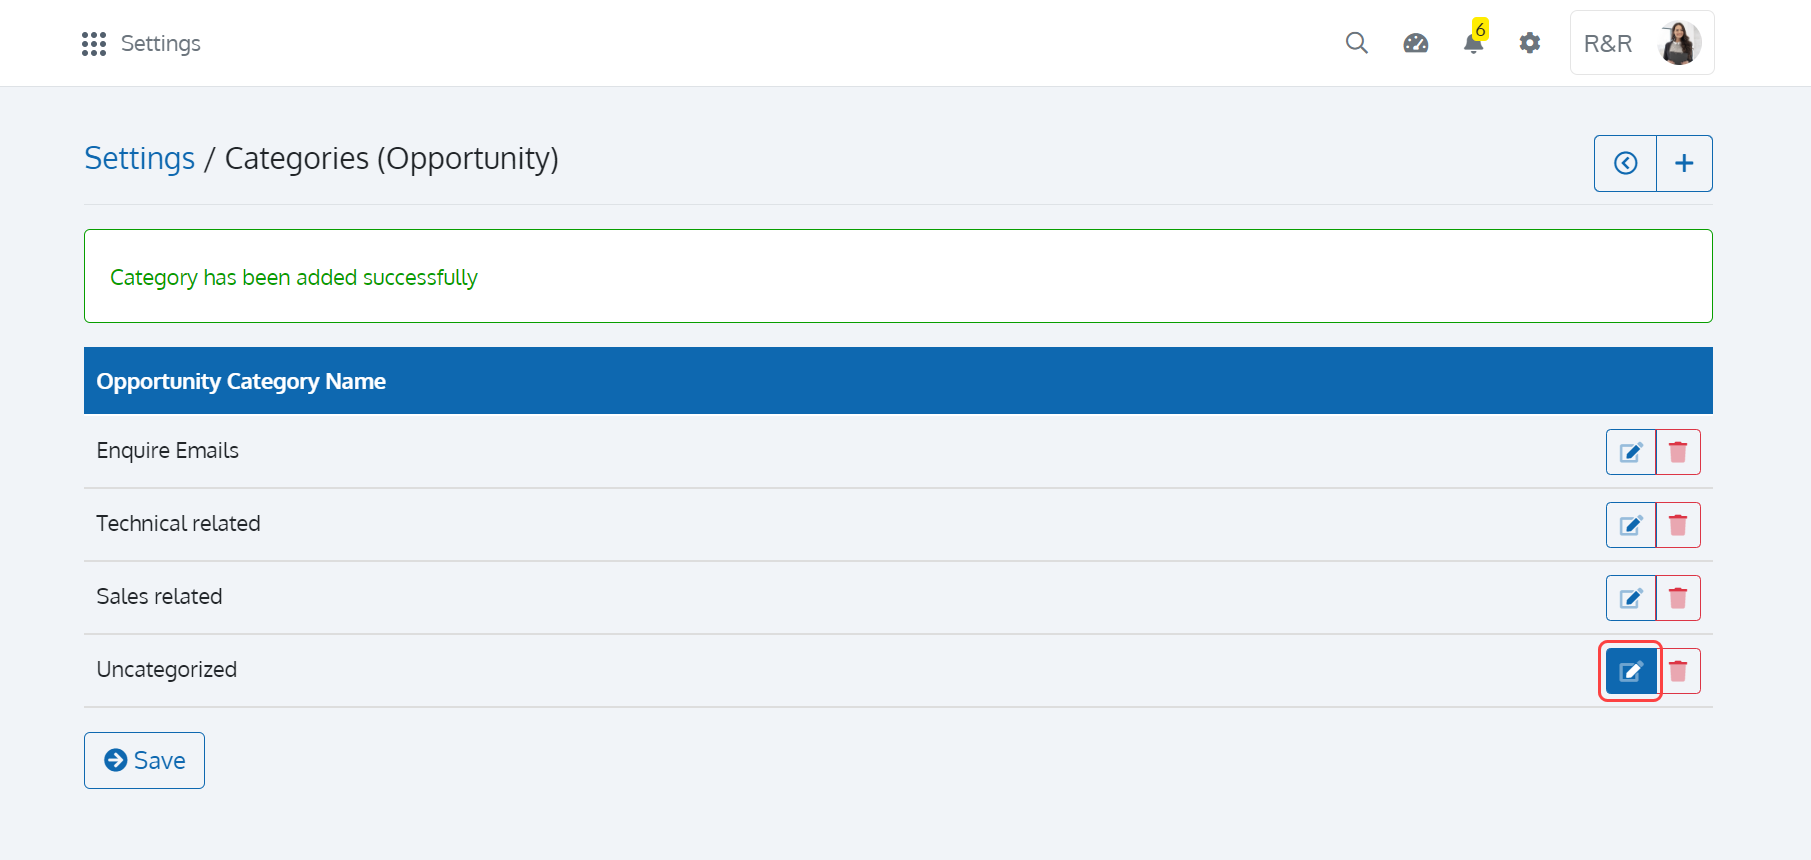
Upon doing so, the Opportunity Categories will appear in the 'Add/Edit Opportunity' page.
Edit a Category
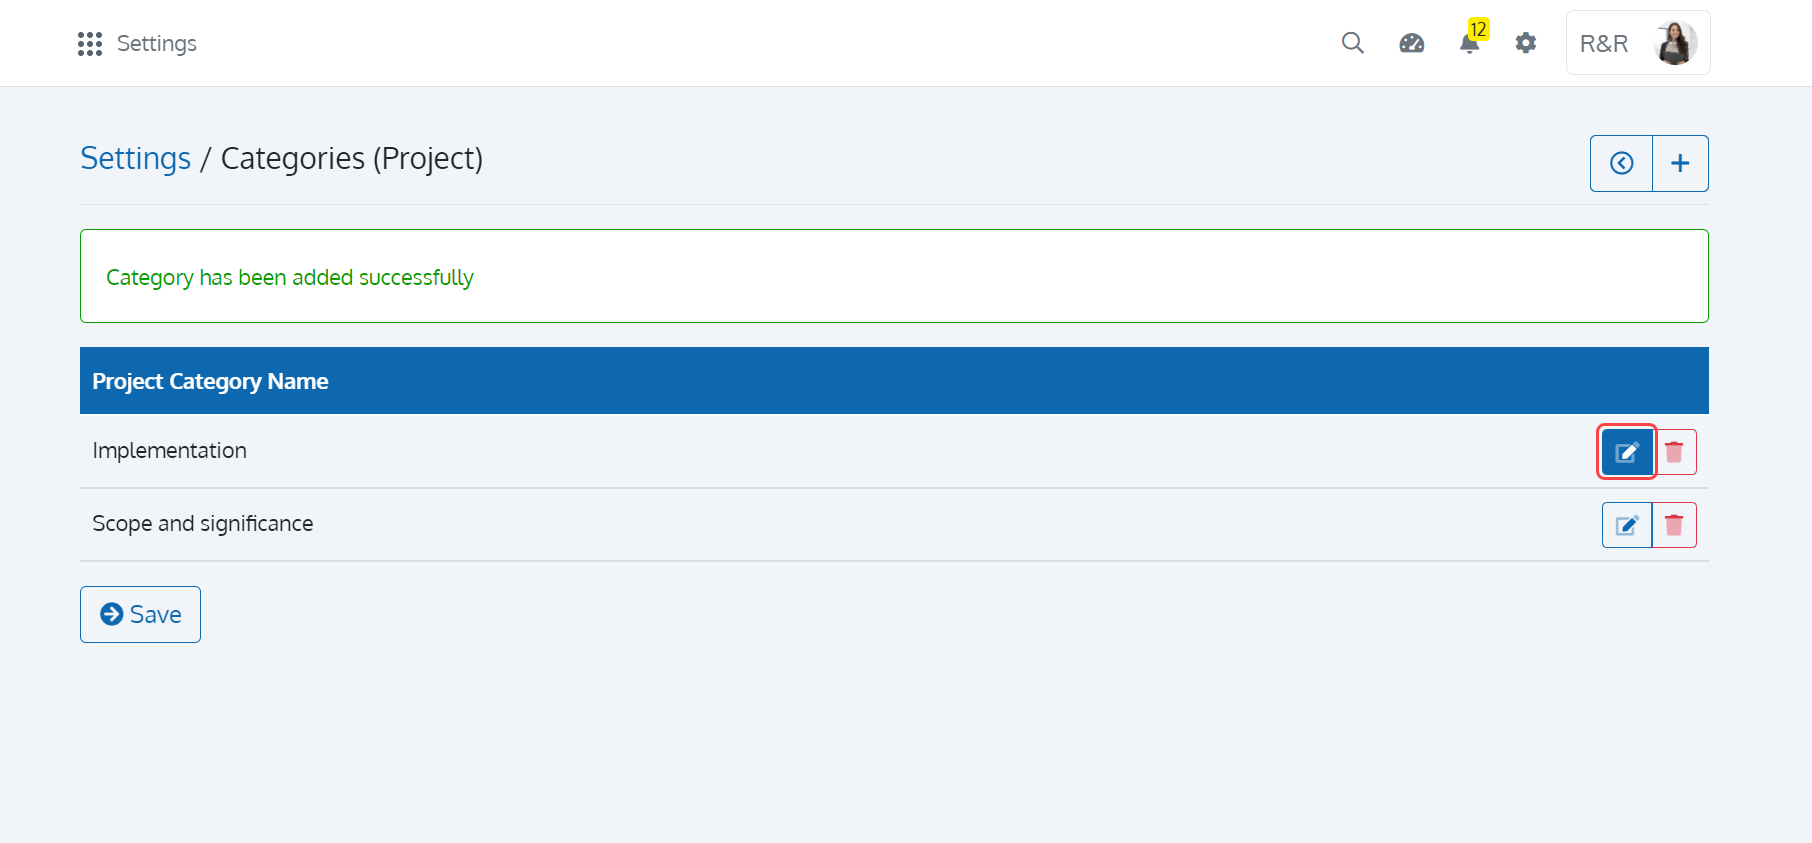
To edit a Category, click on the 'Edit Category' button as shown in Figure 5.
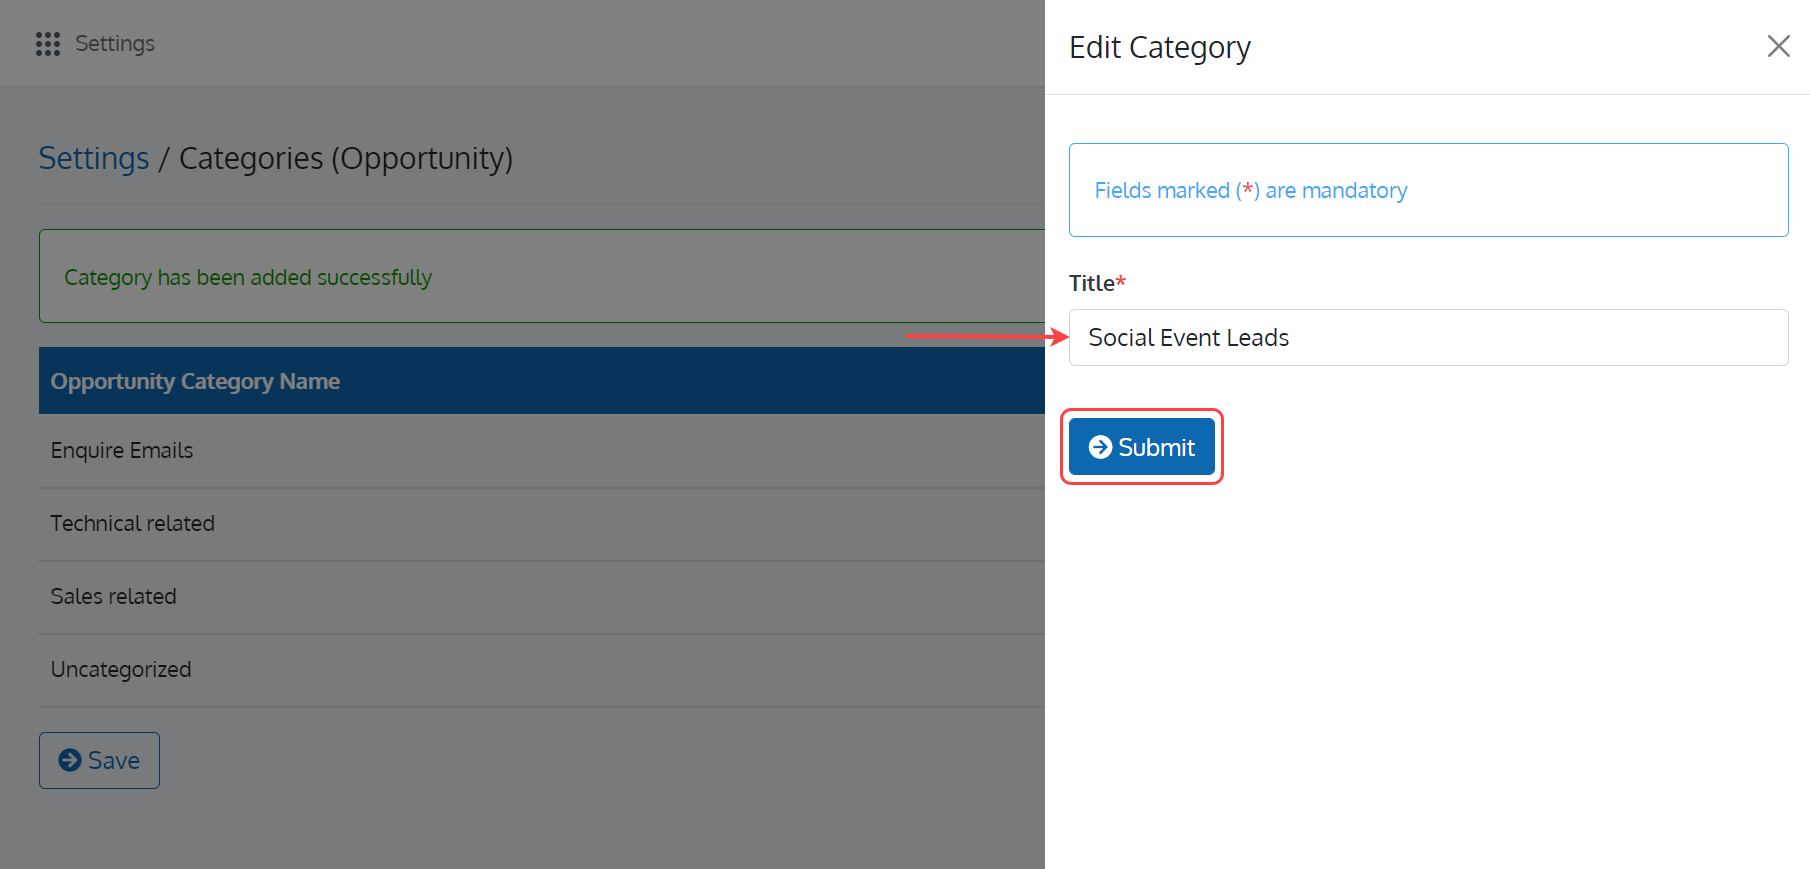
In the 'Edit Category' page, edit the Title of the Category and click on the 'Submit' button as shown in Figure 6 to save your edit.
Archive a Category
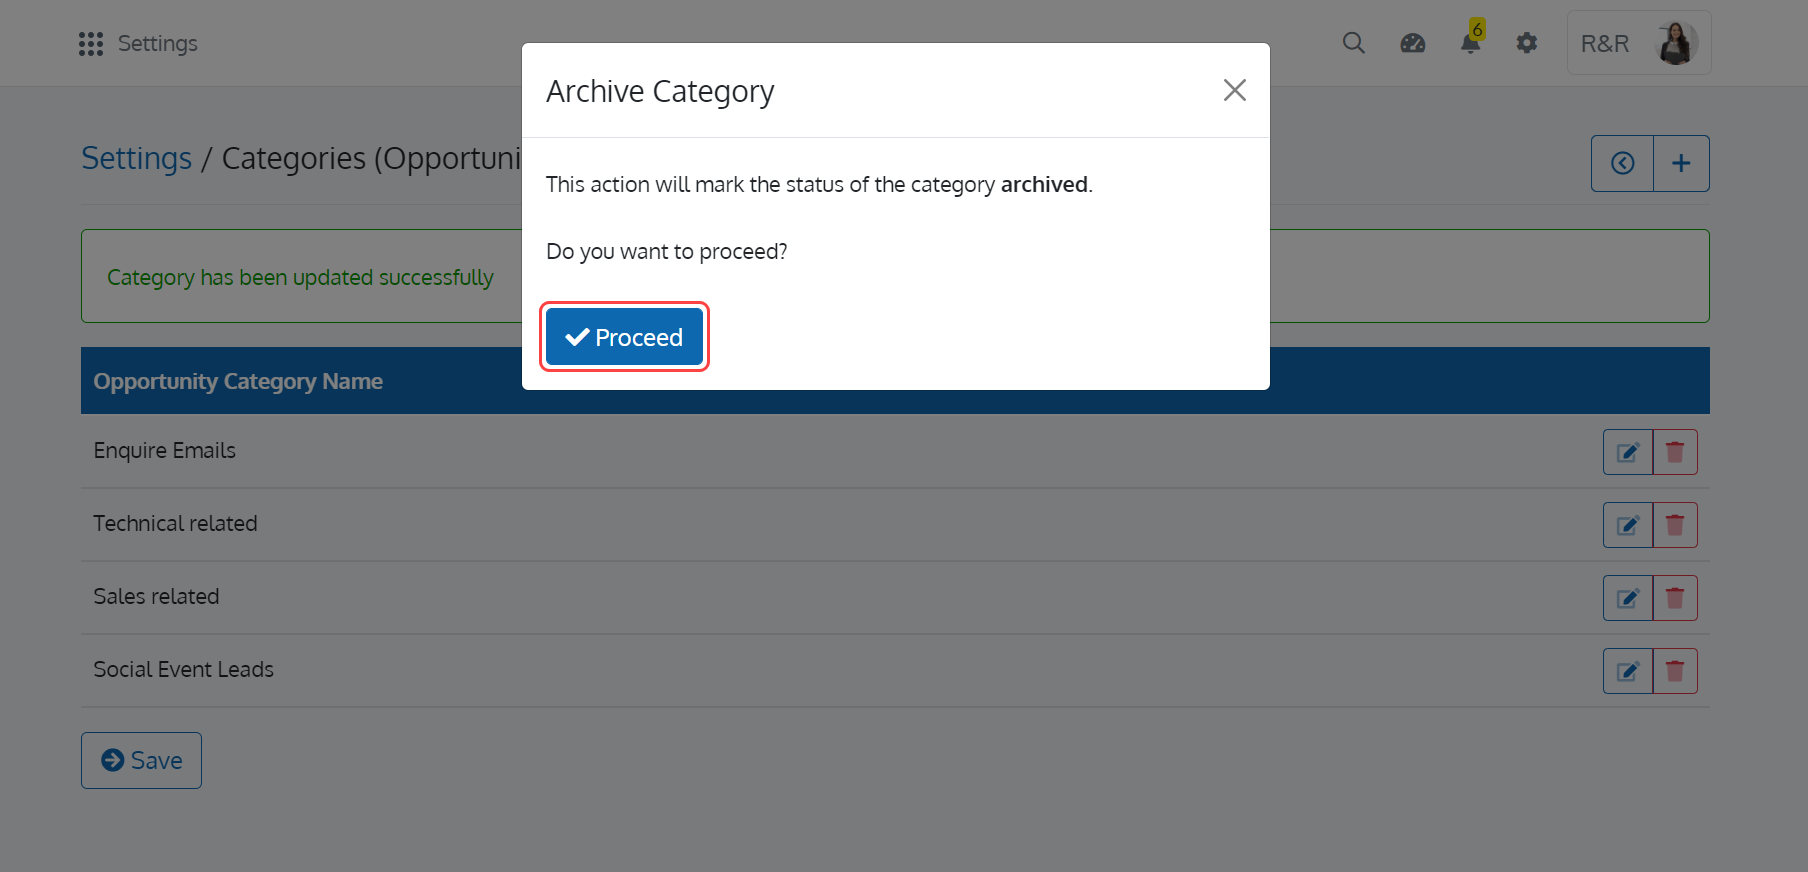
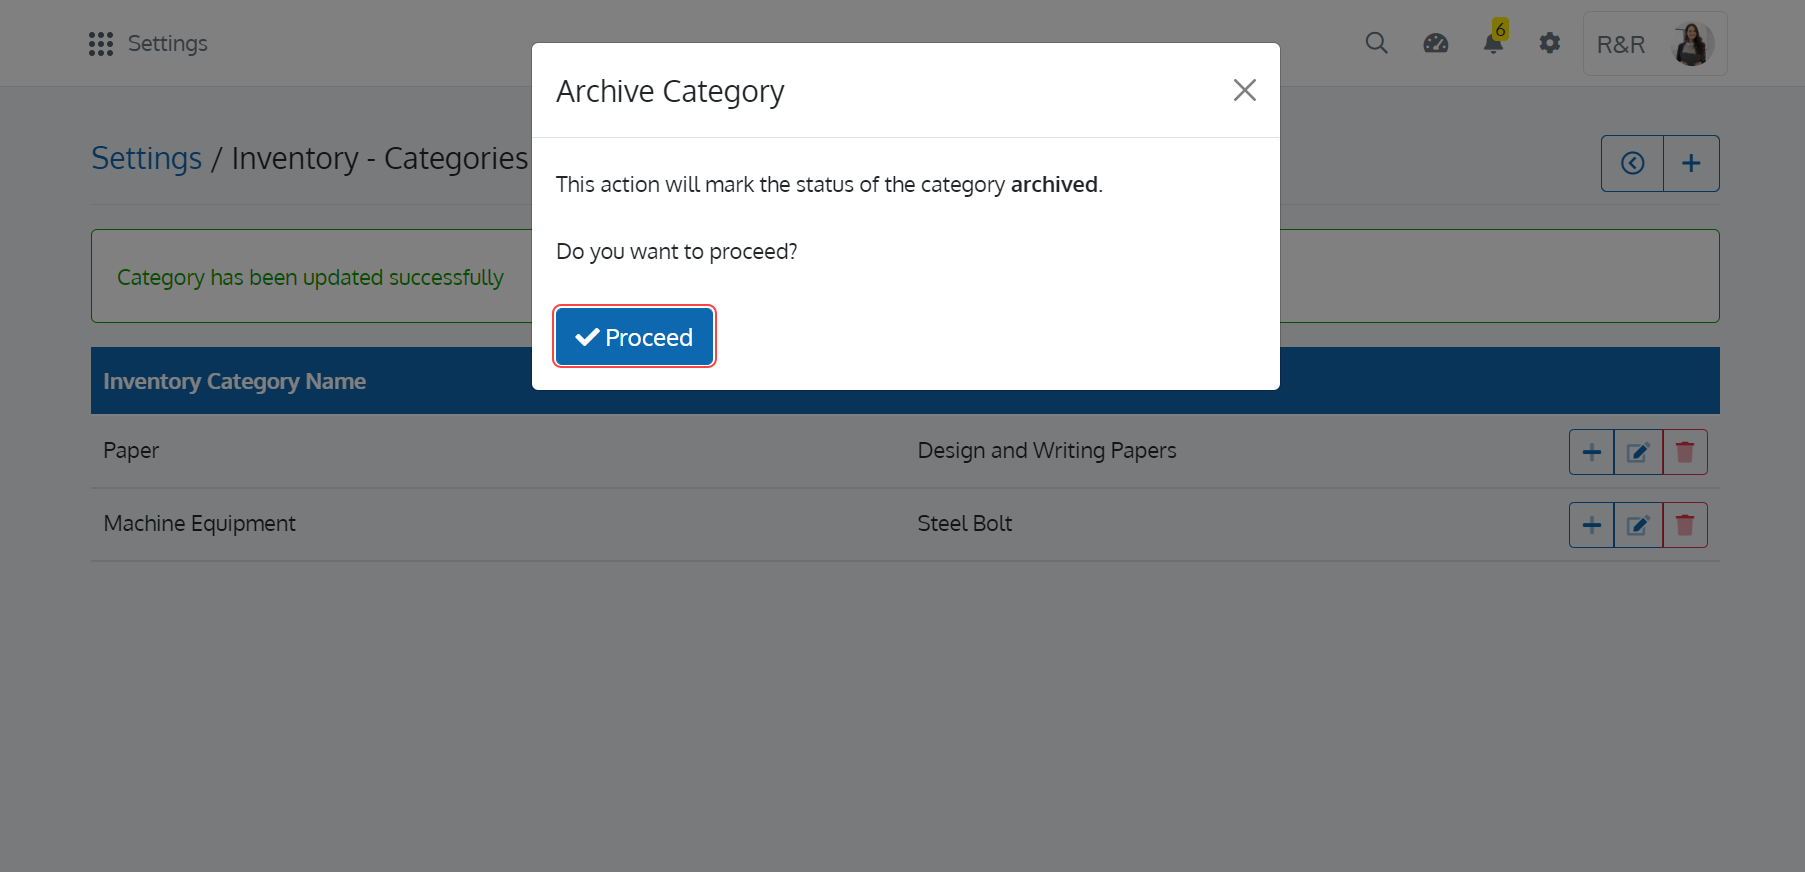
To archive a Category, click on the 'Archive Category' button as shown in Figure 7.

Upon doing so, the 'Archive Category' pop-up window with the buttons 'Proceed' and 'Cancel' will appear as shown in Figure 8. Click on the 'Proceed' button to archive the Category. Click on the 'Cancel' button to close the pop-up window.
To return to the 'Settings' page, click on the 'Back' button present in the 'Categories (Opportunity)' page.
Manage Opportunity Source Category Setting
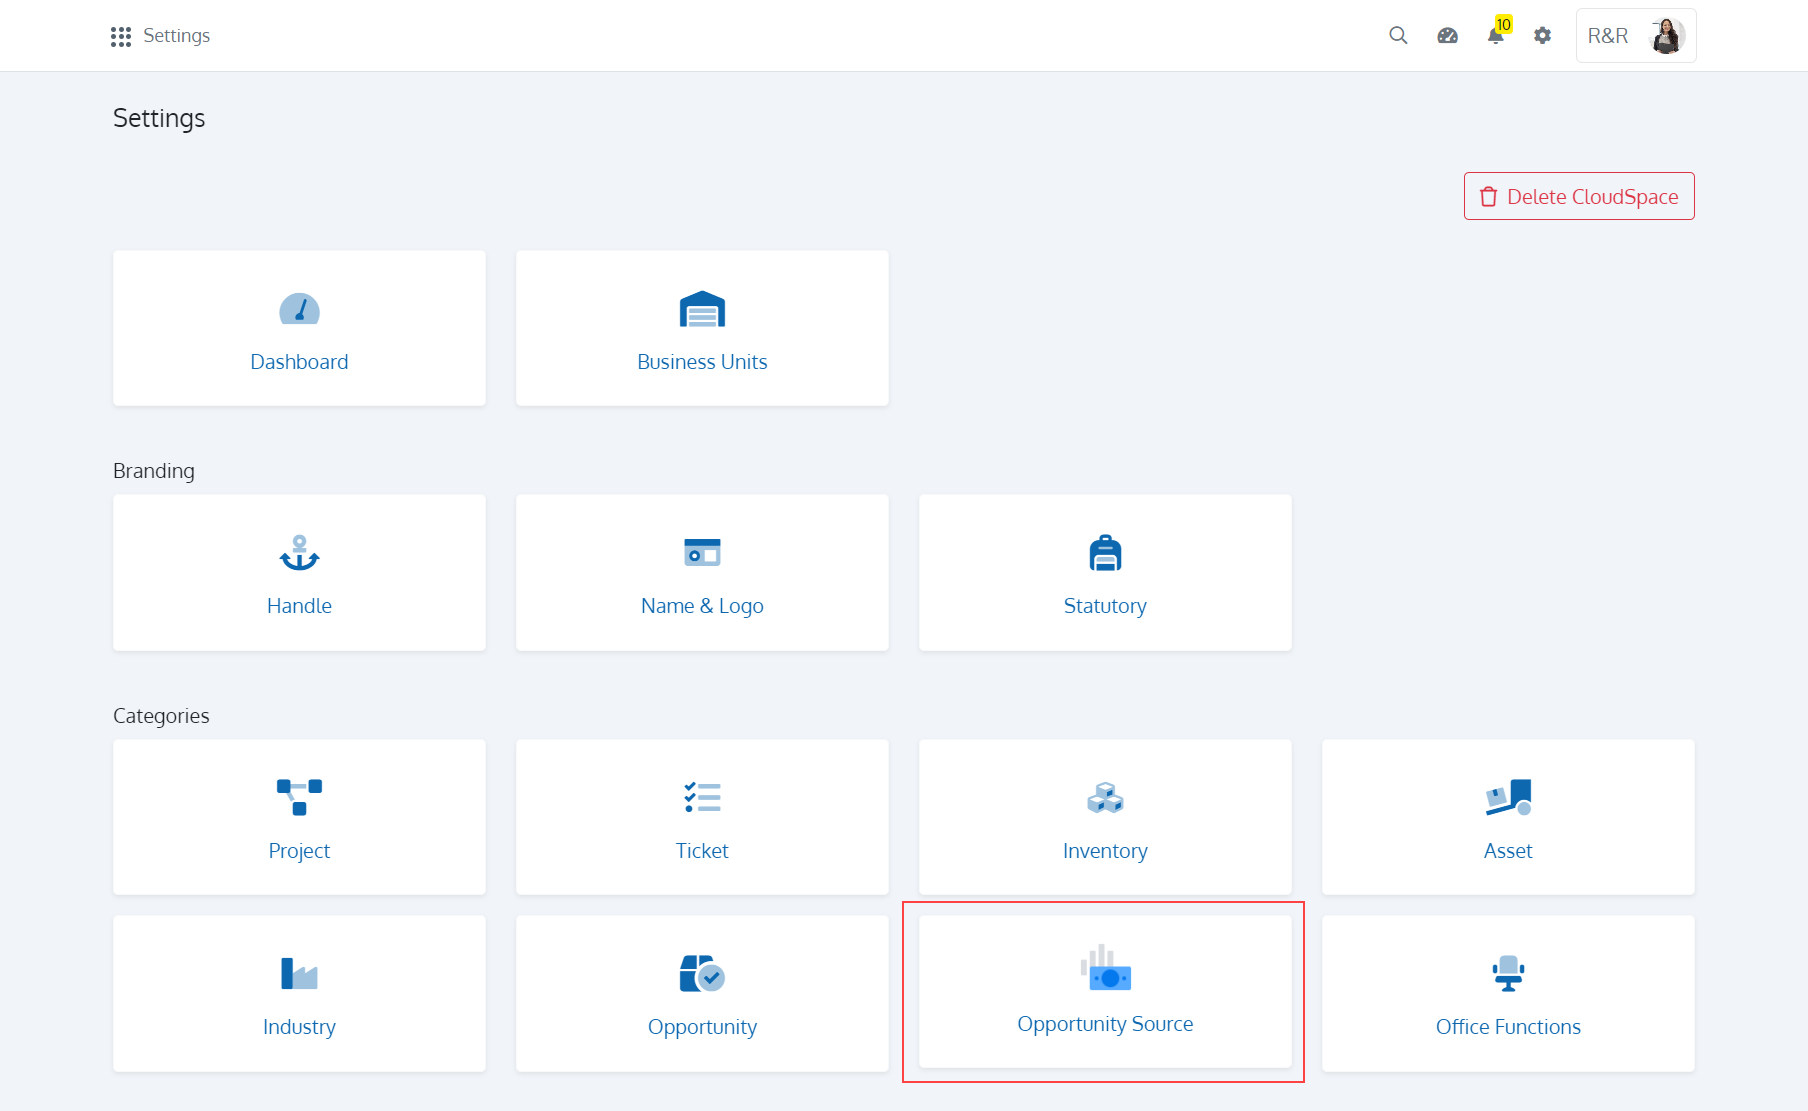
Click on 'Settings' and choose the 'Opportunity Source' card as shown in Figure 9.
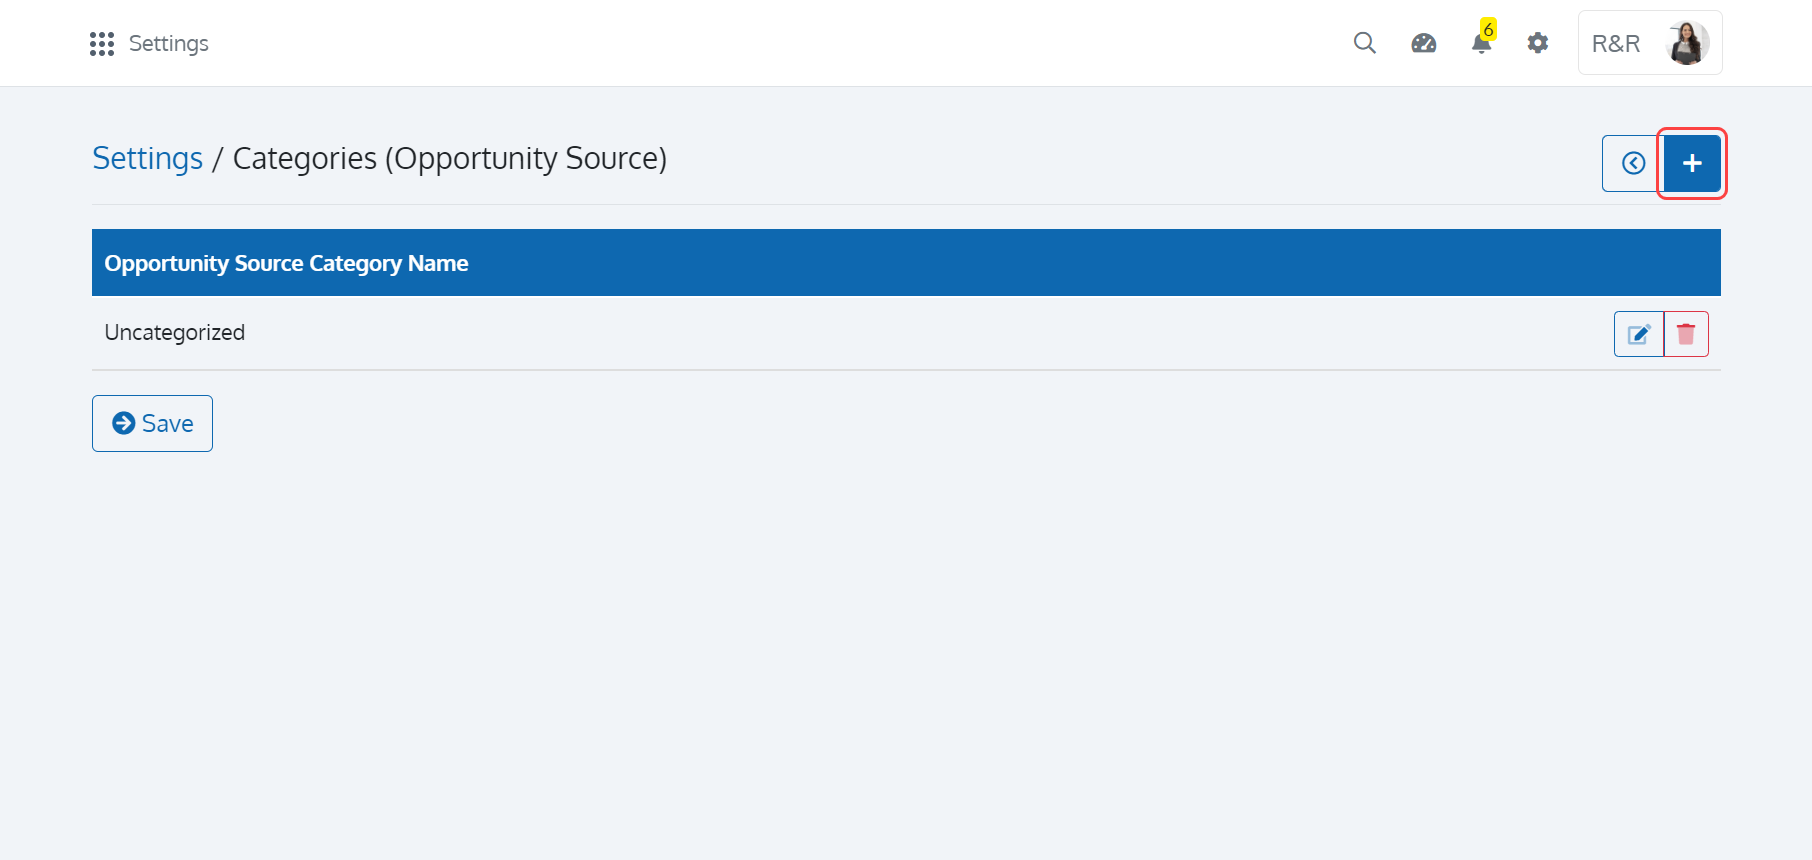
In the 'Opportunity Source - Categories' screen, you can see a set of buttons in the toolbar with the available categories (Uncategorized by default) as shown in Figure 10. Each step shown in Figure 10 is explained in the below table.
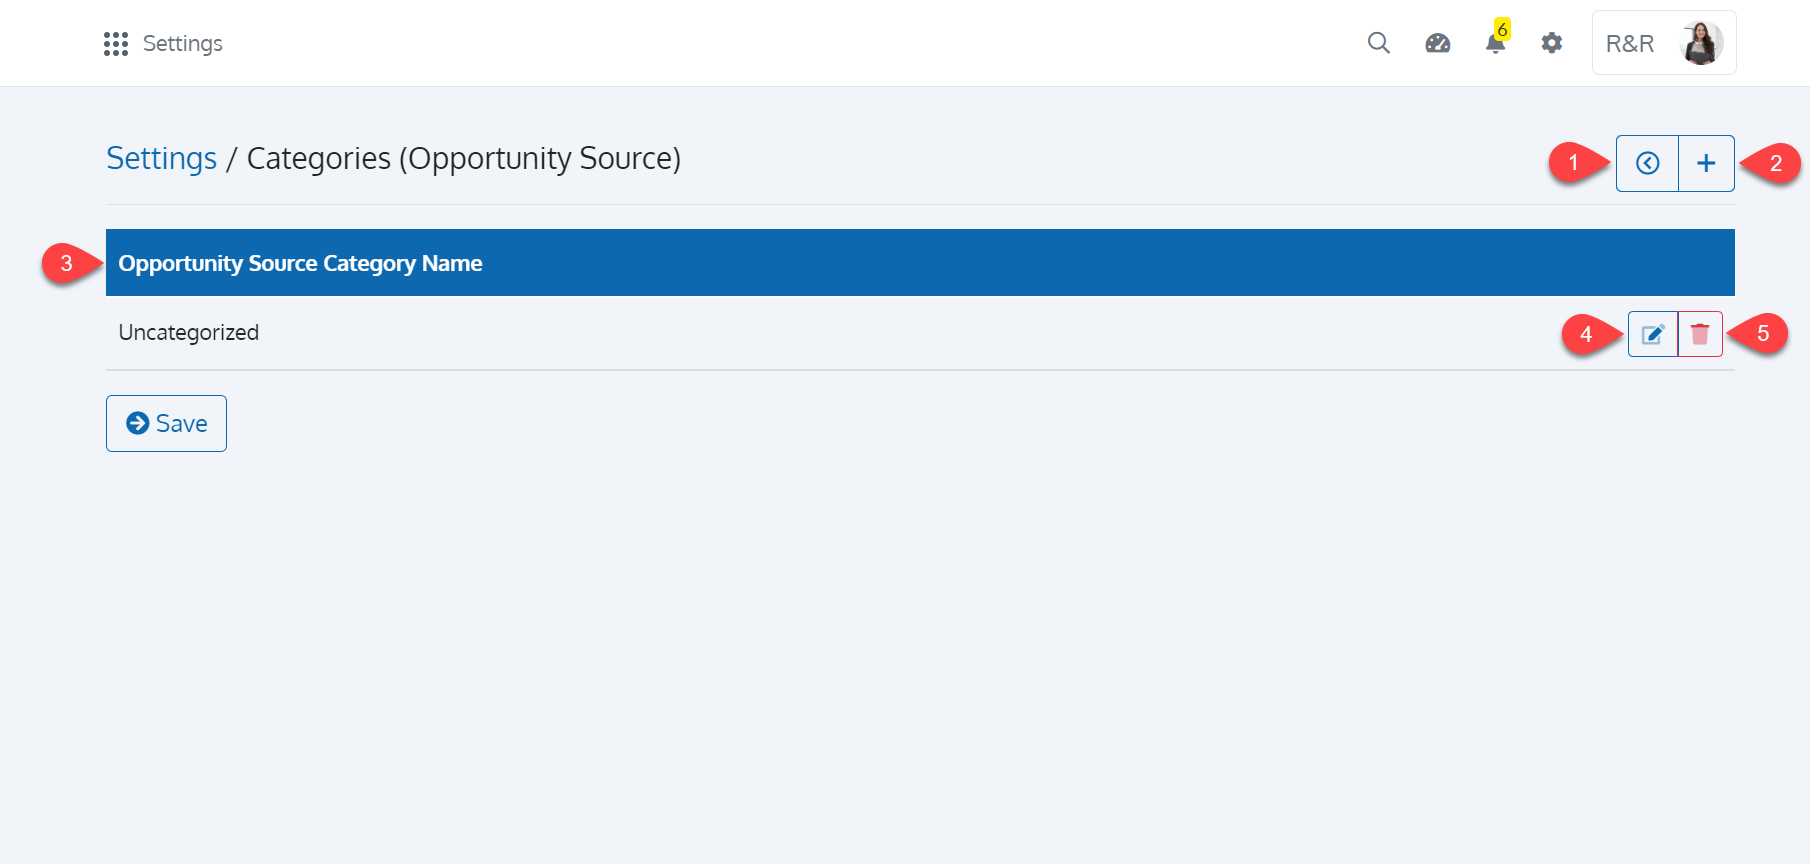
| Sl. No. | Name | Description |
|---|---|---|
| 1 | Back |
Use this button to return to the settings page |
| 2 | Add Category |
Click to add a category for Opportunity Source |
| 3 | Opportunity Source Category Name |
The list of available categories for Opportunity Source |
| 4 | Edit Category |
Click to edit the category |
| 5 | Archive Category |
Click to archive the category |
Add Category
To add a Category for an Opportunity Source, click on the '+' button as shown in Figure 11.
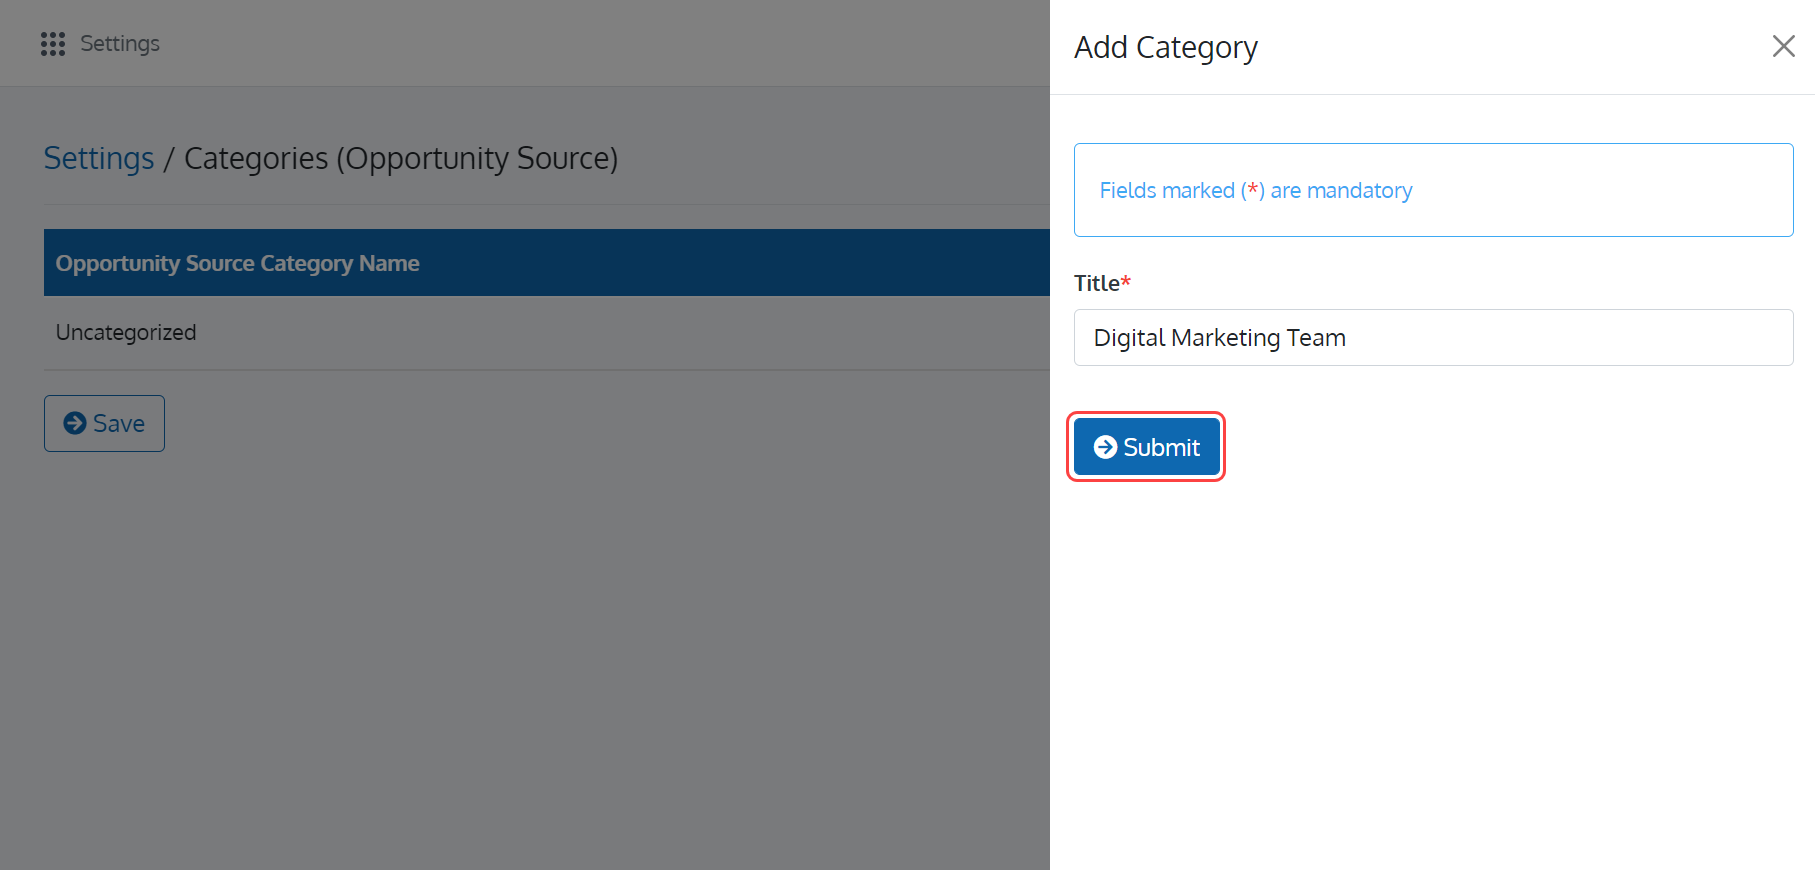
In the 'Add Category' page, enter the Title of the Category. Once you are done with, click on the 'Submit' button to save your information as shown in Figure 12.
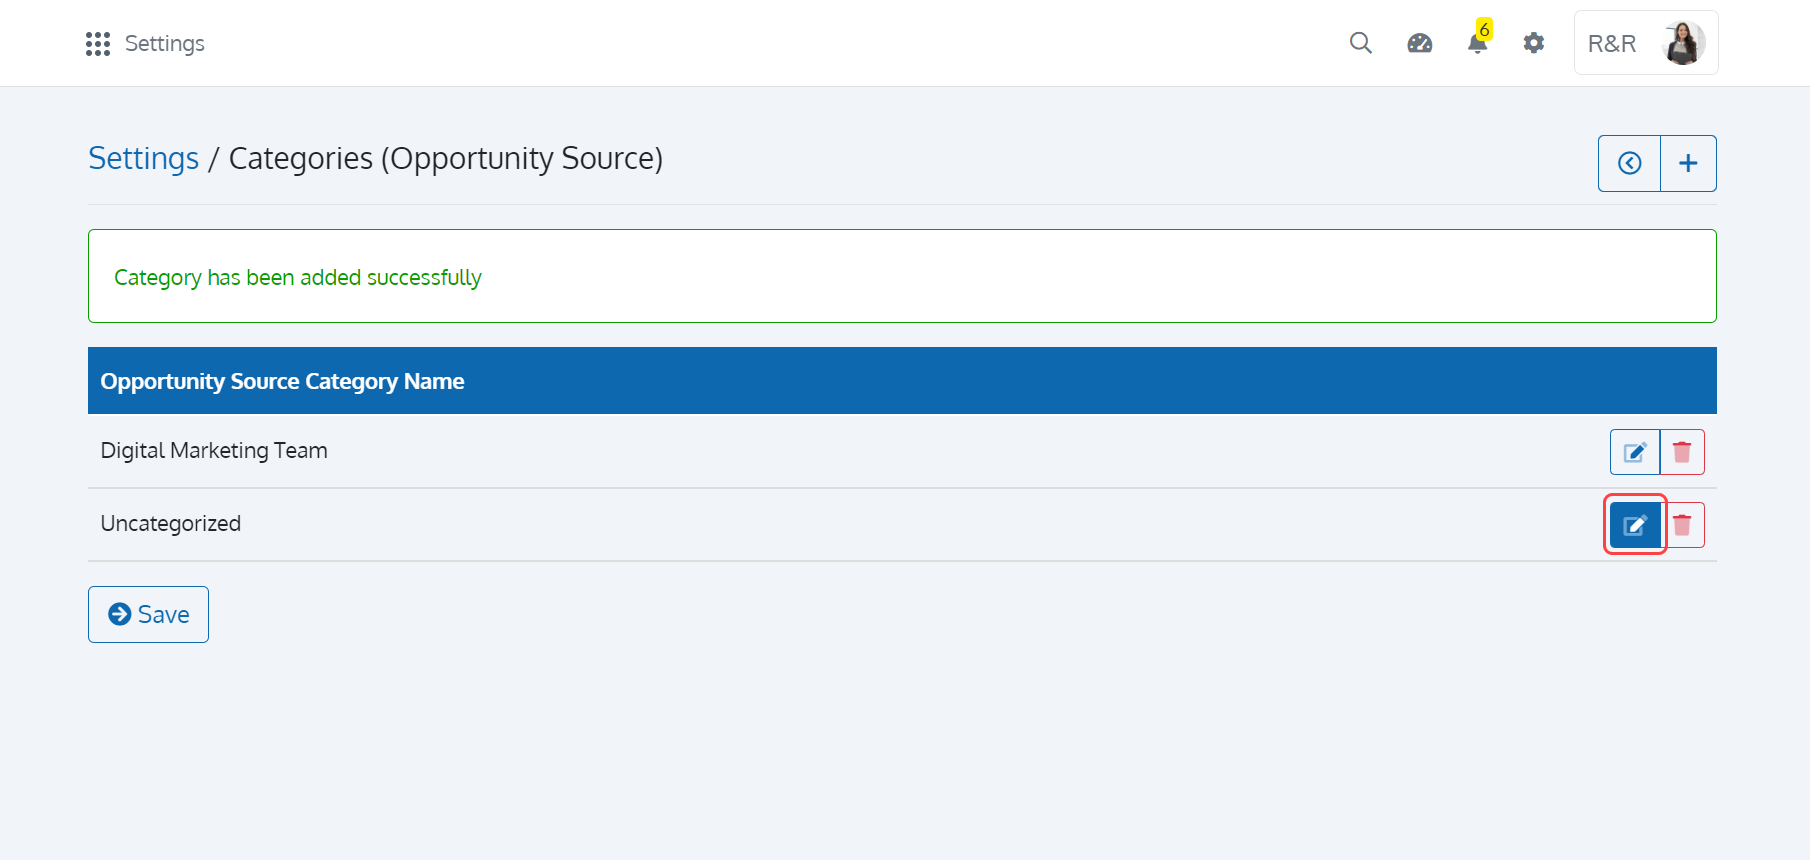
Upon doing so, the Opportunity Source category will appear in the 'Add/Edit Opportunity Source' page.
Edit a Category
To edit a Category, click on the 'Edit Category' button as shown in Figure 13.
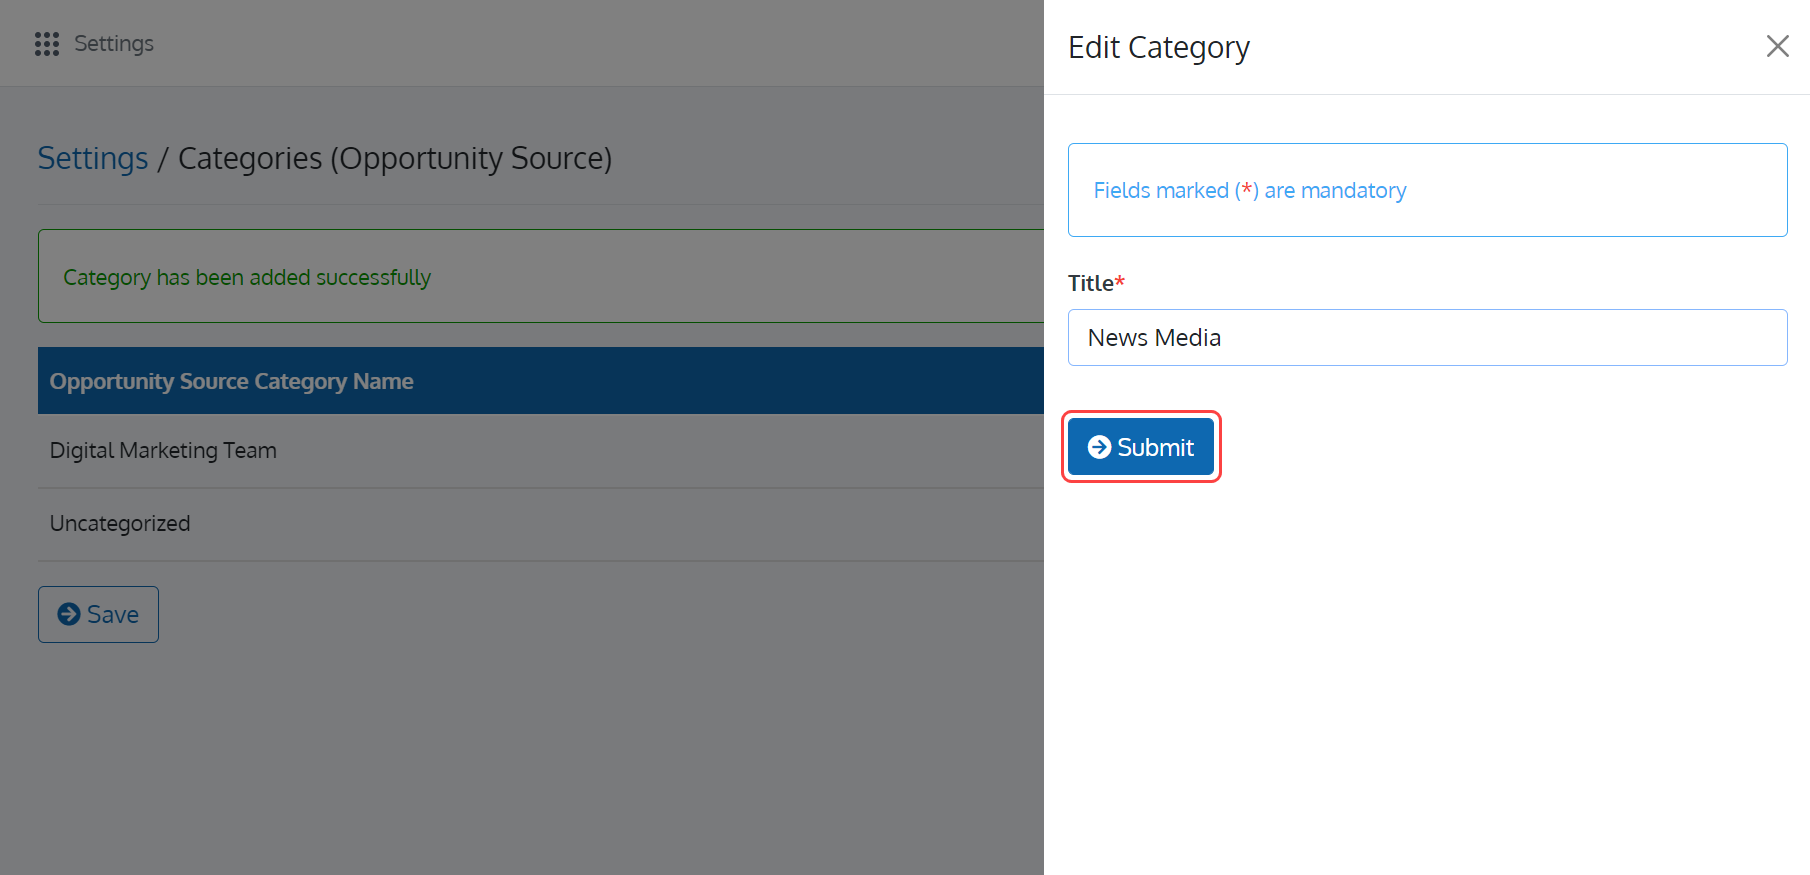
In the 'Edit Category' page, edit the Title of the Category and click on the 'Submit' button as shown in Figure 14 to save your edit.
Archive a Category
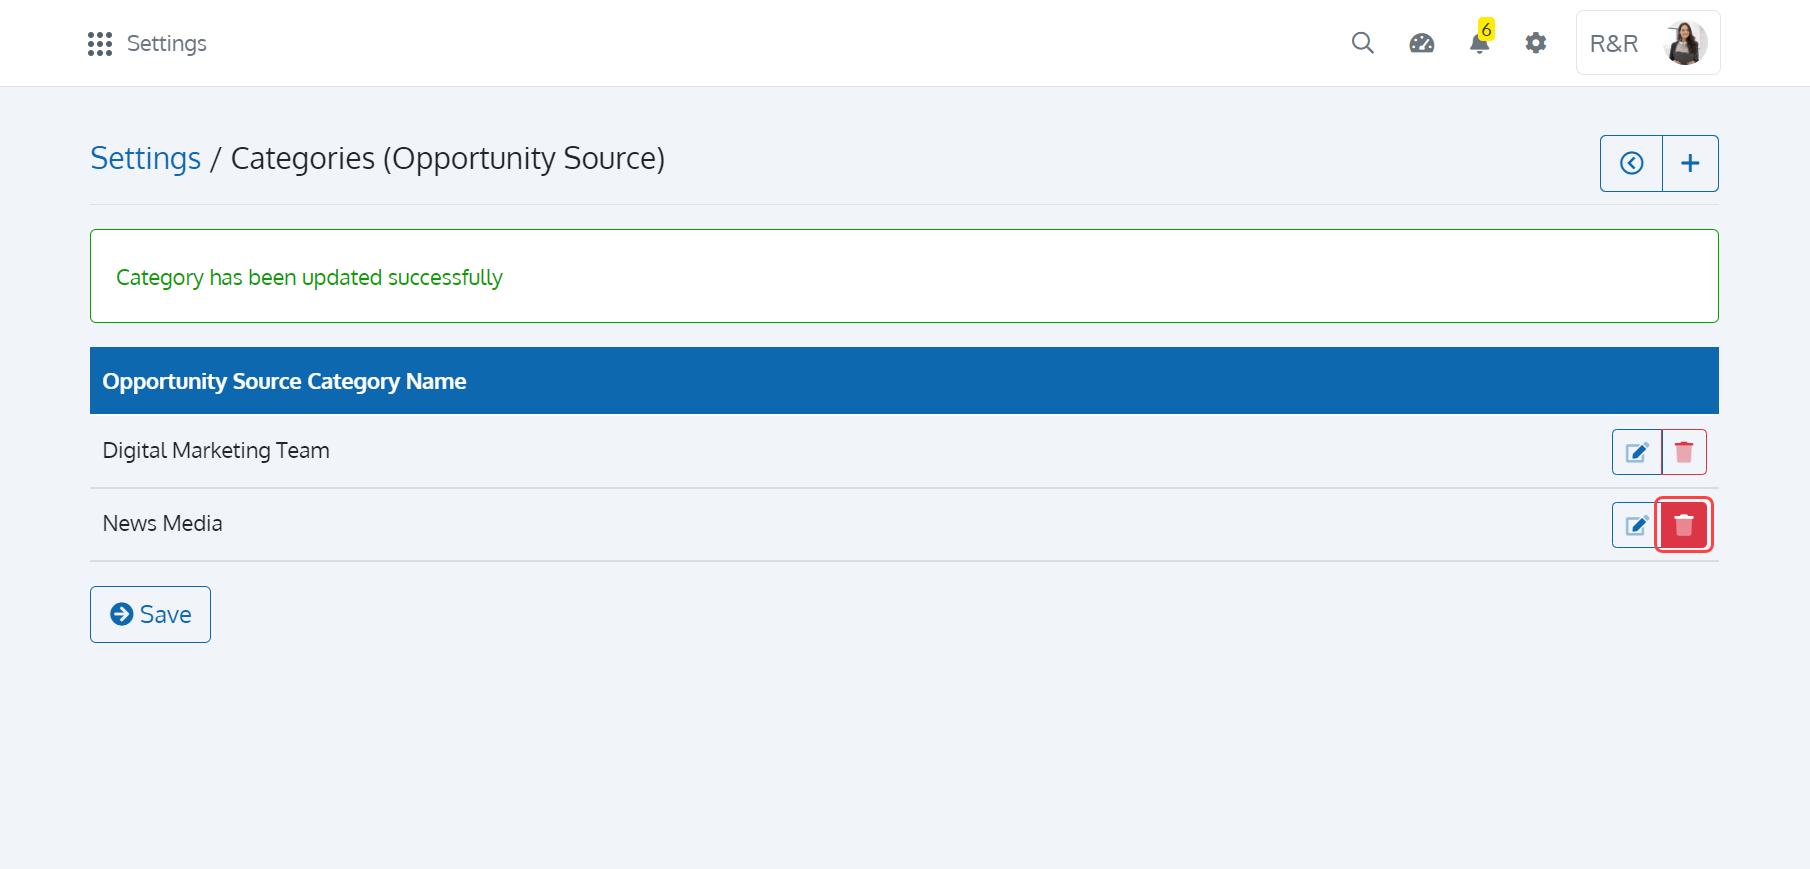
To archive a Category, click on the 'Archive Category' button as shown in Figure 15.
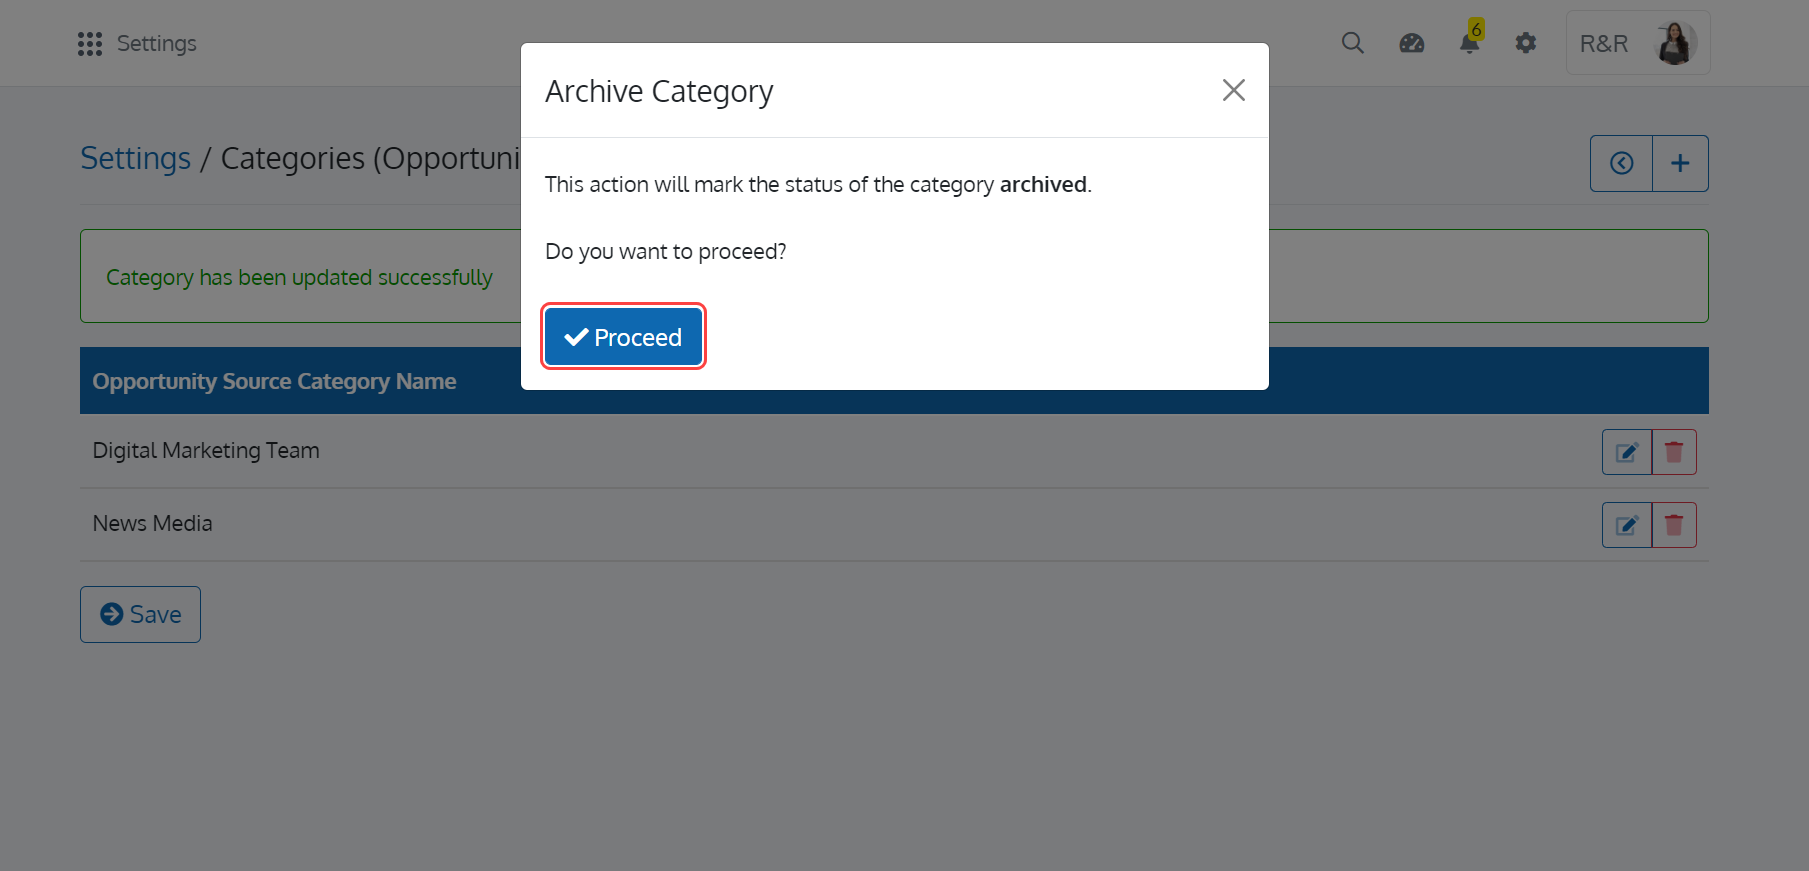
Upon doing so, the 'Archive Category' pop-up window with the buttons 'Proceed' and 'Cancel' will appear as shown in Figure 16. Click on the 'Proceed' button to archive the Category. Click on the 'Cancel' button to close the pop-up window.
To return to the 'Settings' page, click on the 'Back' button present in the 'Categories (Opportunity Source)' page.
Manage Inventory Category Setting
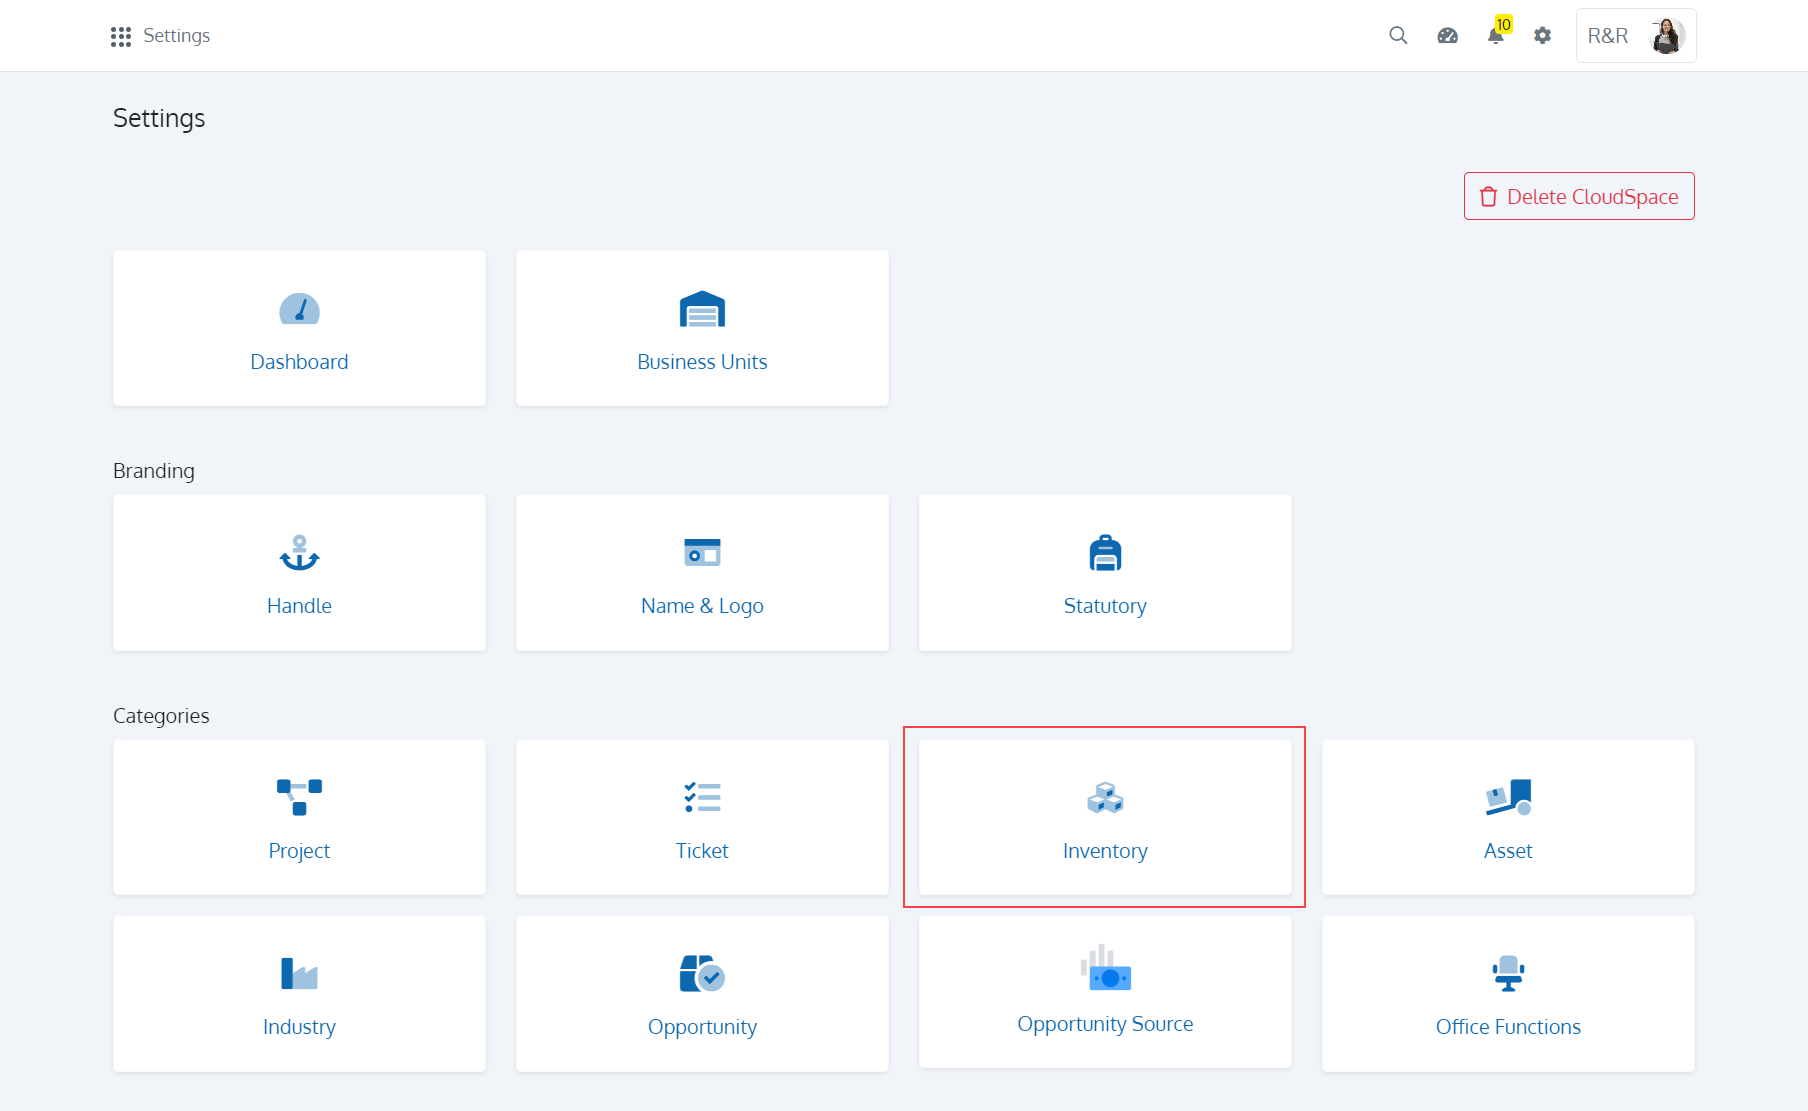
Click on the 'Settings' icon and choose the 'Inventory' card as shown in Figure 17.
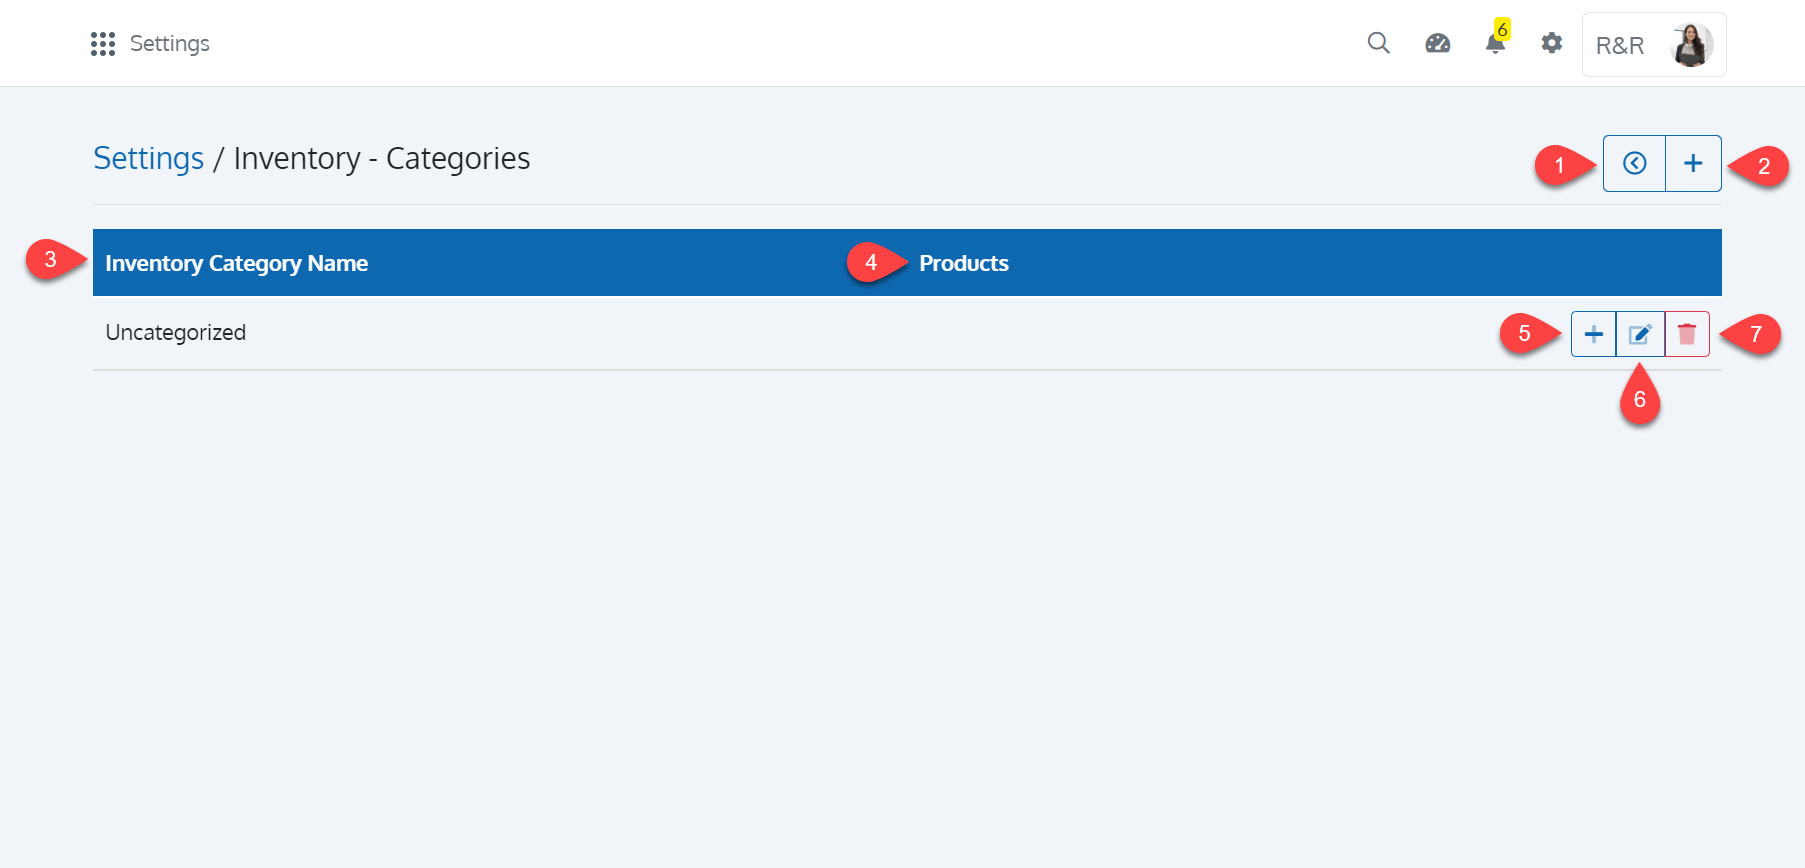
In the ' Inventory - Categories' screen, you can see a set of buttons in the toolbar with the available categories (Uncatergorized by default) as shown in Figure 18. Each step shown in Figure 18 is explained in the below table.
| Sl. No. | Name | Description |
|---|---|---|
| 1 | Back |
Use this button to return to the settings page |
| 2 | Add Category |
Click to add a category for Inventory |
| 3 | Inventory Category Name |
The list of available categories for Inventory |
| 4 | Add Sub-Category |
Click to add sub-categories for the said category |
| 5 | Edit Category |
Click to edit the category of the said Inventory |
| 6 | Archive Category |
Click to archive the category for the said Inventory |
Add Category
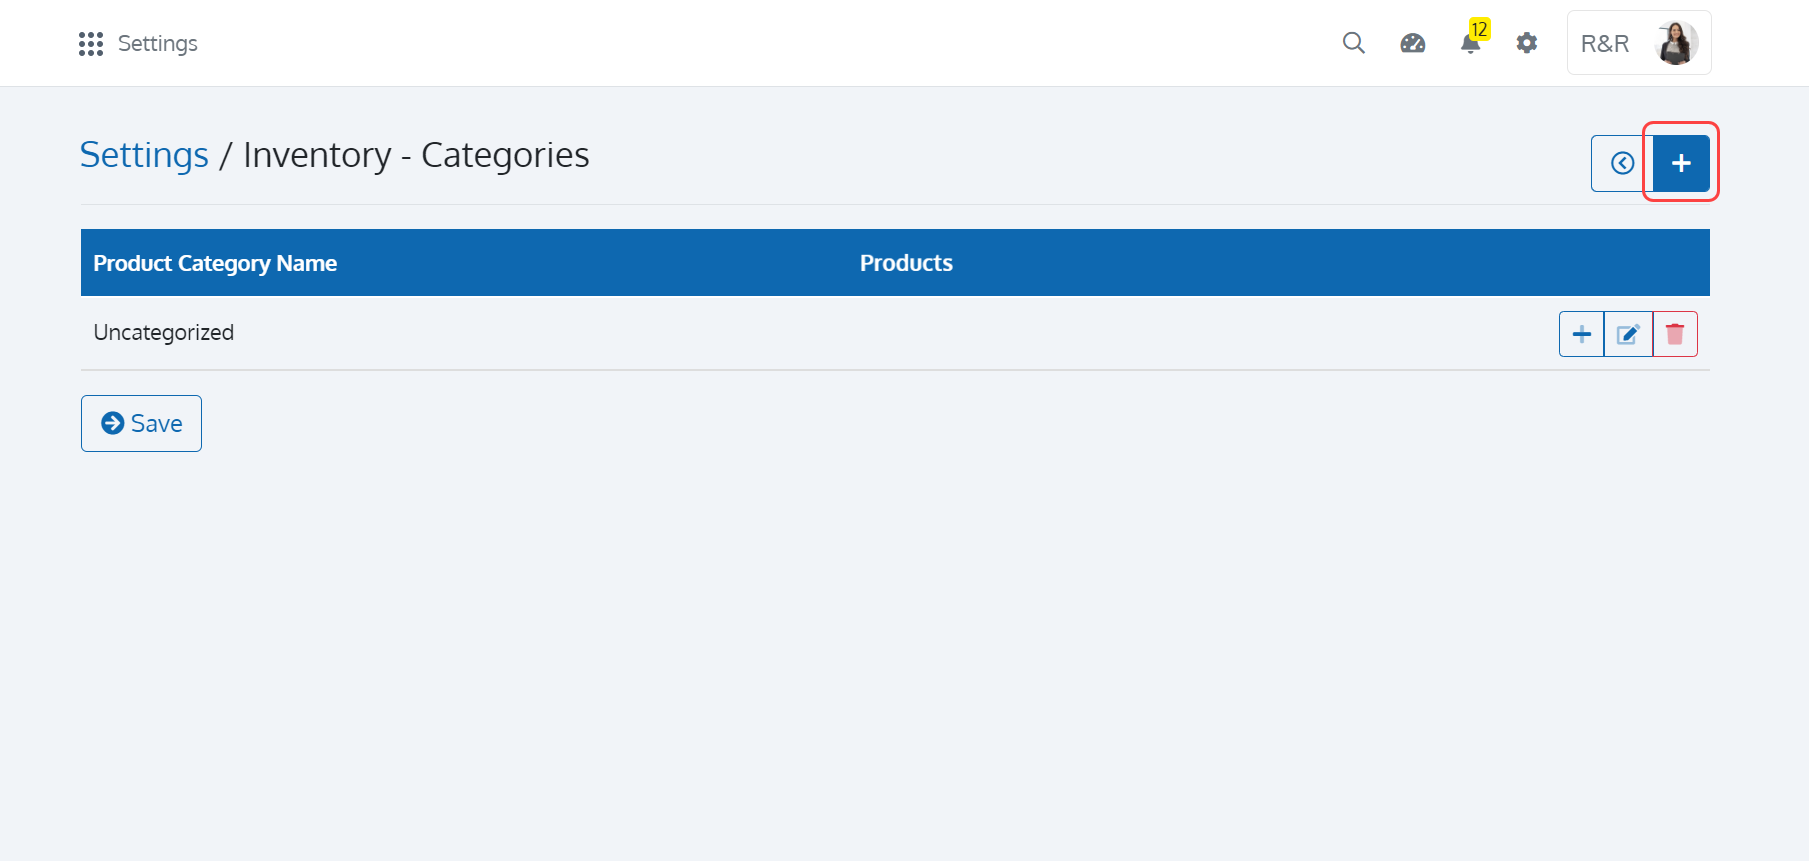
To add a Category for Inventory, click on the '+' button as shown in Figure 19.
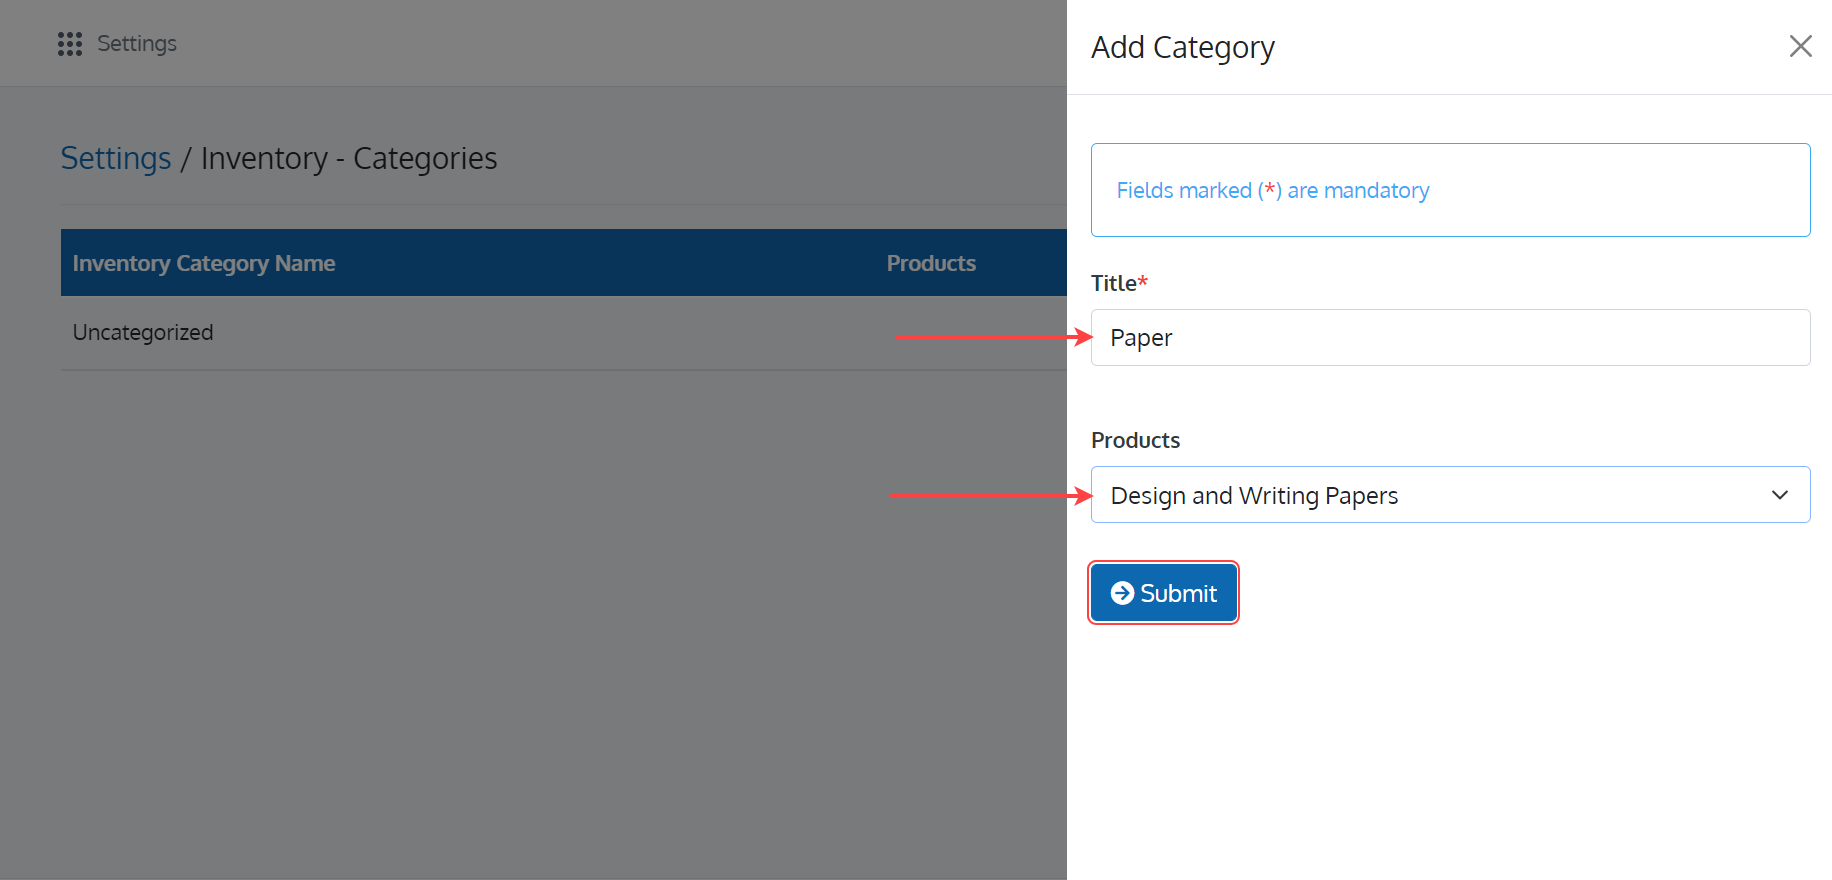
In the 'Add Category' page, enter the Title of the Category. Once you are done with, click on the 'Submit' button to save your information as shown in Figure 20.
Upon doing so, the Category will appear in the 'Add/Edit product' page.
Edit a Category
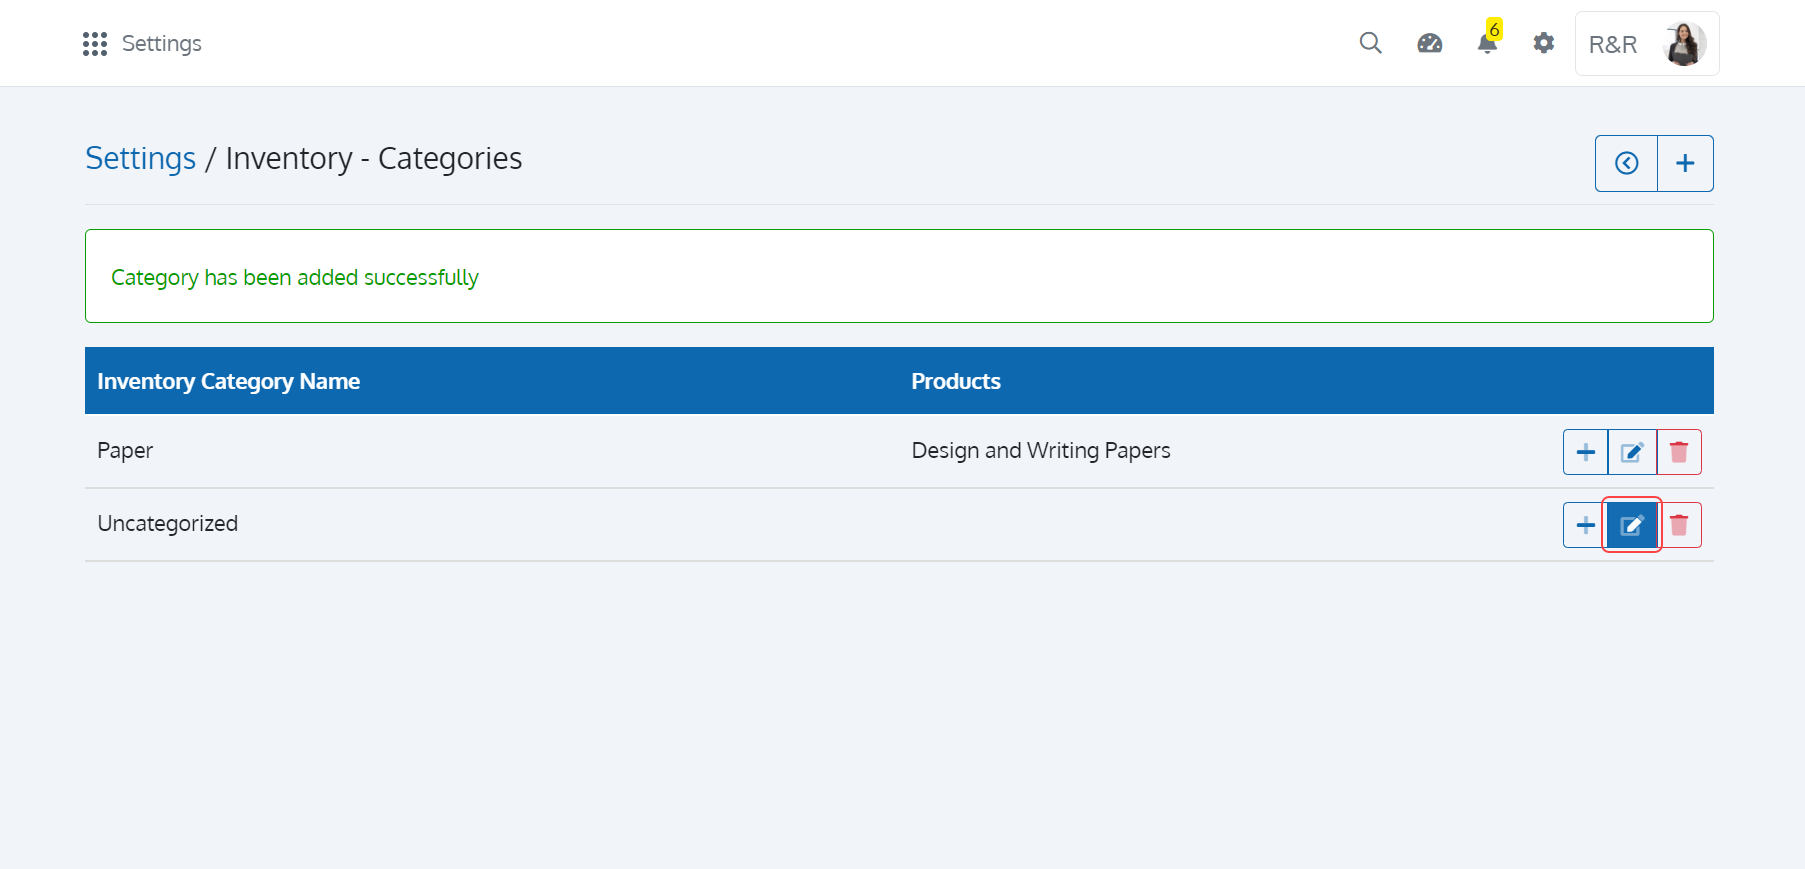
To edit a Category, click on the 'Edit Category' button as shown in Figure 21.
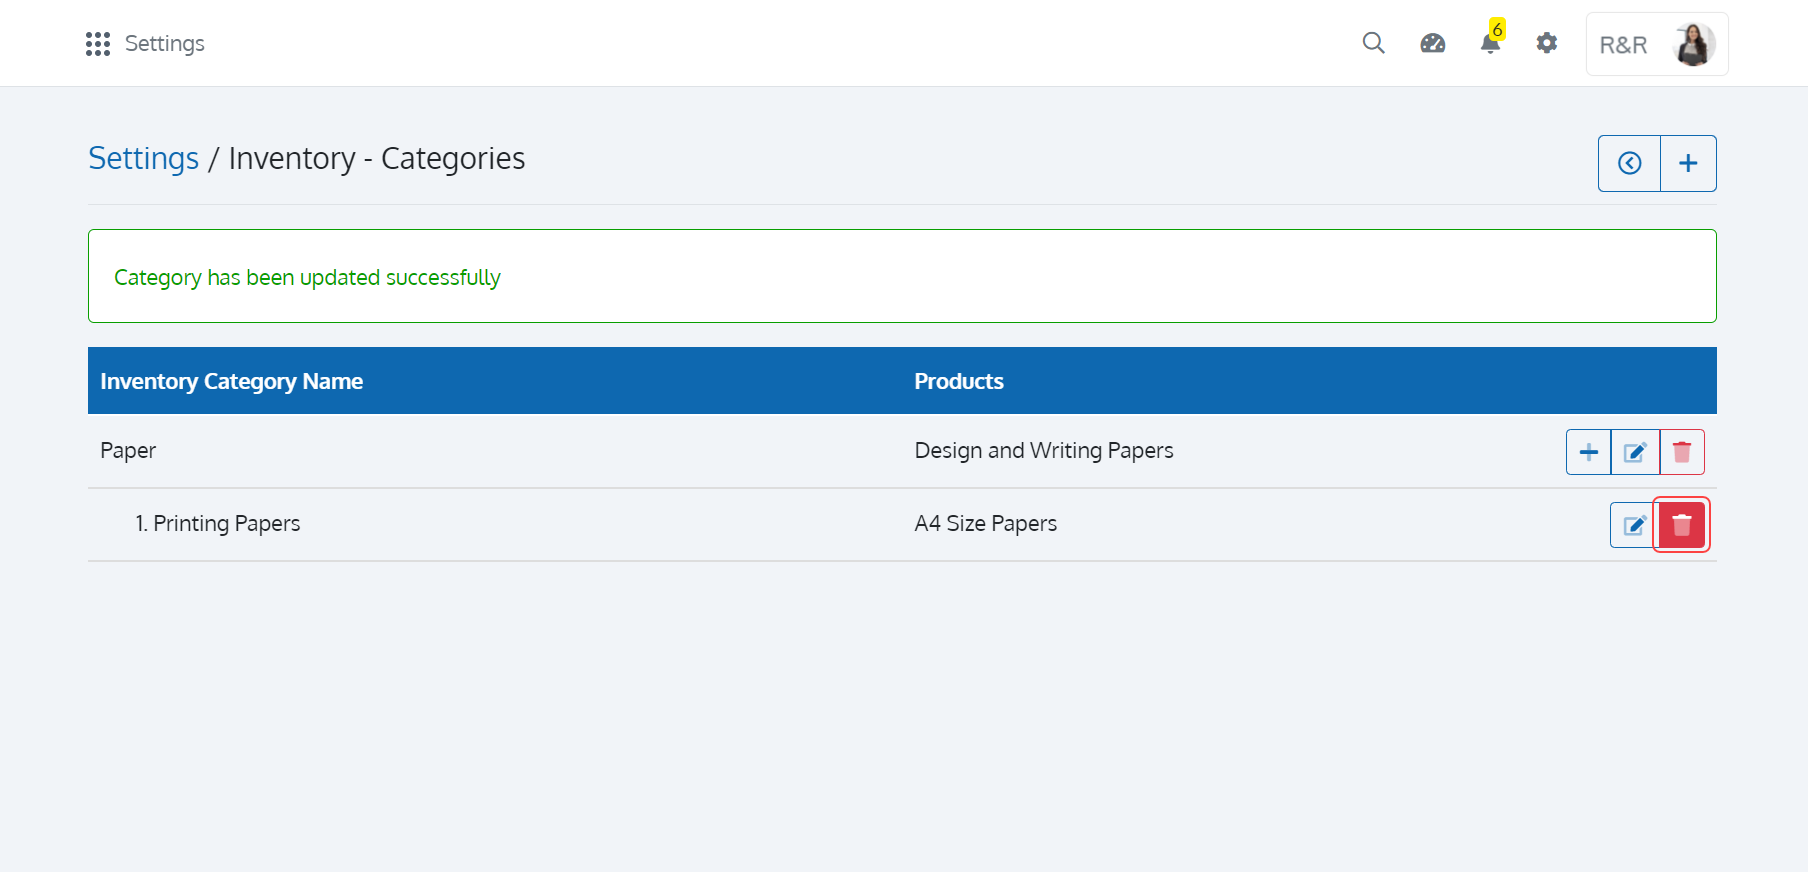
In the 'Edit Category' page, edit the Title of the Category and click on the 'Submit' button as shown in Figure 22 to save your edit.

Archive a Category
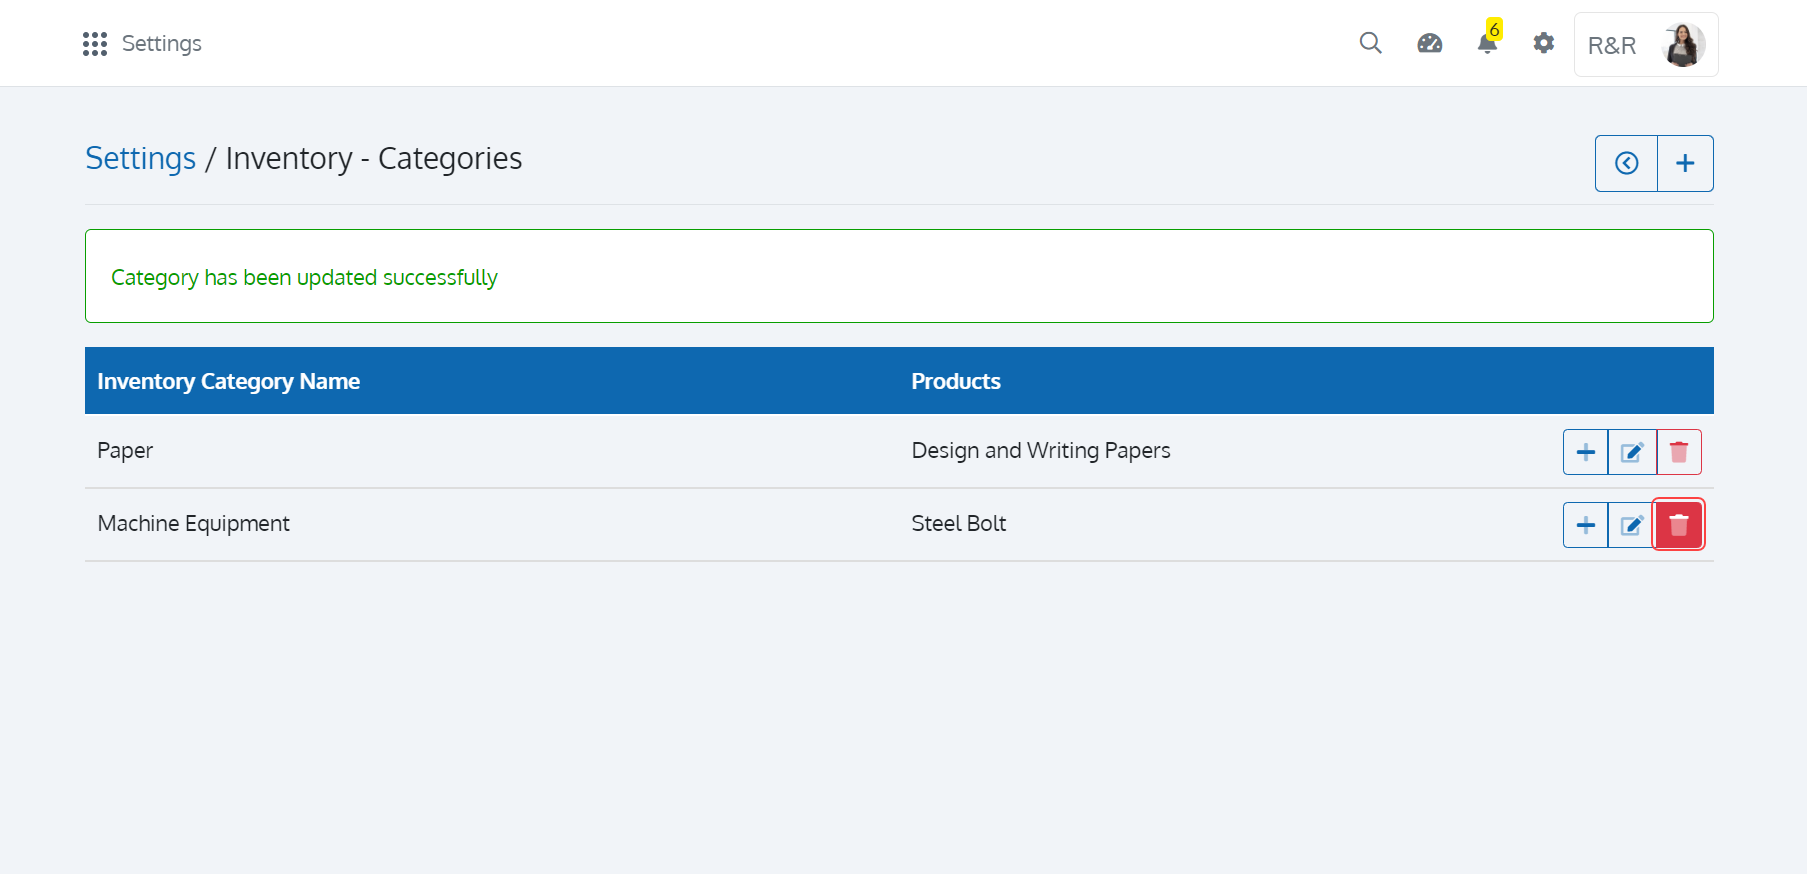
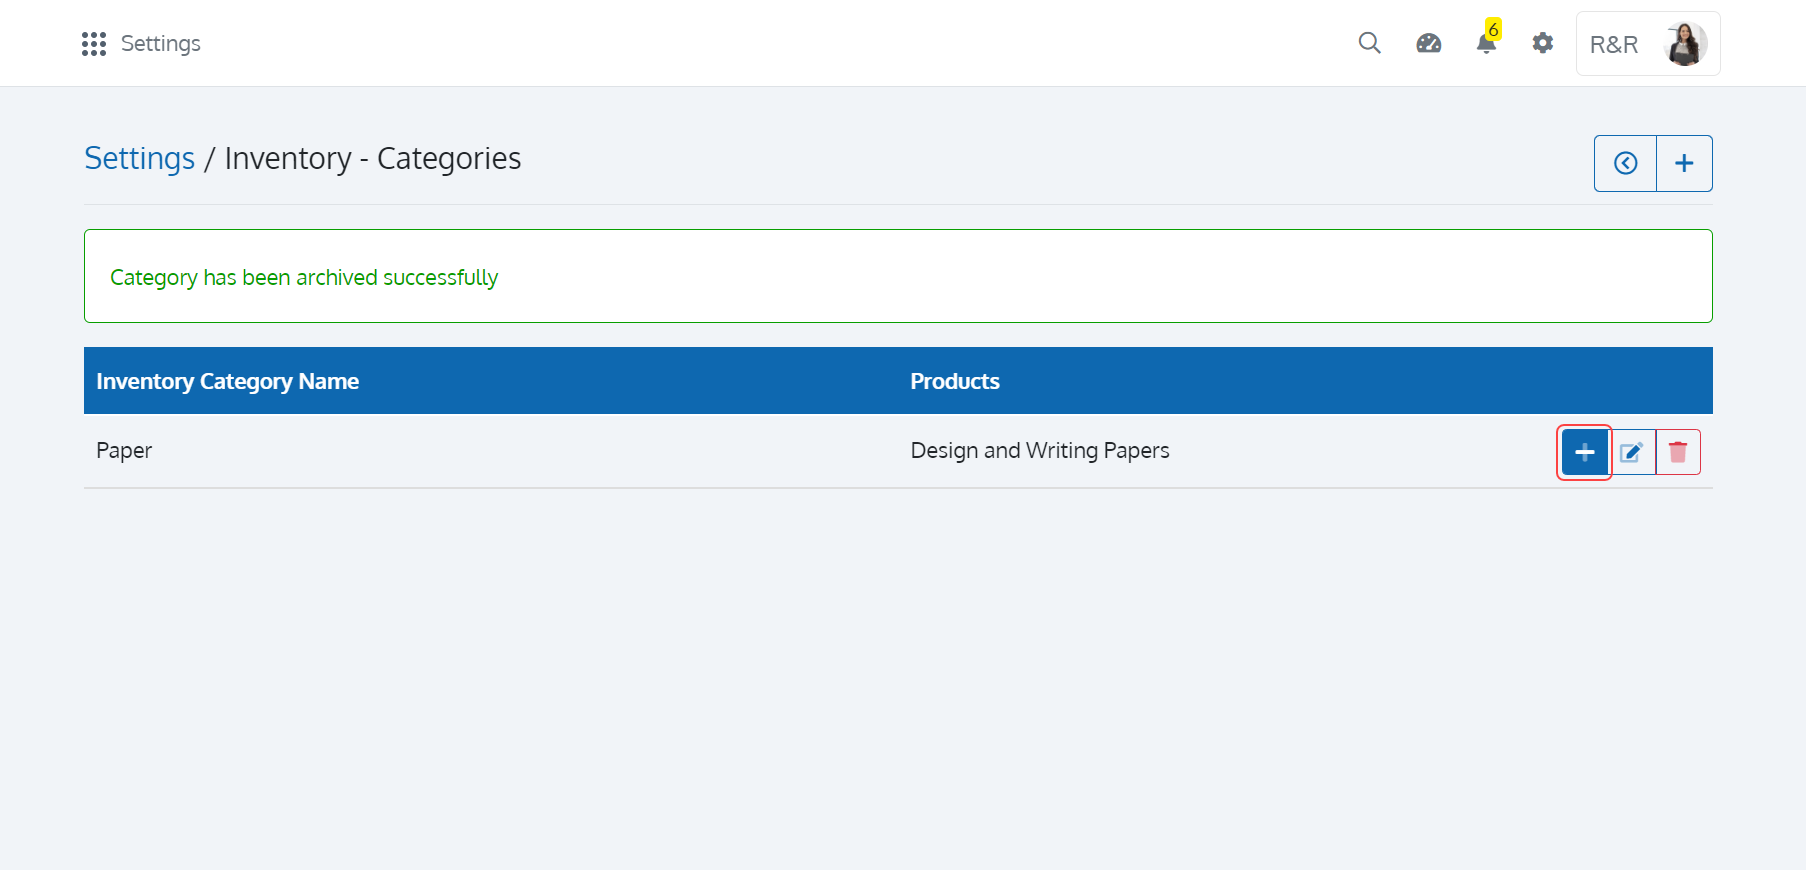
To archive a Category, click on the 'Archive Category' button as shown in Figure 23.
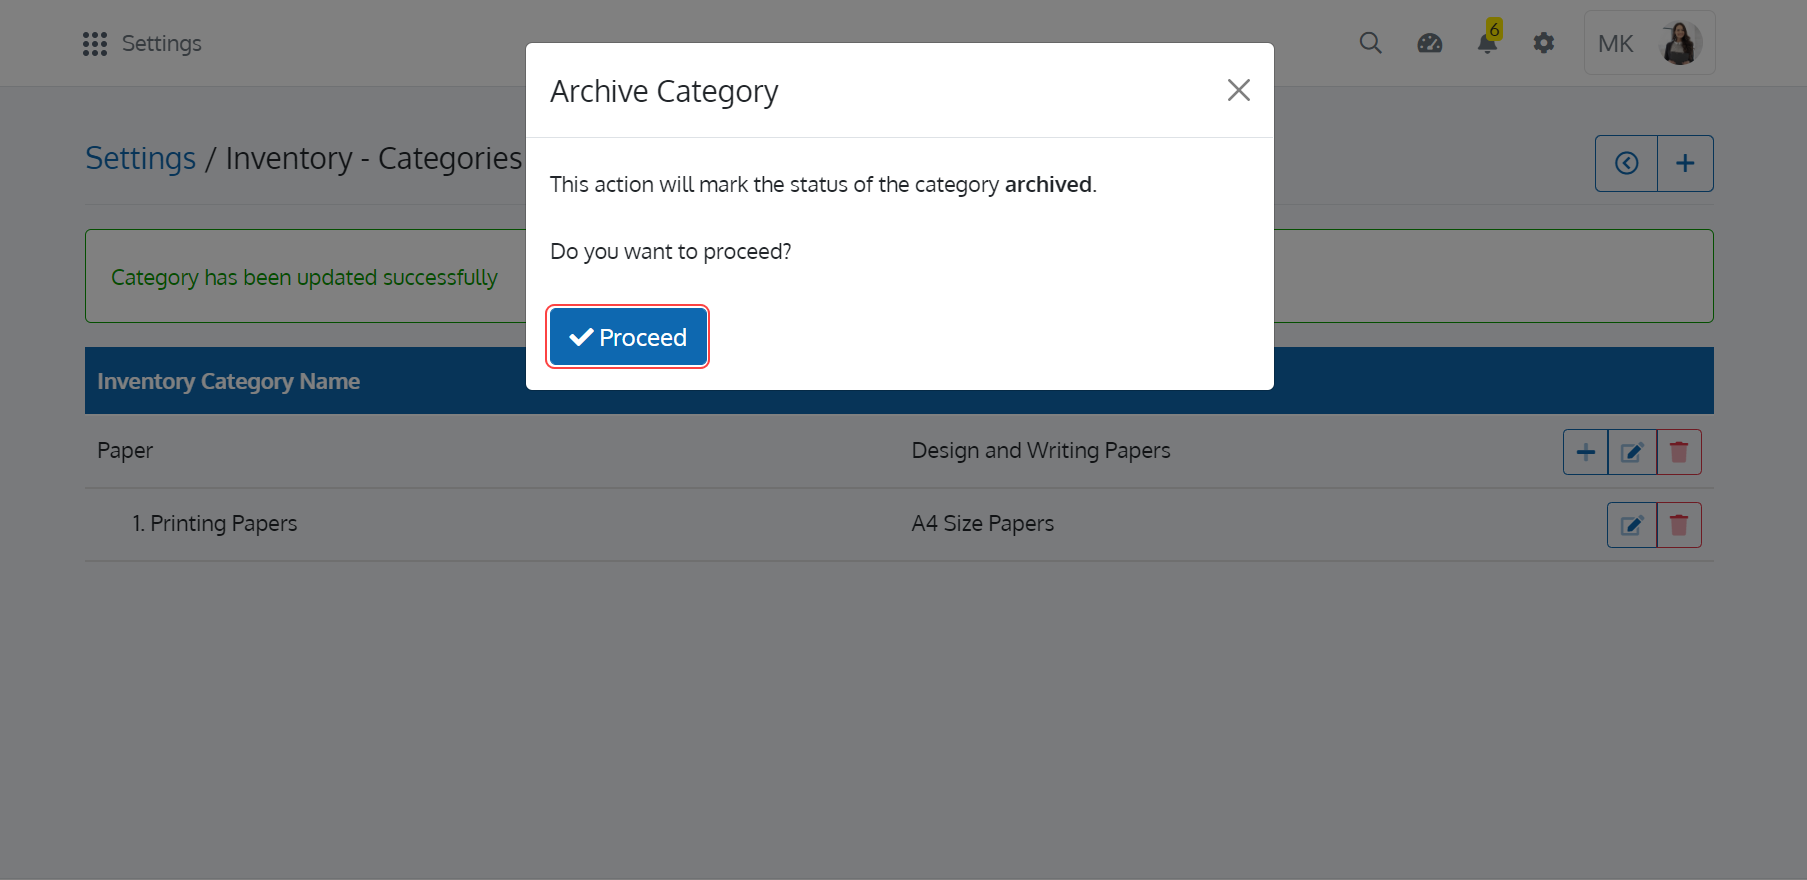
Upon doing so, the 'Archive Category' pop-up window with the buttons 'Proceed' and 'Cancel' will appear as shown in Figure 24. Click on the 'Proceed' button to archive the Category. Click on the 'Cancel' button to close the pop-up window.
Add a Sub-Category
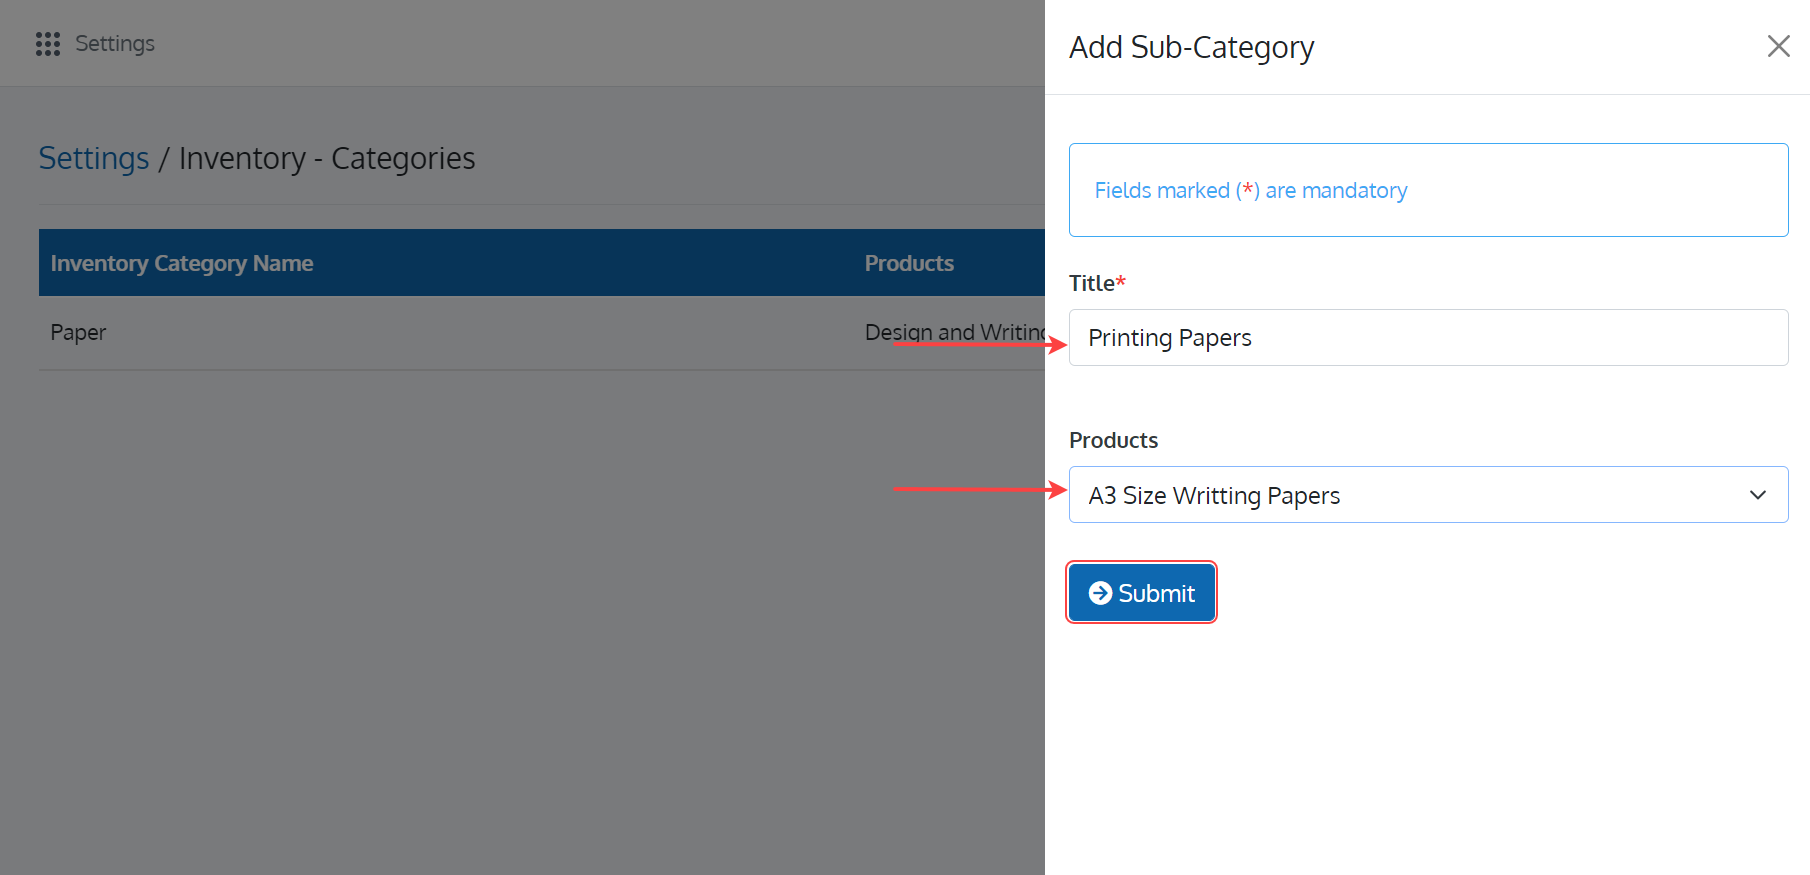
To add a sub-category for a Category, click on the 'Add Sub-Category' button as shown in Figure 25.
In the 'Add Sub-Category' page, enter the Title of the Sub-Category and click on the 'Submit' button as shown in Figure 26.
Edit a Sub-Category
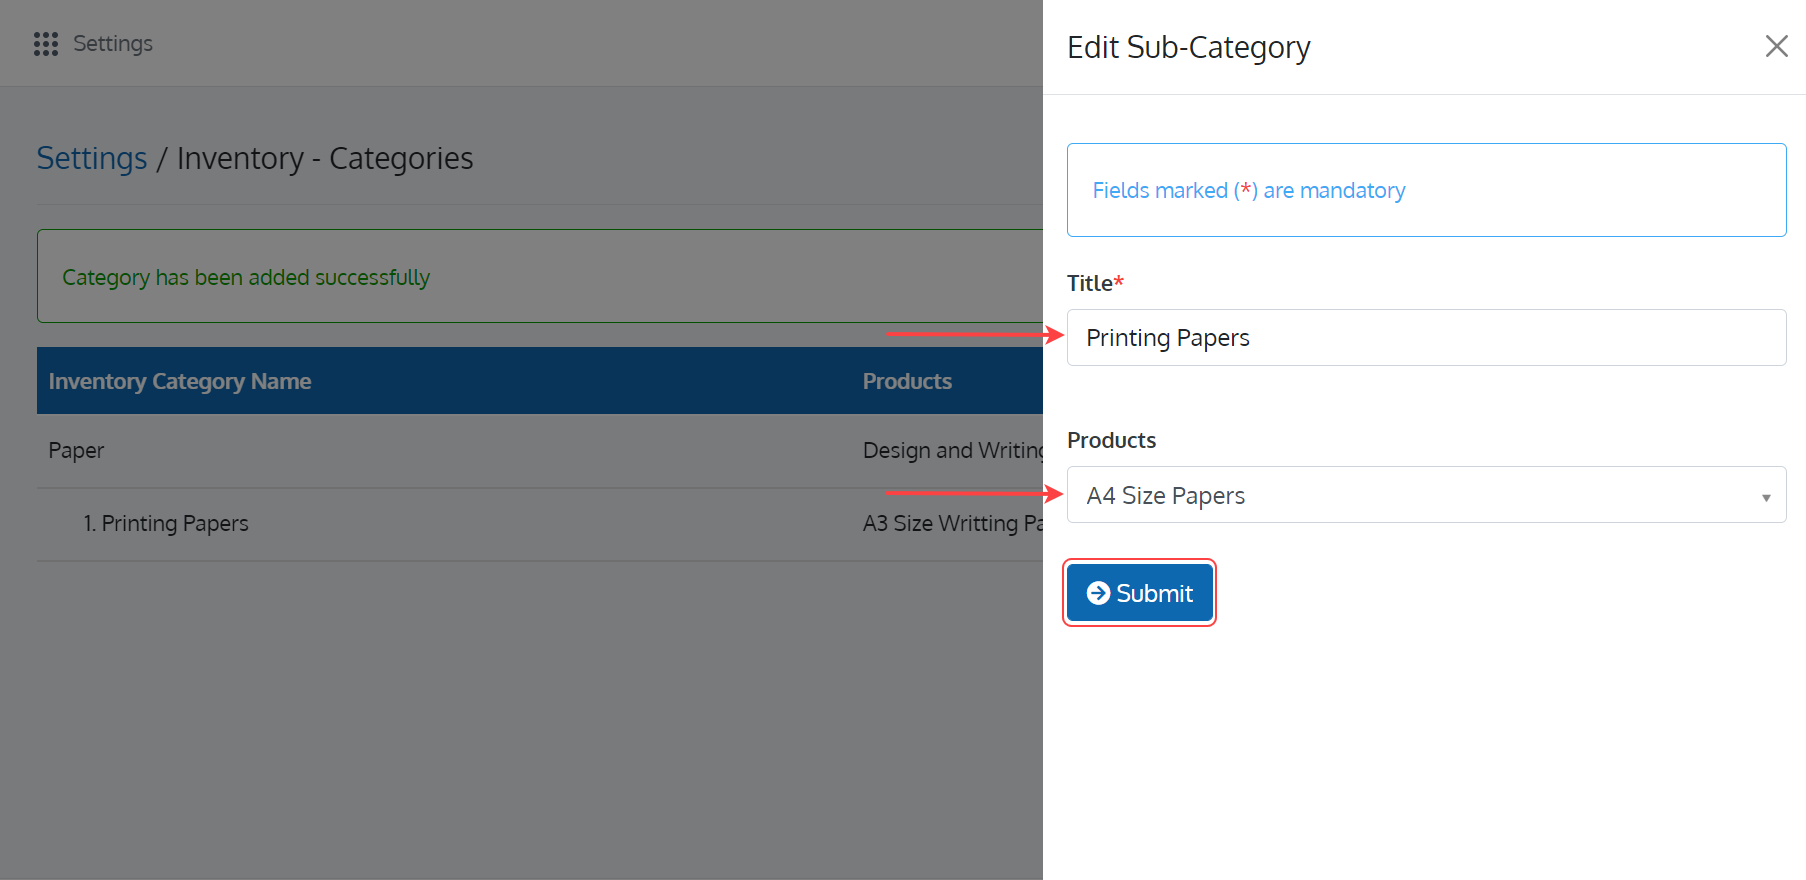
To edit a Category, click on the 'Edit Sub-Category' button as shown in Figure 27.
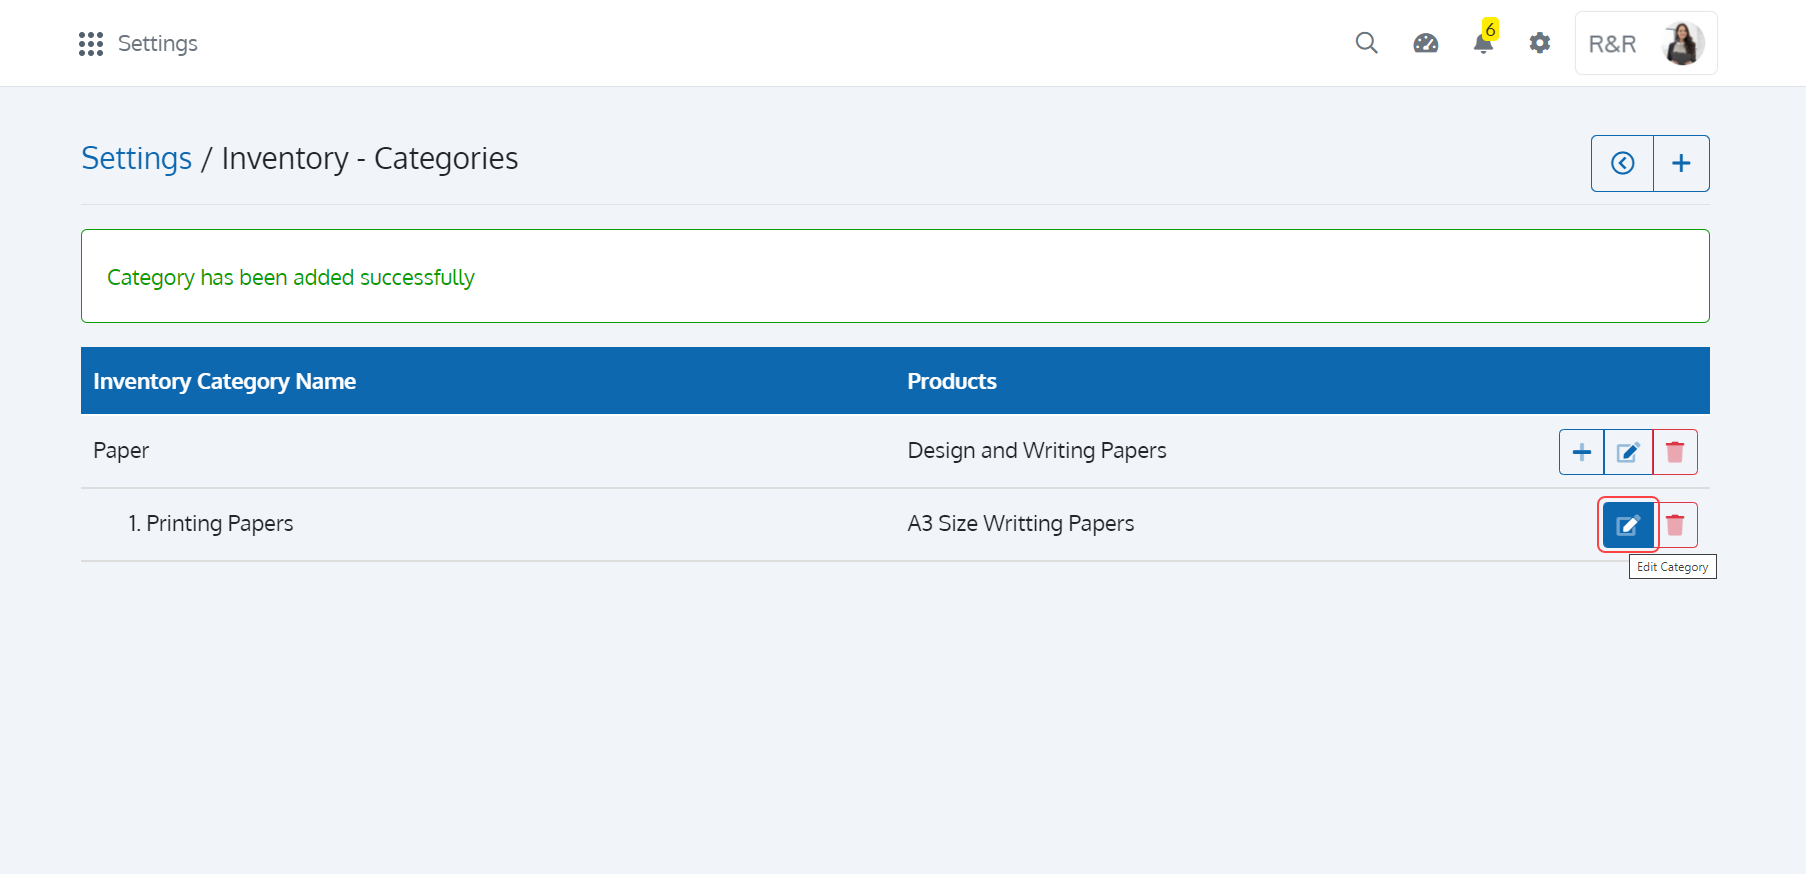
In the 'Edit Sub-Category' page, edit the Title of the Sub-Category and click on the 'Submit' button as shown in Figure 28 to save your edit.
Archive a Sub-Category
To archive a Sub-Category, click on the 'Archive Category' button as shown in Figure 29.
Upon doing so, the 'Archive Sub-Category' pop-up window with the buttons 'Proceed' and 'Cancel' will appear as shown in Figure 30. Click on the 'Proceed' button to archive the Sub-Category. Click on the 'Cancel' button to close the pop-up window.
To return to the 'Settings' page, click on the 'Back' button present in the 'Categories (Inventory)' page.
Manage Asset Category Setting
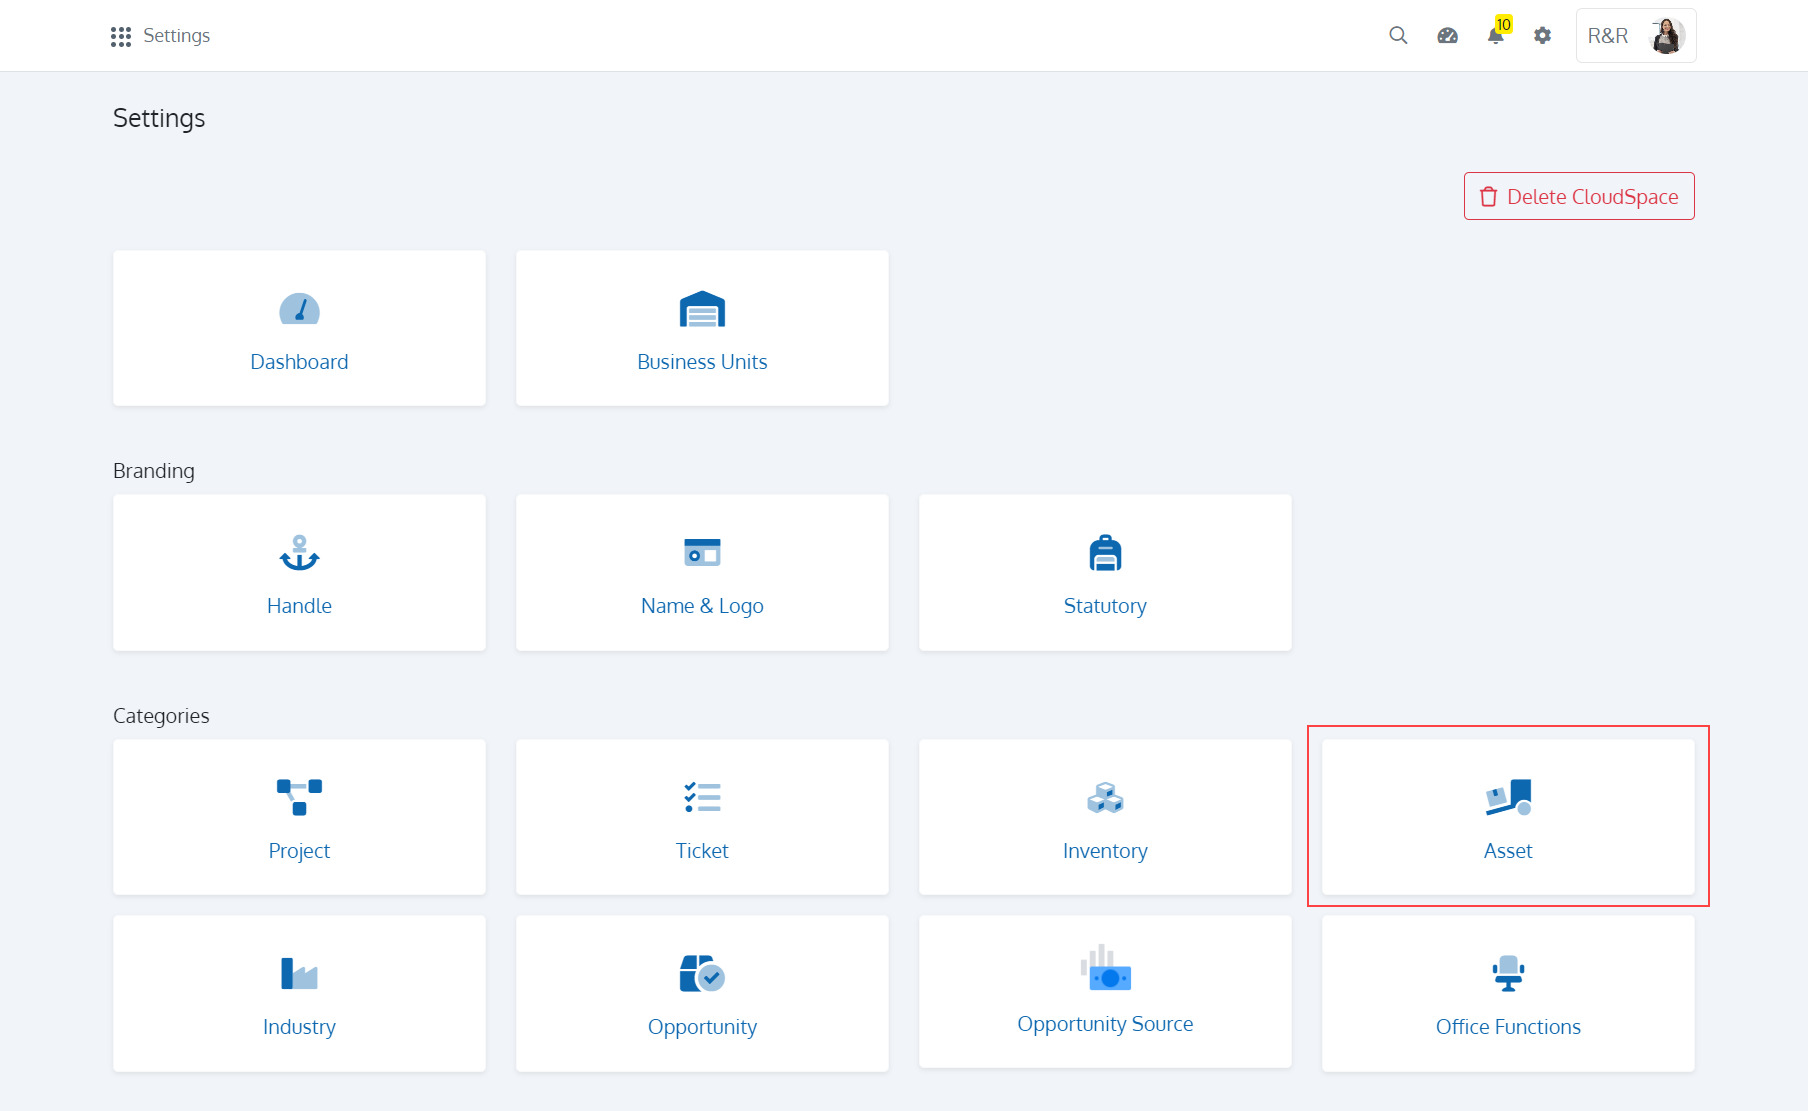
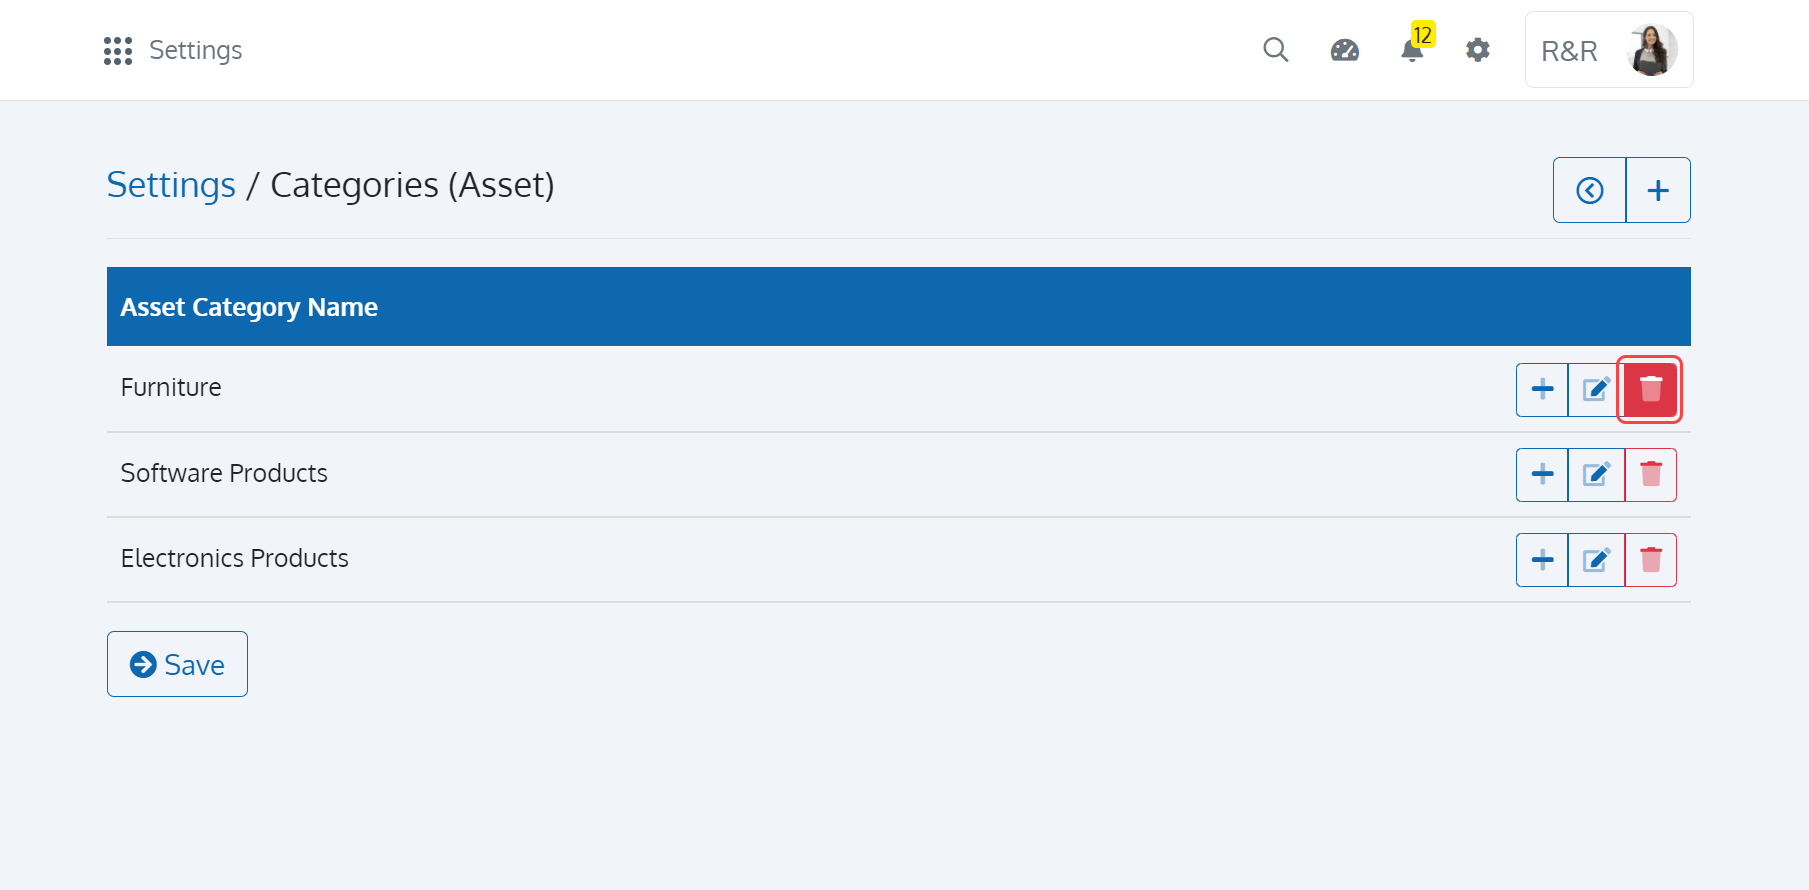
Click on the 'Settings' icon and choose the 'Asset' card as shown in Figure 31.
In the 'Asset - Categories' screen, you can see a set of buttons in the toolbar with the available categories (Uncatergorized by default) as shown in Figure 2. Each step shown in Figure 32 is explained in the below table.
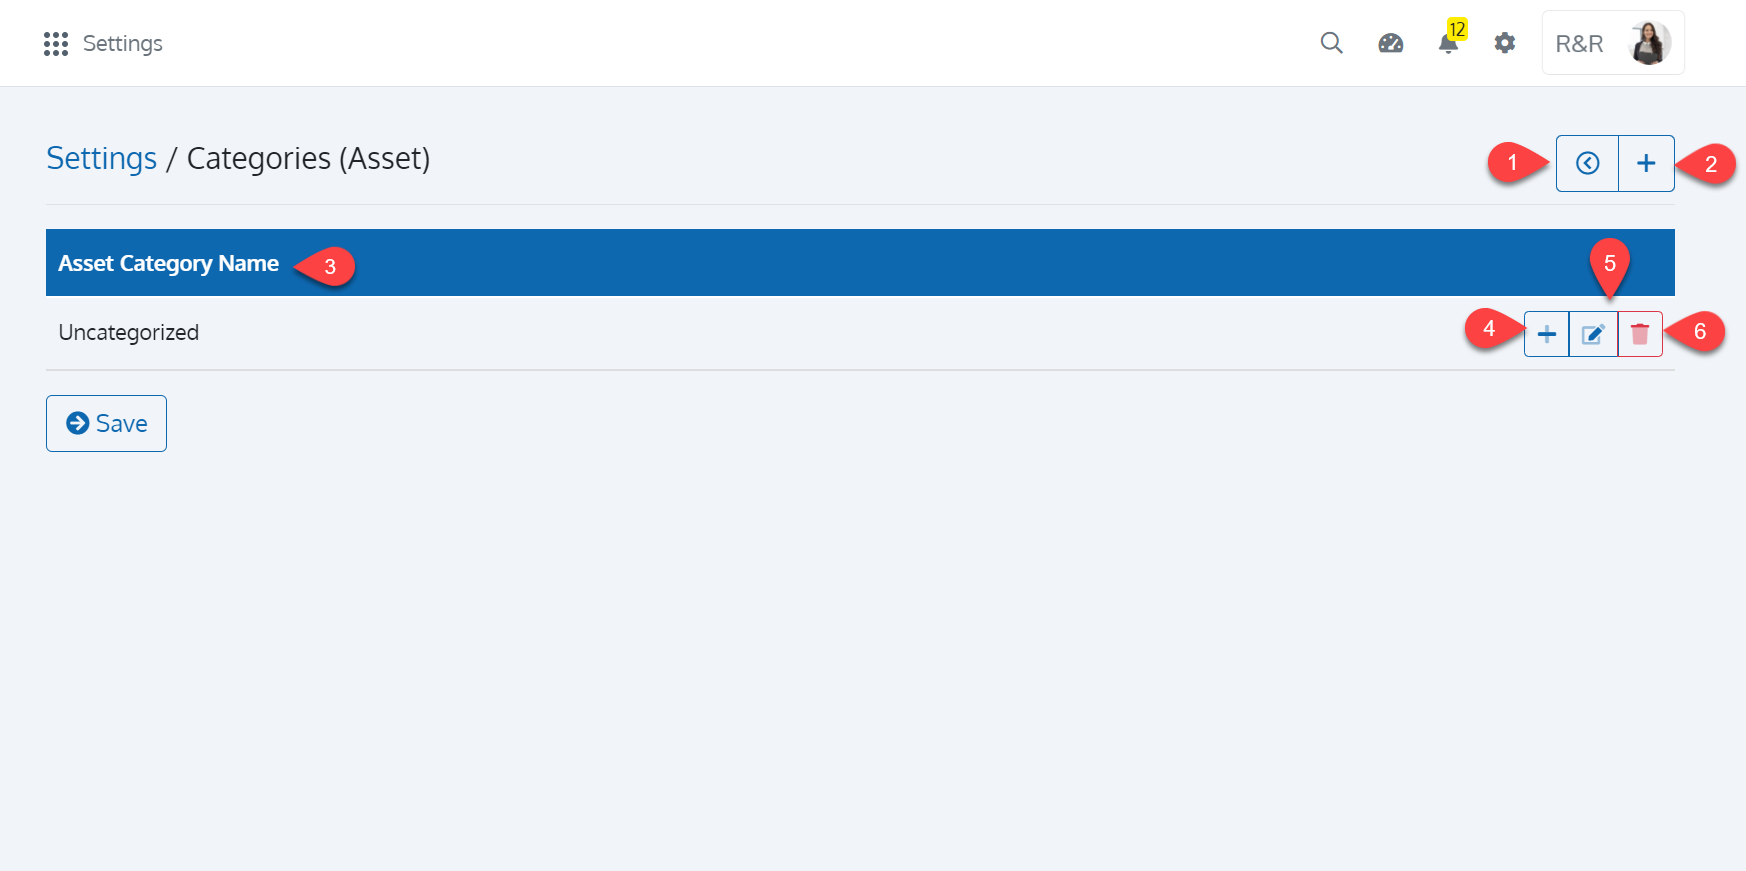
| Sl. No. | Name | Description |
|---|---|---|
| 1 | Back |
Use this button to return to the settings page |
| 2 | Add Category |
Click to add a category for assets |
| 3 | Asset Category Name |
The list of available categories for assets |
| 4 | Add Sub-Category |
Click to add sub-categories for the said category |
| 5 | Edit Category |
Click to edit category of asset |
| 6 | Archive Category |
Click to archive category of asset |
Add Category
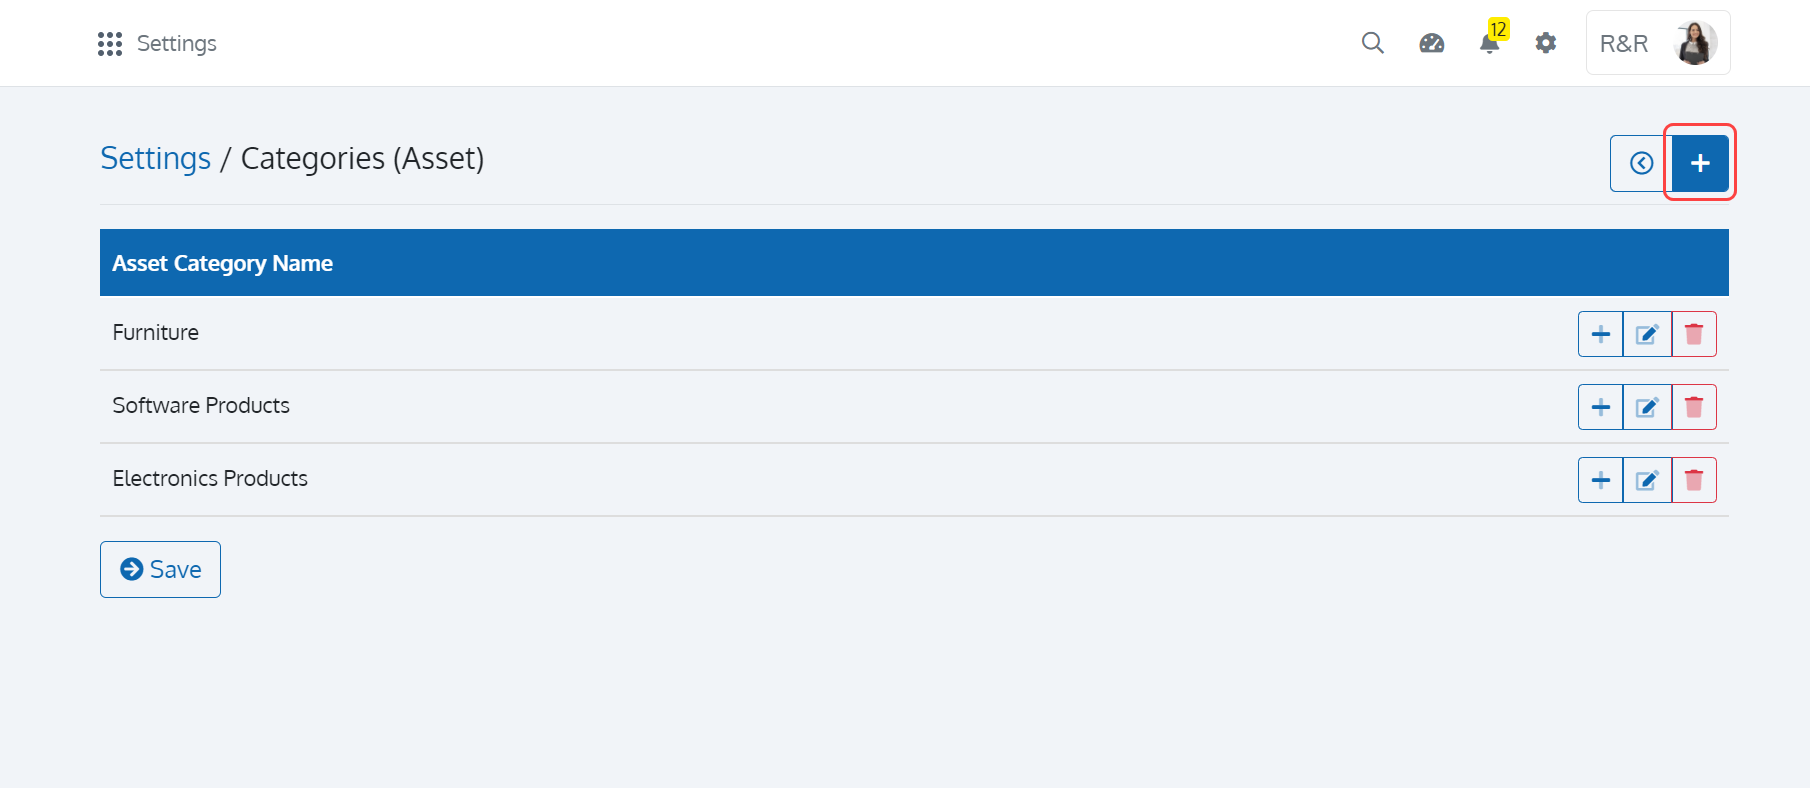
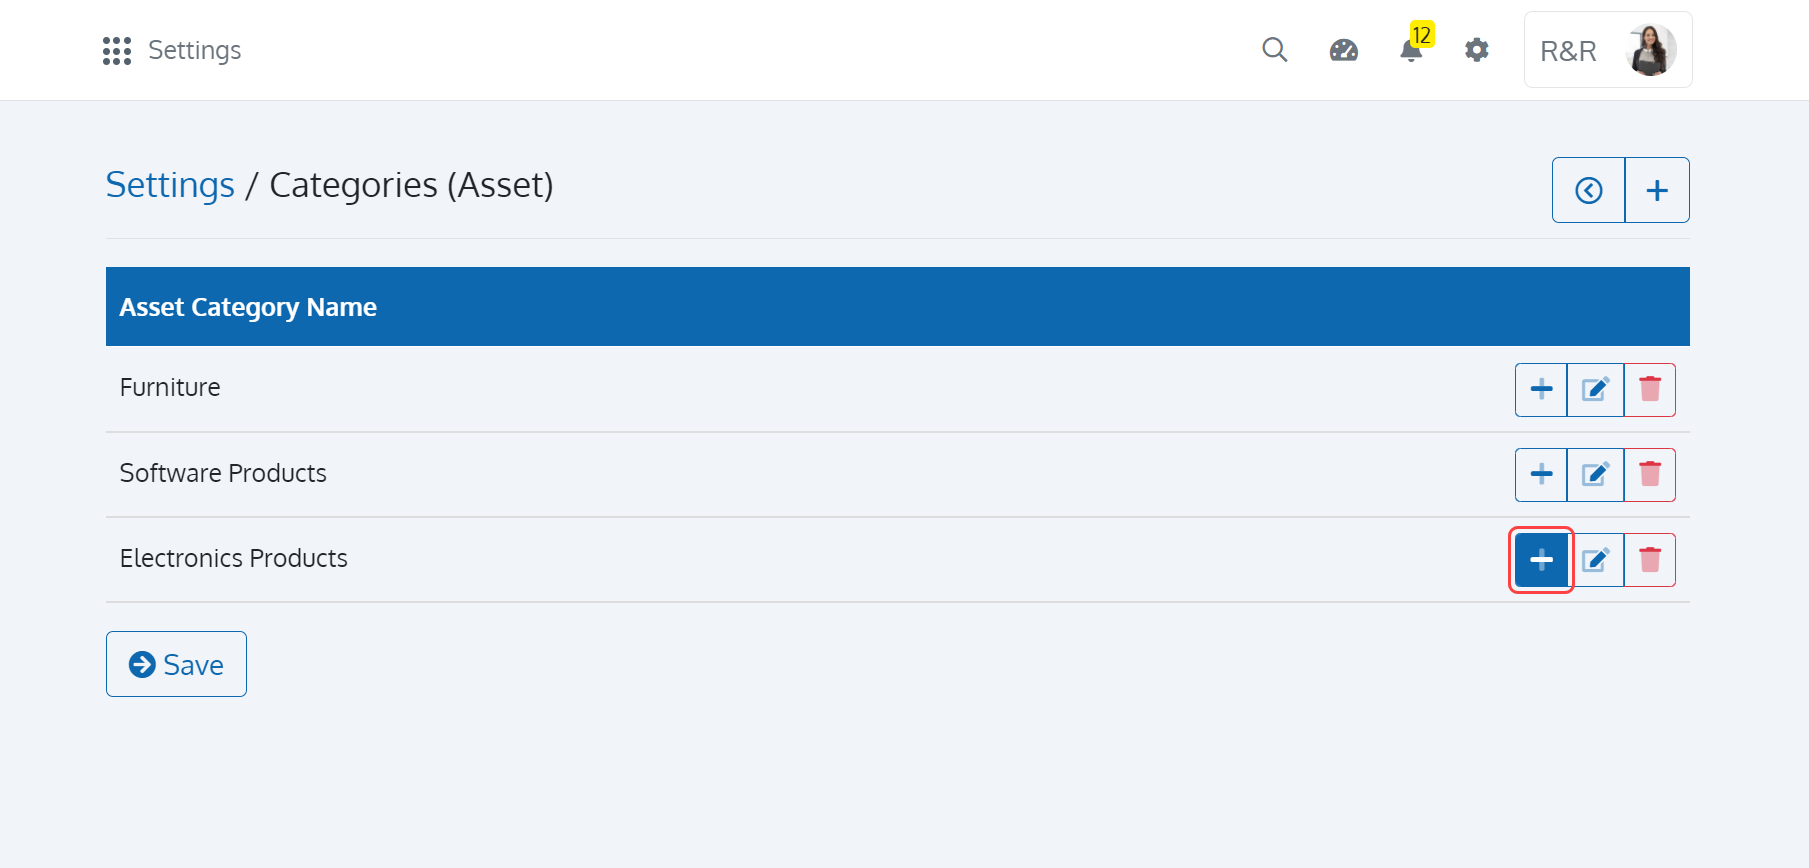
To add a Category for Asset, click on the '+' button as shown in Figure 33.
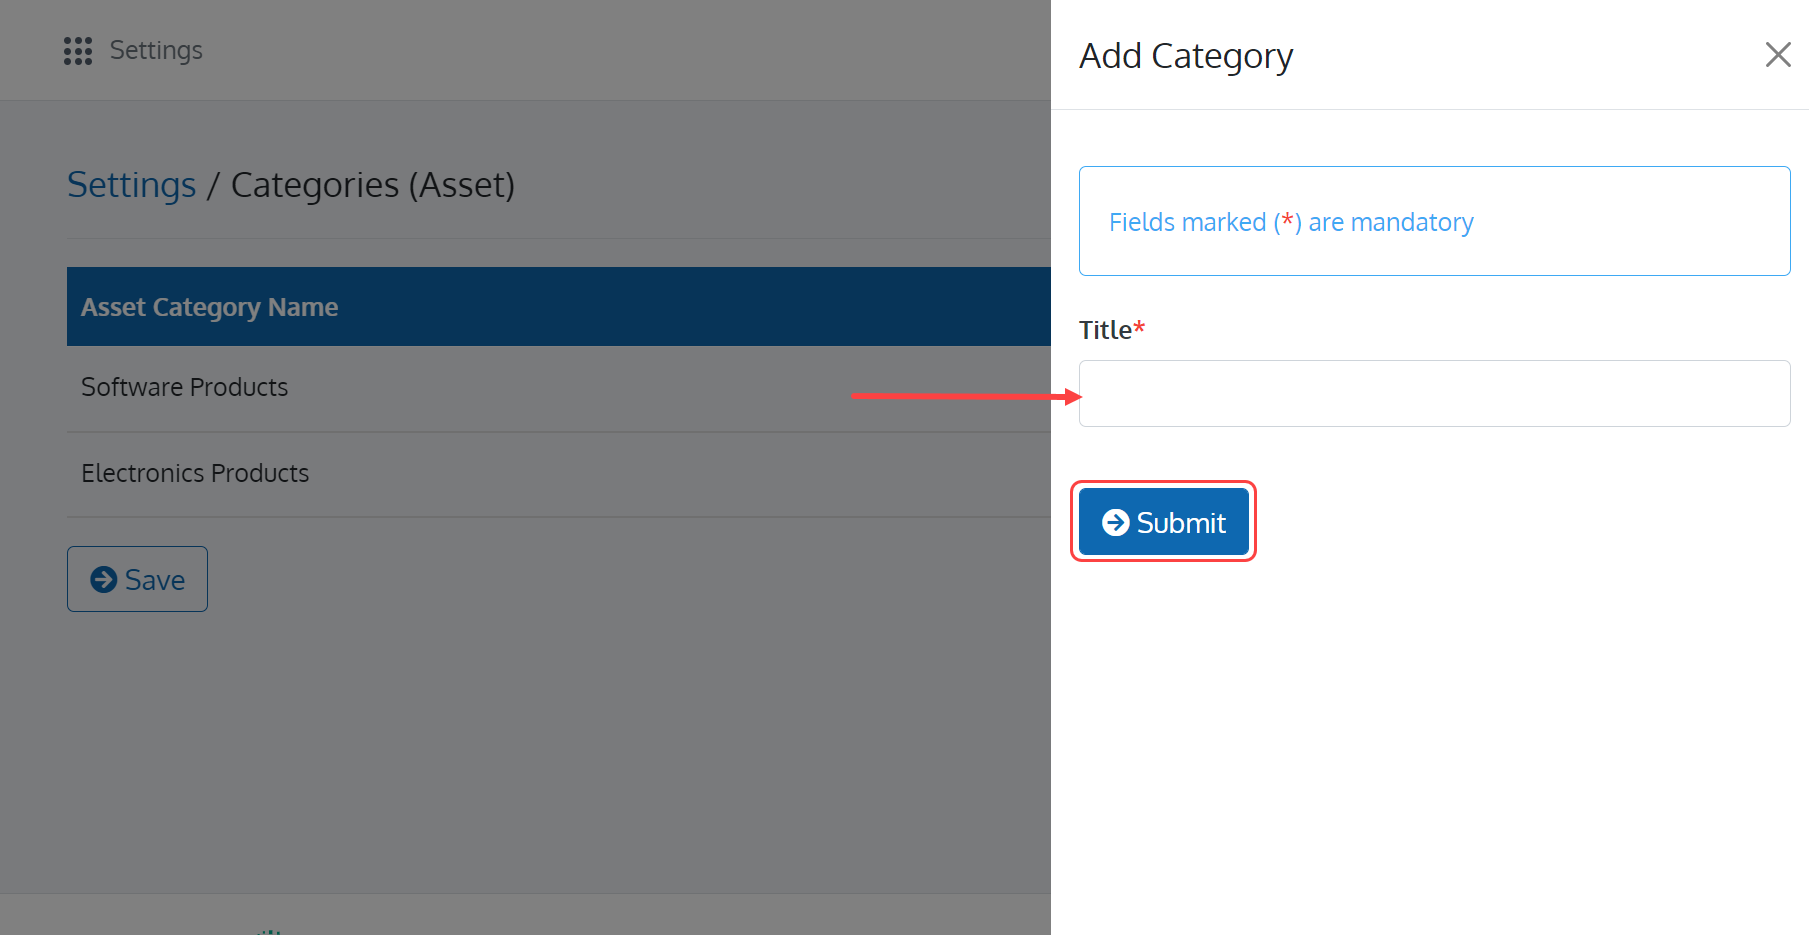
In the 'Add Category' page, enter the Title of the Category. Once you are done with, click on the 'Submit' button to save your information as shown in Figure 34.
Upon doing so, the Category will appear in the 'Add/Edit Asset' page.
Edit a Category
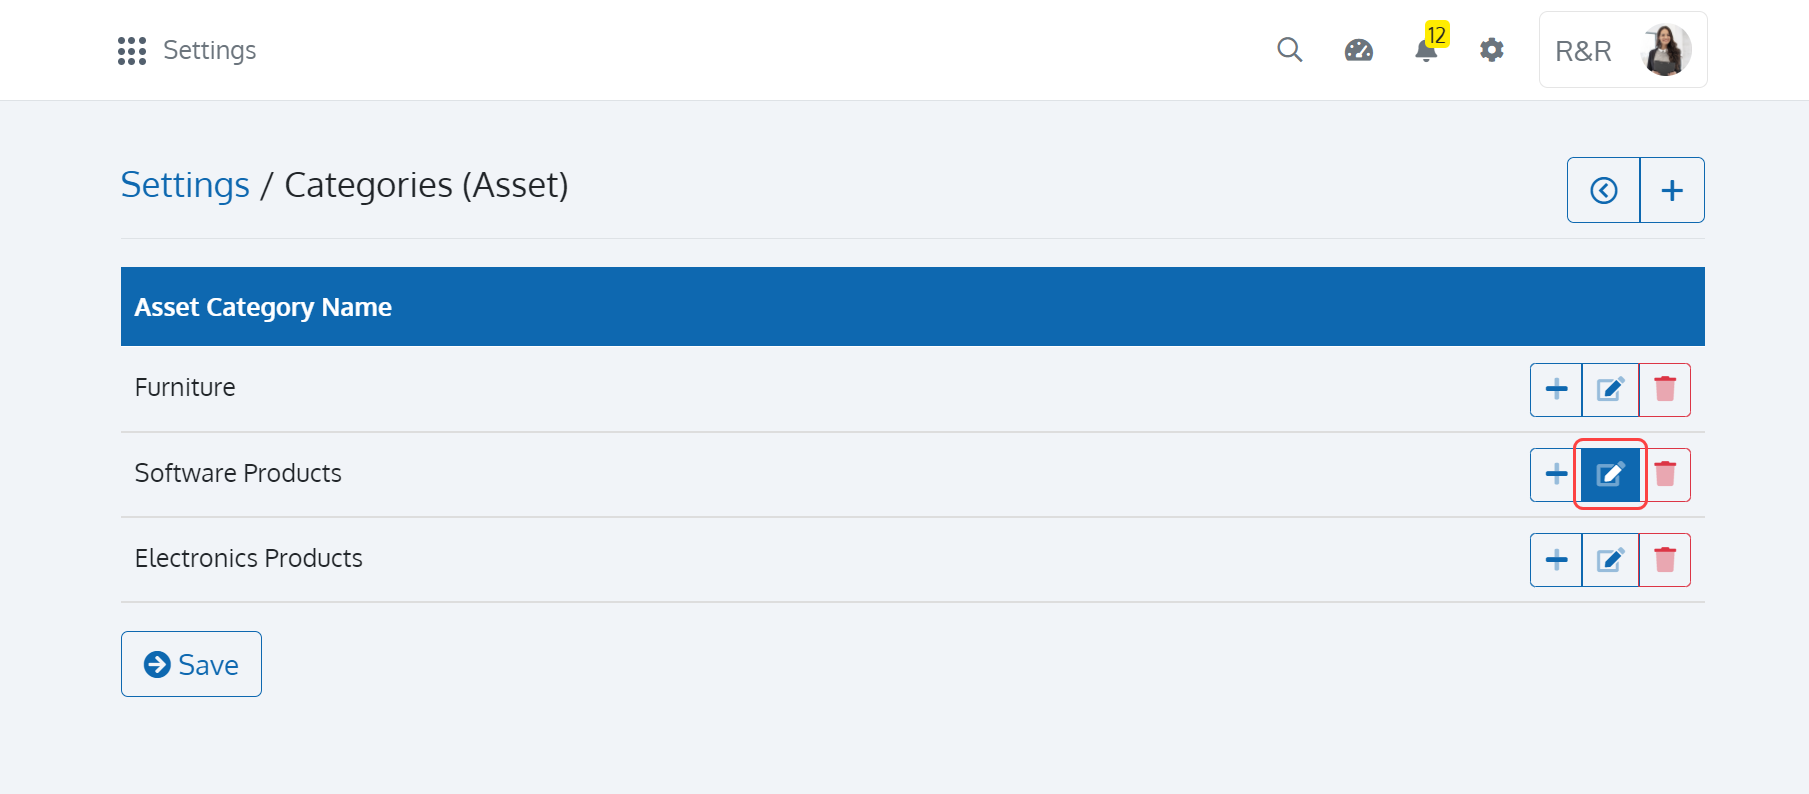
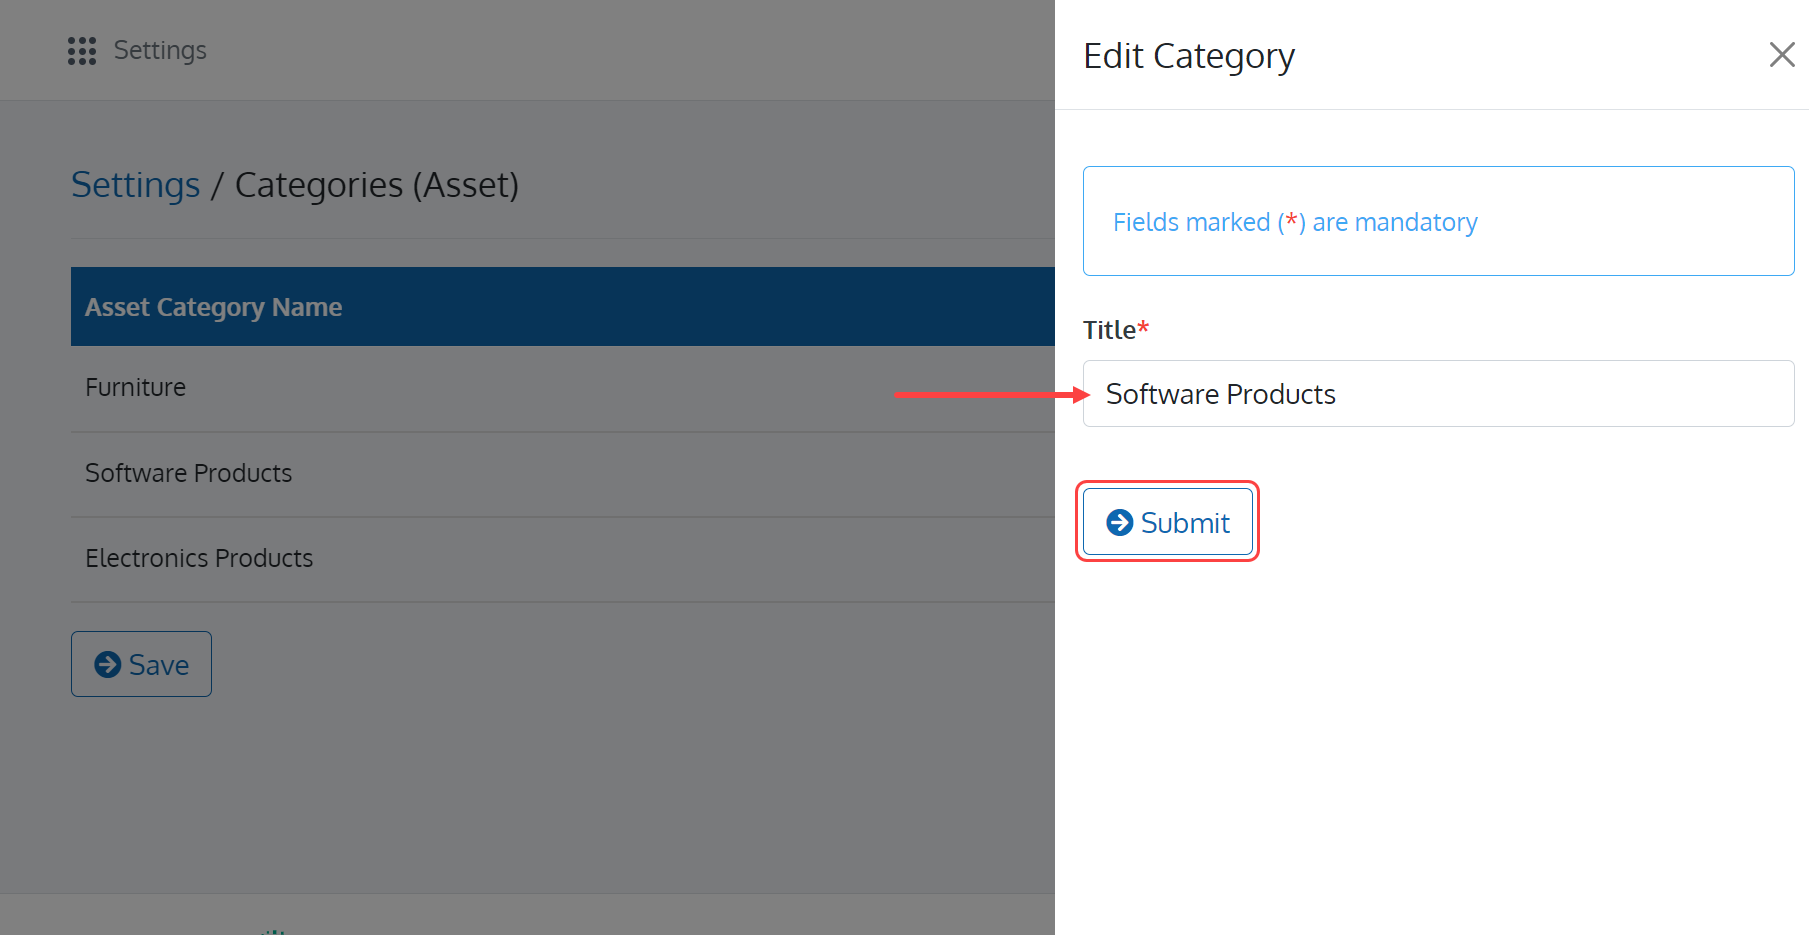
To edit a Category, click on the 'Edit Category' button as shown in Figure 35.
In the 'Edit Category' page, edit the Title of the Category and click on the 'Submit' button as shown in Figure 36 to save your edit.
Archive a Category
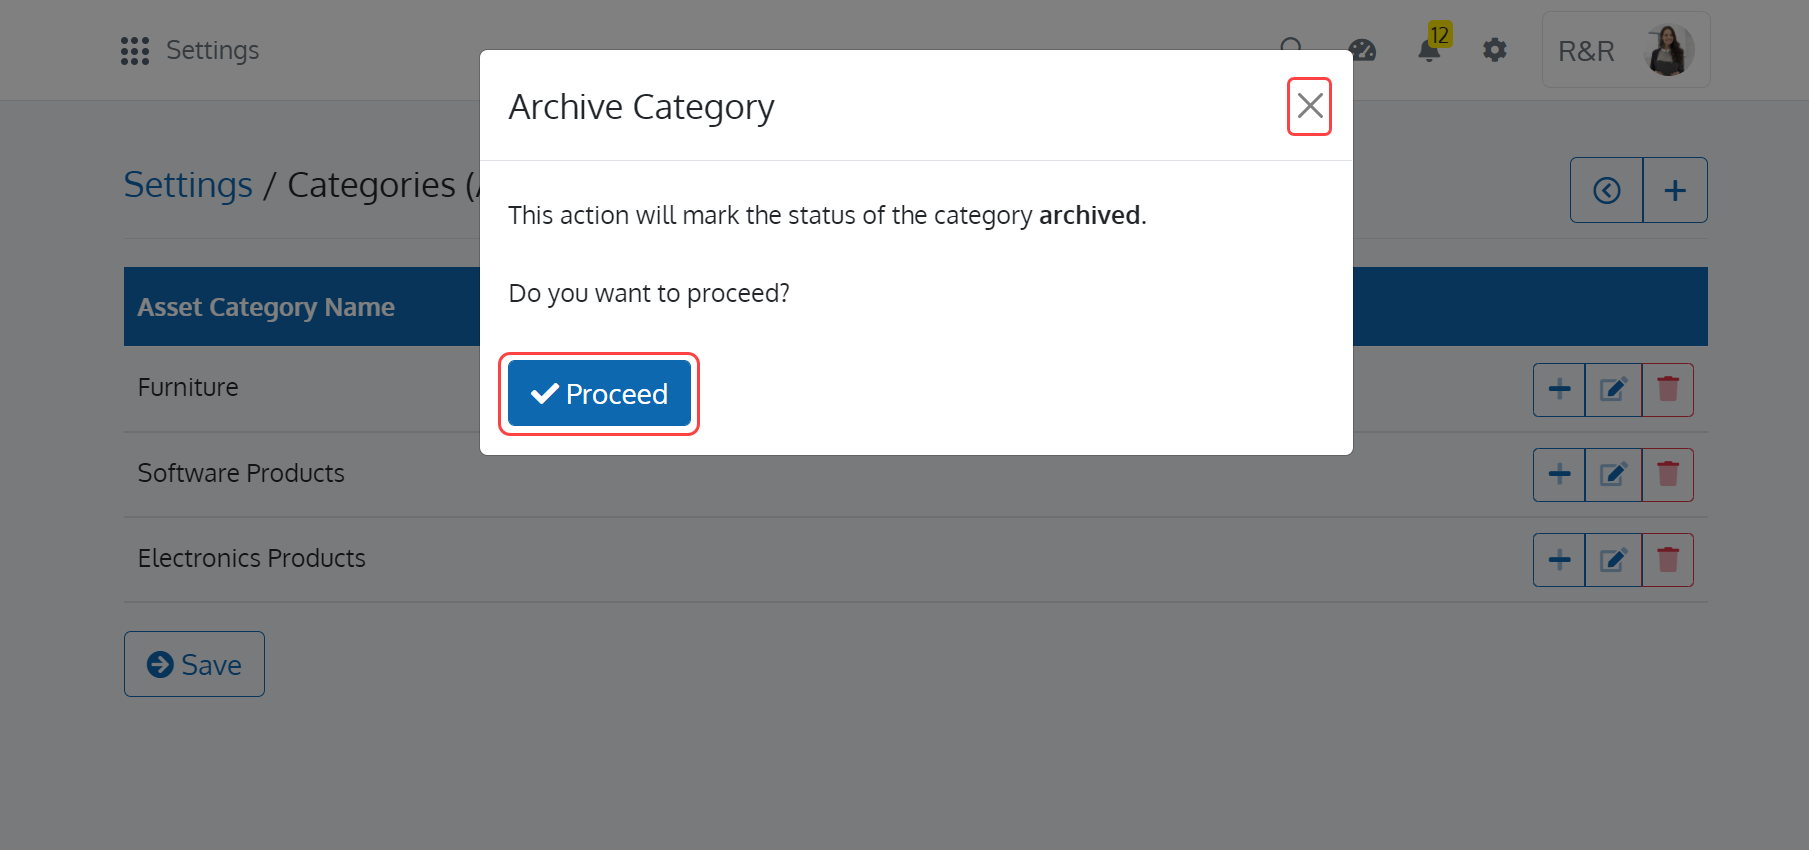
To archive a Category, click on the 'Archive Category' button as shown in Figure 37.
Upon doing so, the 'Archive Category' pop-up window with the buttons 'Proceed' and 'Cancel' will appear as shown in Figure 38. Click on the 'Proceed' button to archive the Category. Click on the 'Cancel' button to close the pop-up window.
Add a Sub-Category
To add a sub-category for a Category, click on the 'Add Sub-Category' button as shown in Figure 39.
In the 'Add Sub-Category' page, enter the Title of the Sub-Category and click on the 'Submit' button as shown in Figure 40.

Edit a Sub-Category
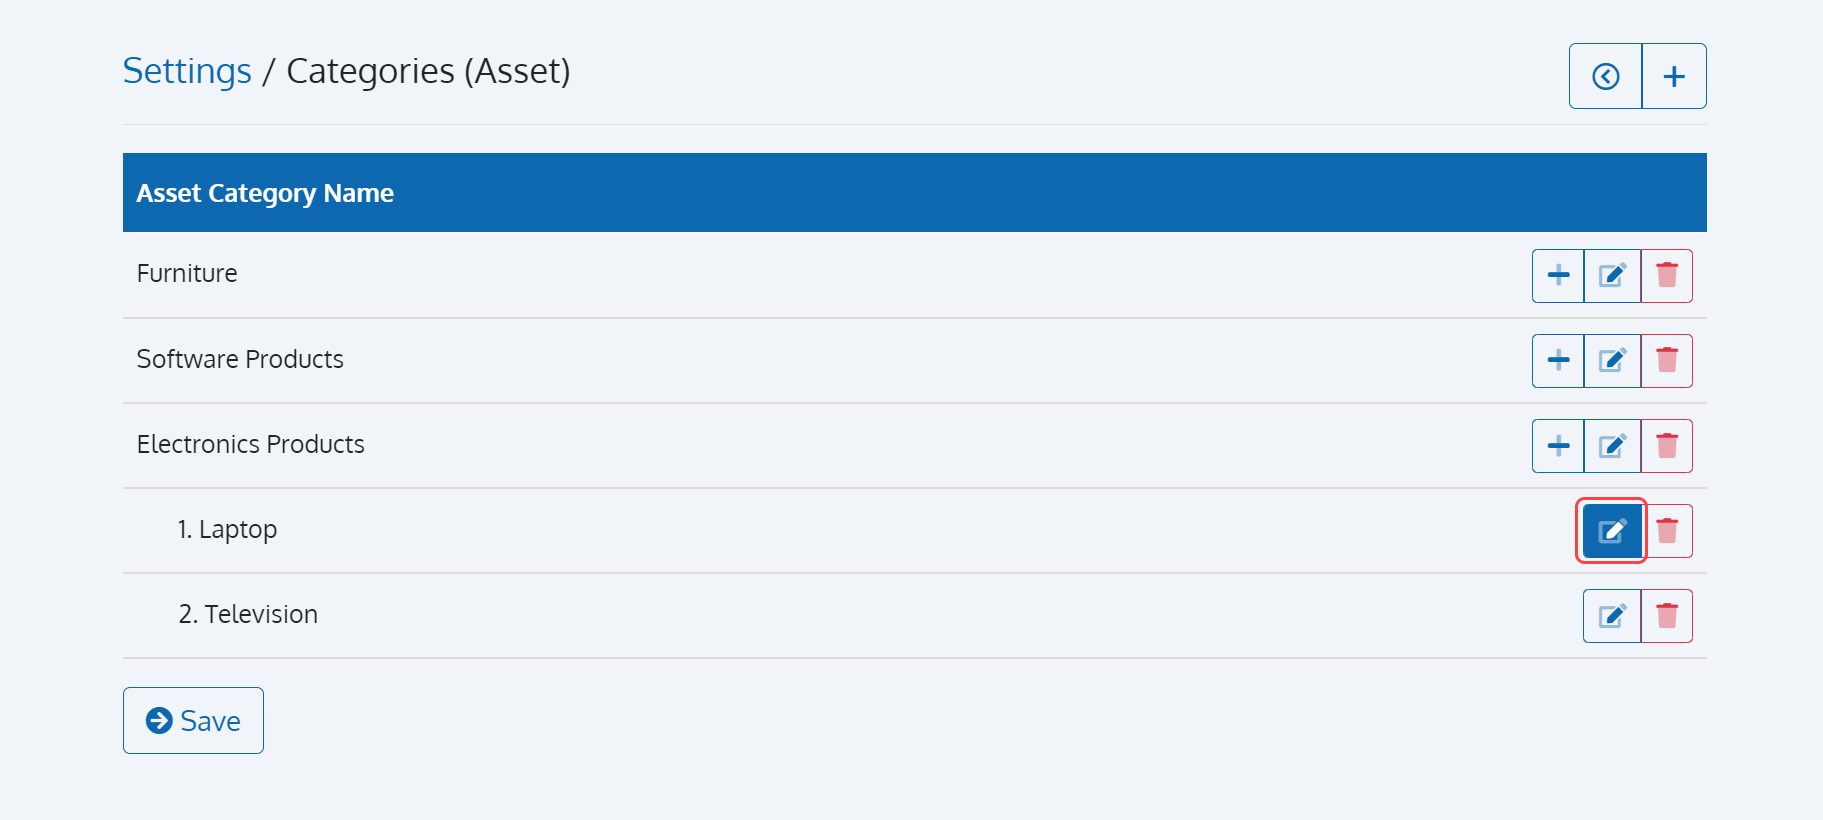
To edit a Category, click on the 'Edit Sub-Category' button as shown in Figure 41.
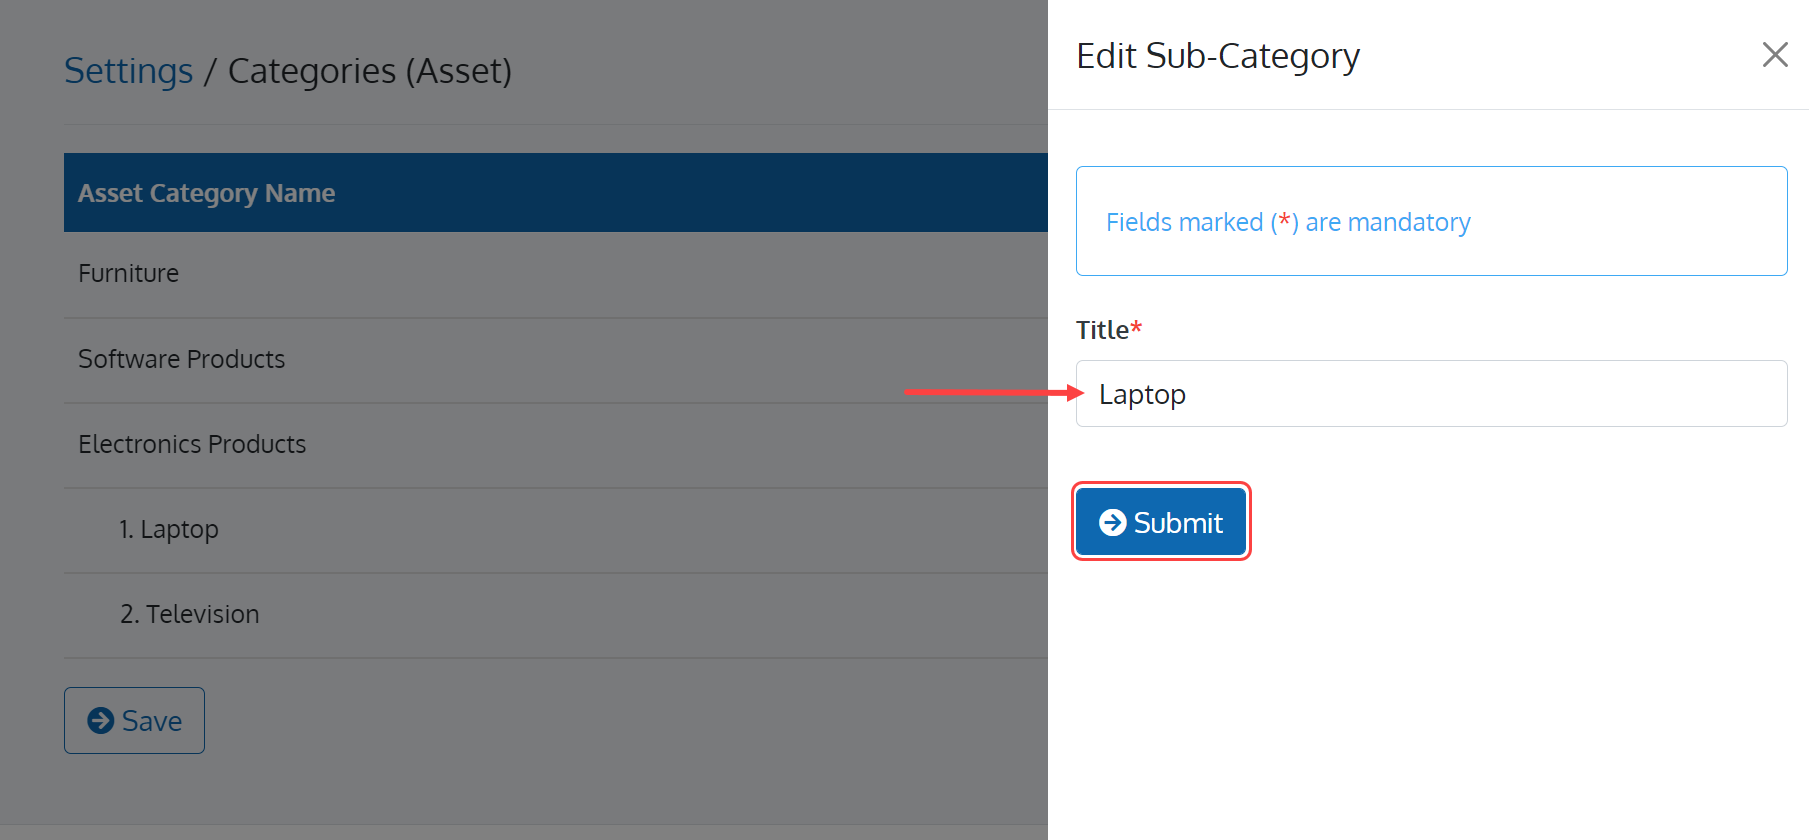
In the 'Edit Sub-Category' page, edit the Title of the Sub-Category and click on the 'Submit' button as shown in Figure 42 to save your edit.
Archive a Sub-Category
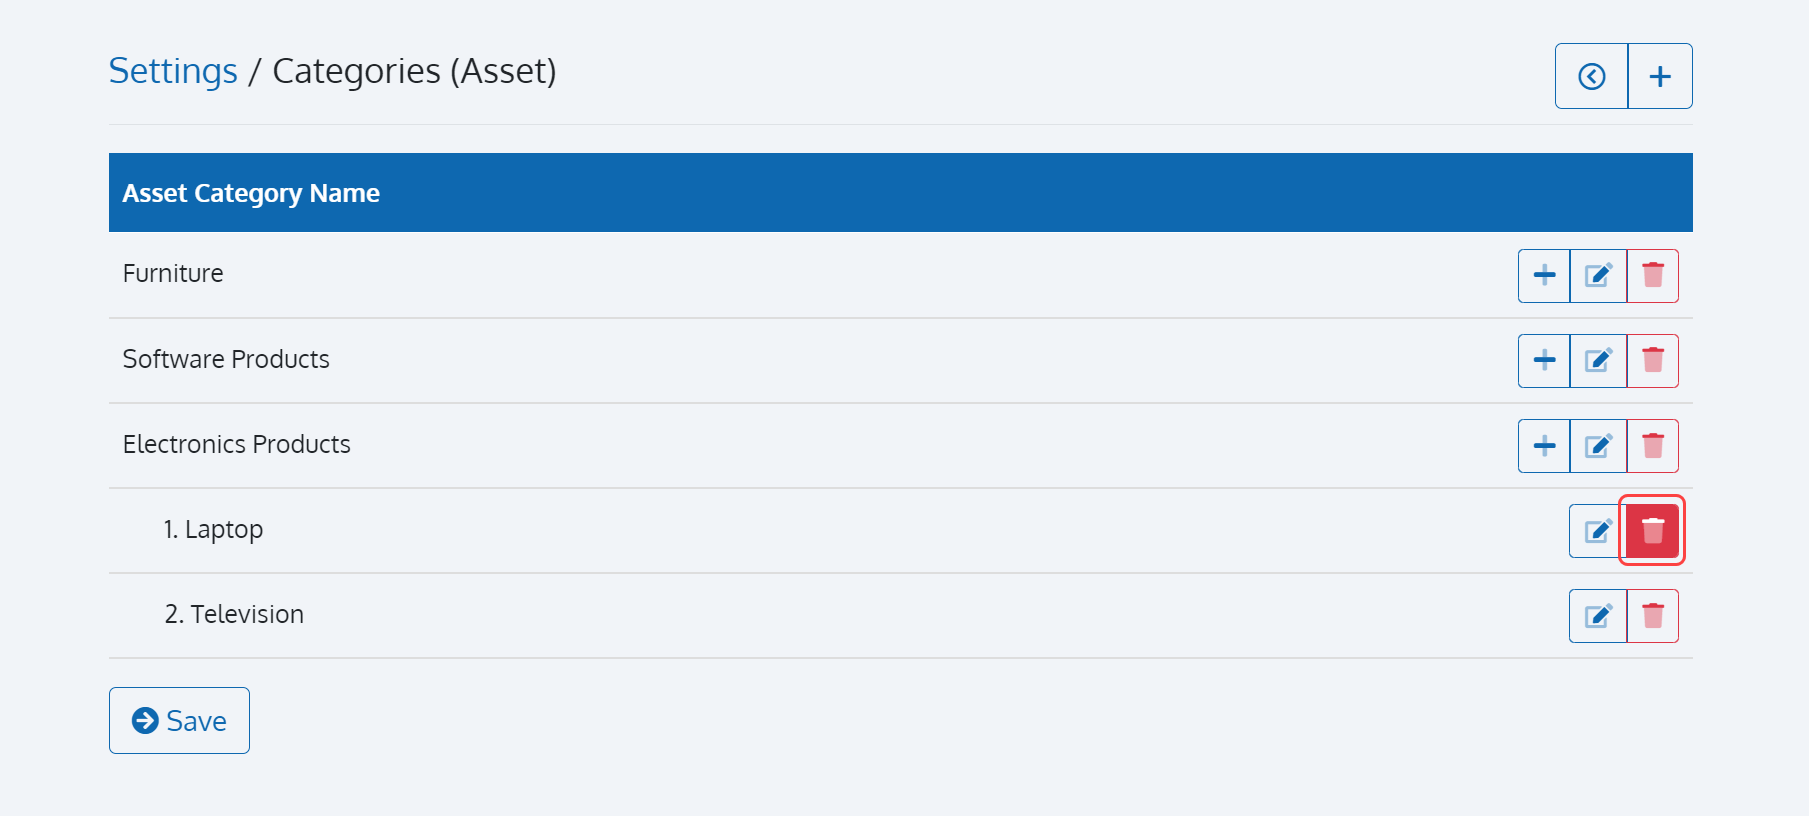
To archive a Sub-Category, click on the 'Archive Category' button as shown in Figure 43.
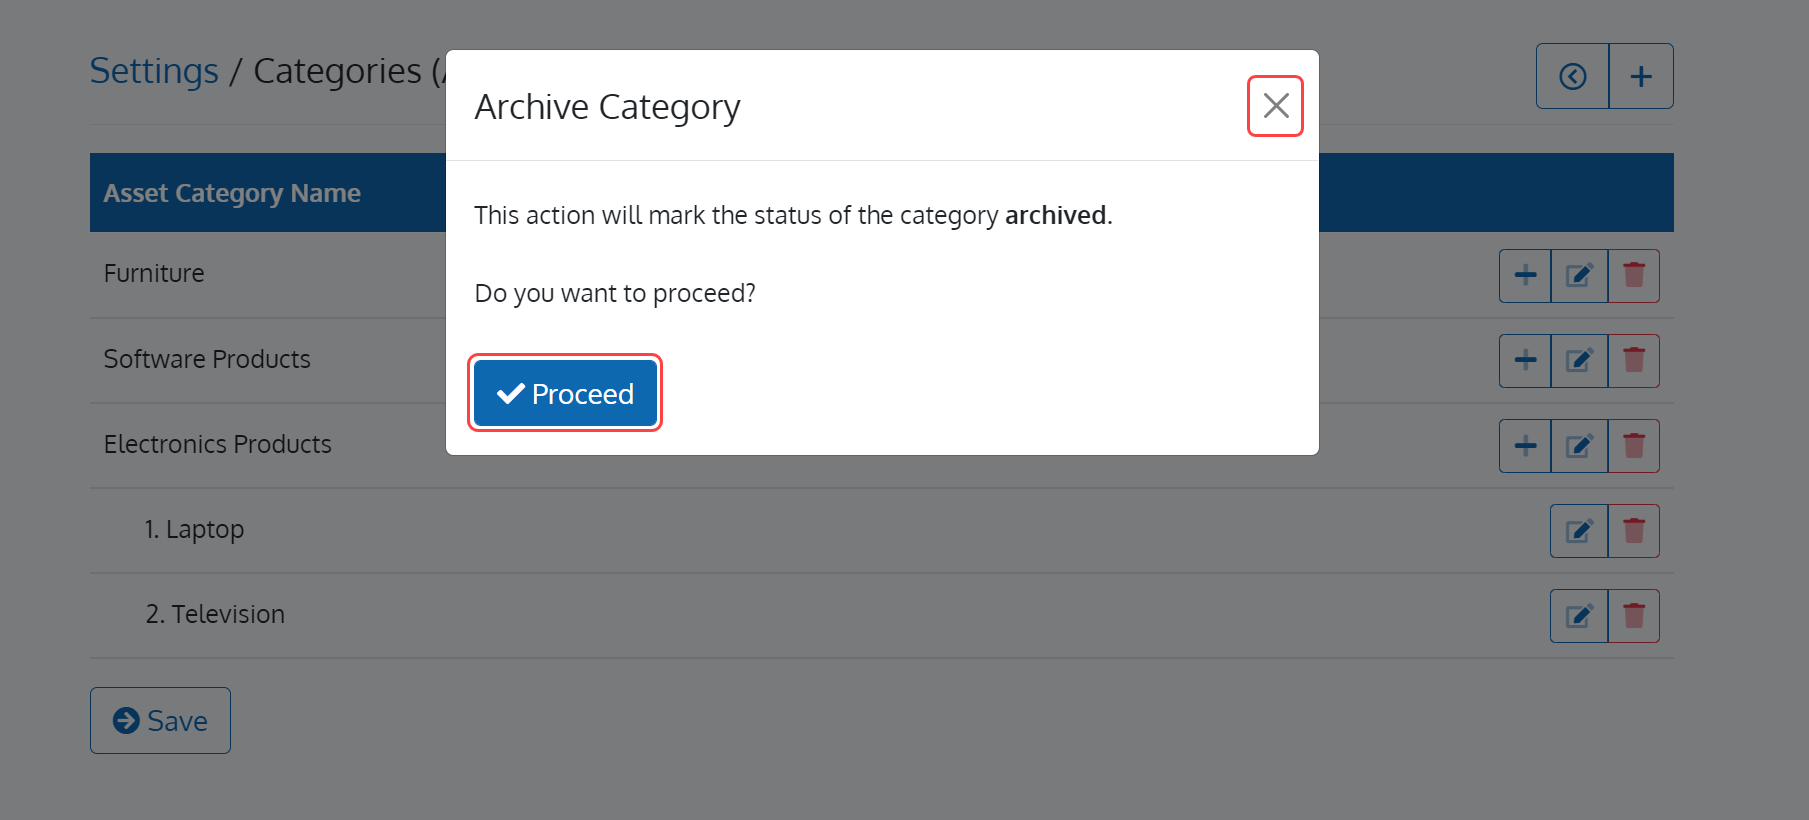
Upon doing so, the 'Archive Sub-Category' pop-up window with the buttons 'Proceed' and 'Cancel' will appear as shown in Figure 44. Click on the 'Proceed' button to archive the Sub-Category. Click on the 'Cancel' button to close the pop-up window.
To return to the 'Settings' page, click on the 'Back' button present in the 'Categories (Asset)' page.
Manage Project Category Setting
Click on 'Settings' and choose the 'Project' card as shown in Figure 45.
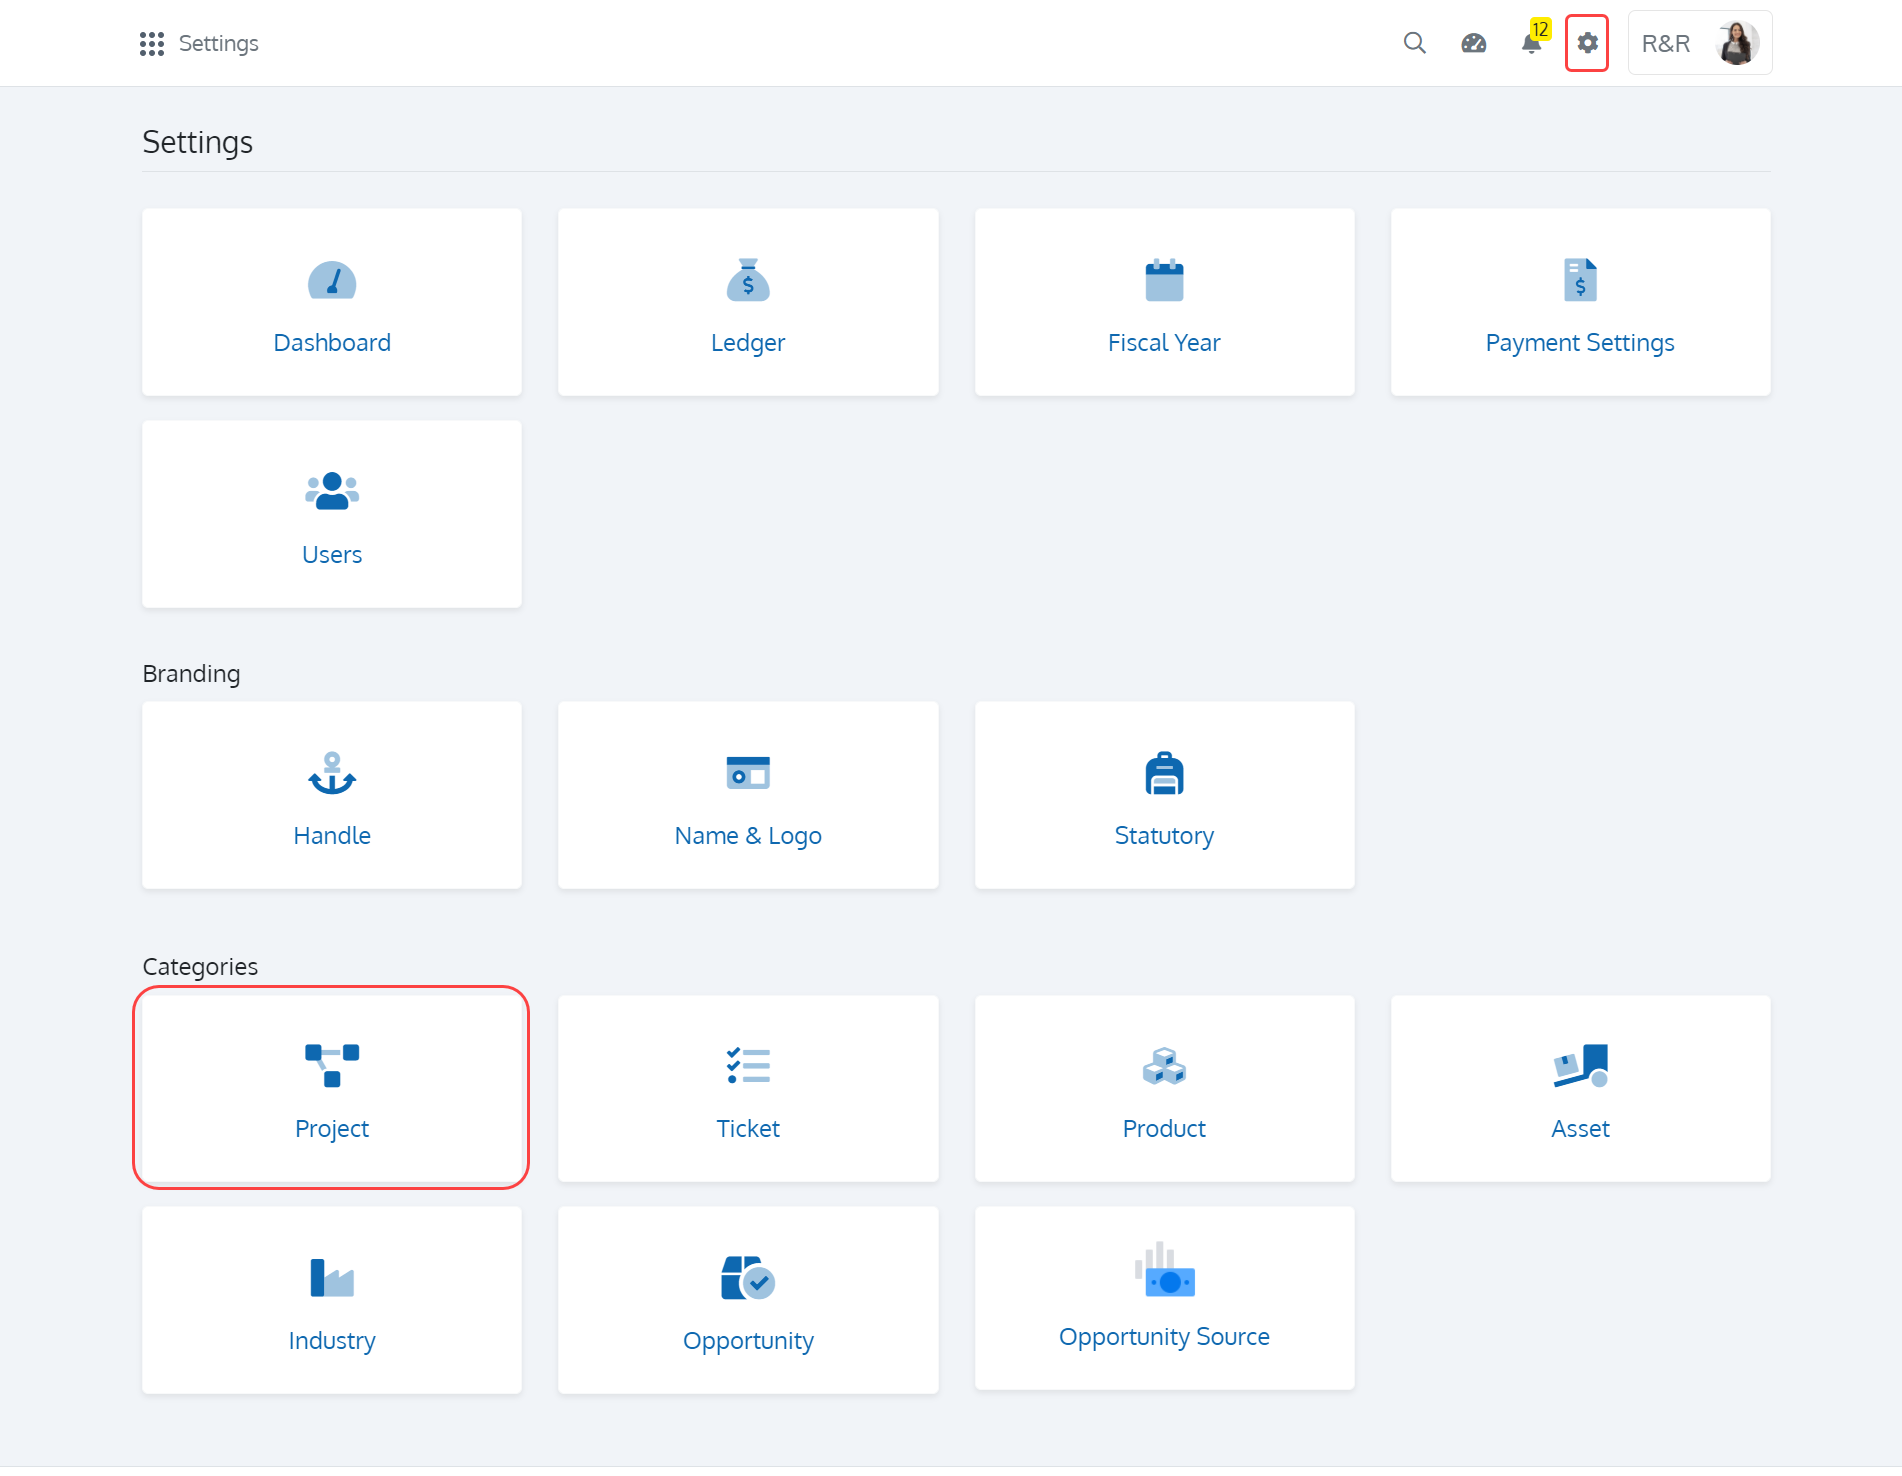
In the 'Project - Categories' screen, you can see a set of buttons in the toolbar with the available categories as shown in Figure 46. Each step shown in Figure 46 is explained in the below table.
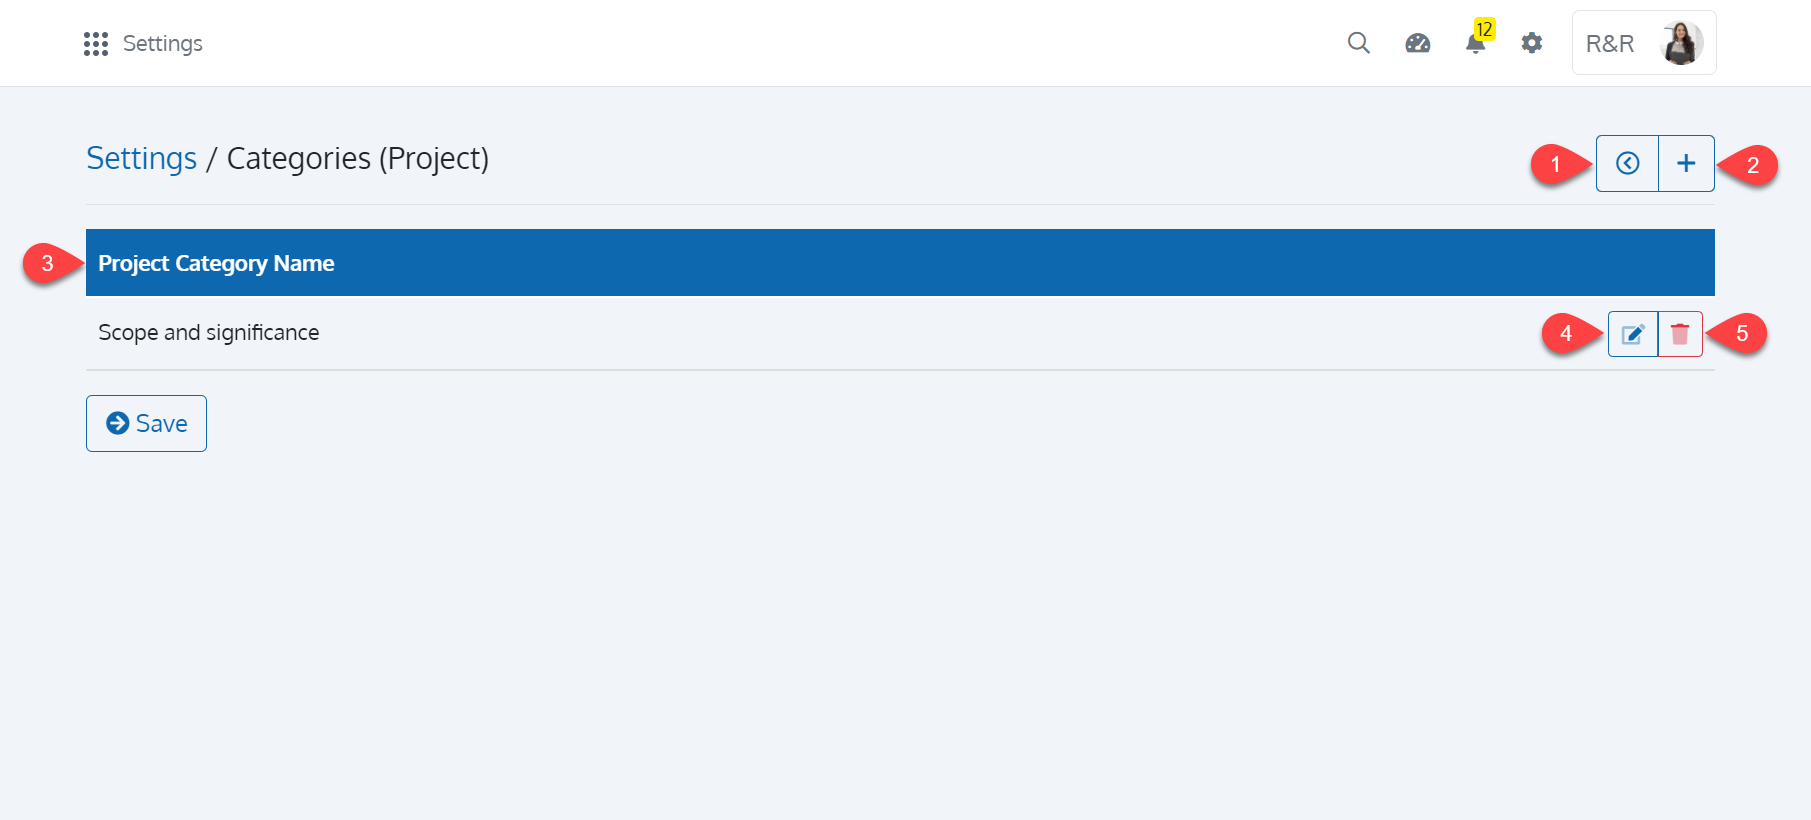
| Sl. No. | Name | Description |
|---|---|---|
| 1 | Back |
Use this button to return to the settings page |
| 2 | Add Category |
Click to add a category for projects |
| 3 | Project Category Name |
The list of available categories for projects |
| 4 | Edit Category |
Click to edit category of project |
| 5 | Archive Category |
Click to archive category of project |
Add Category
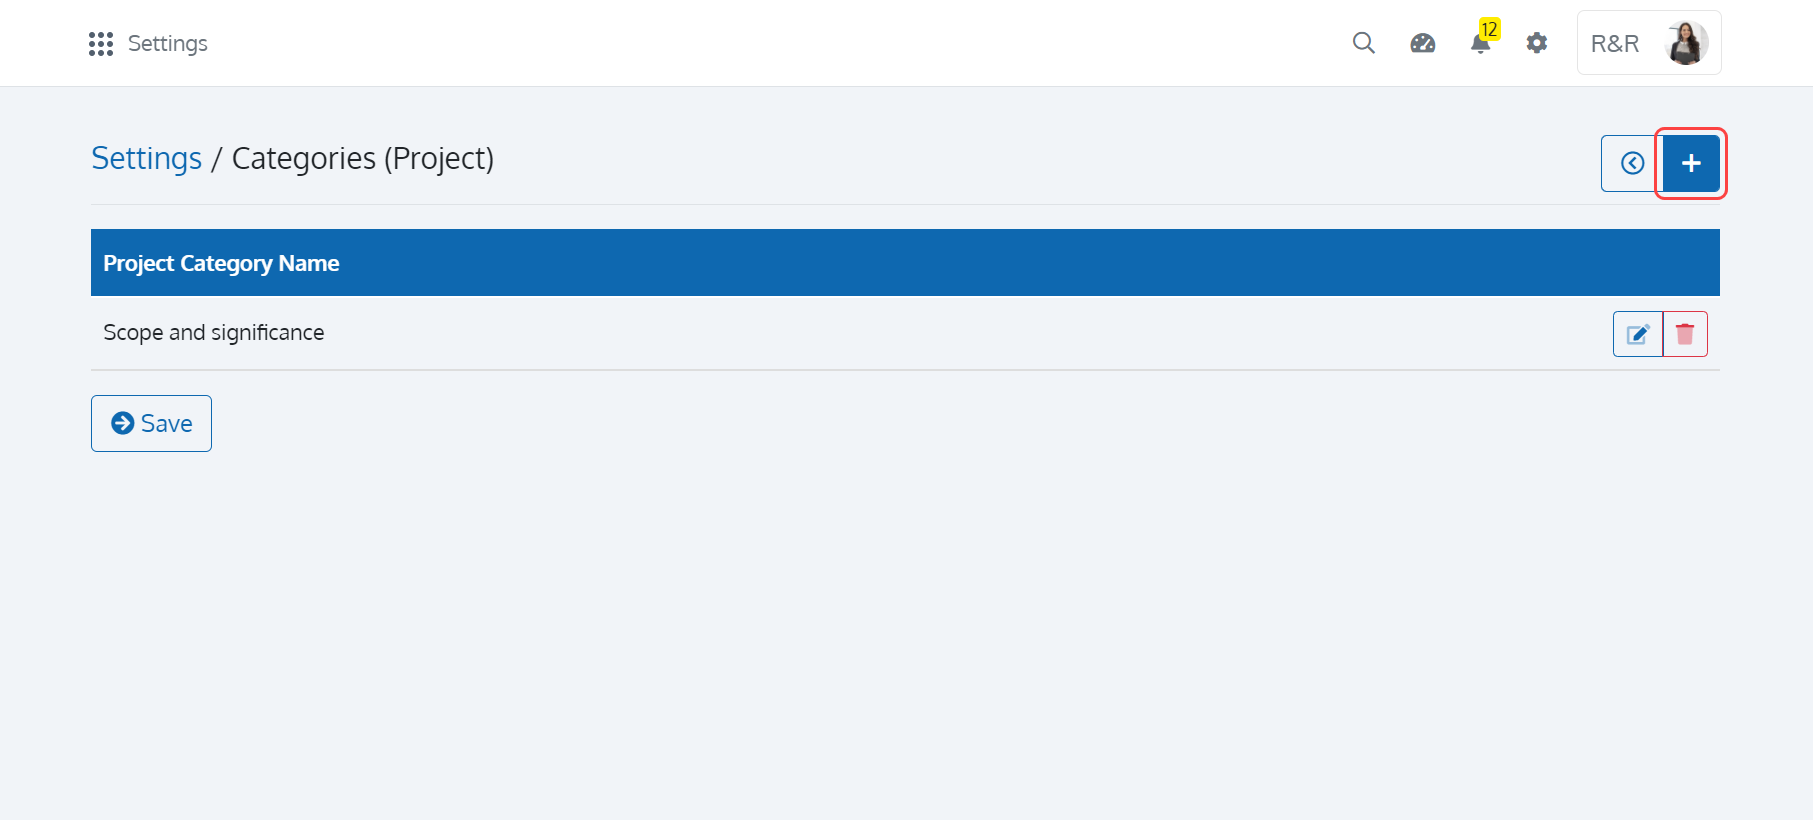
To add a Category for Project, click on the '+' button as shown in Figure 47.
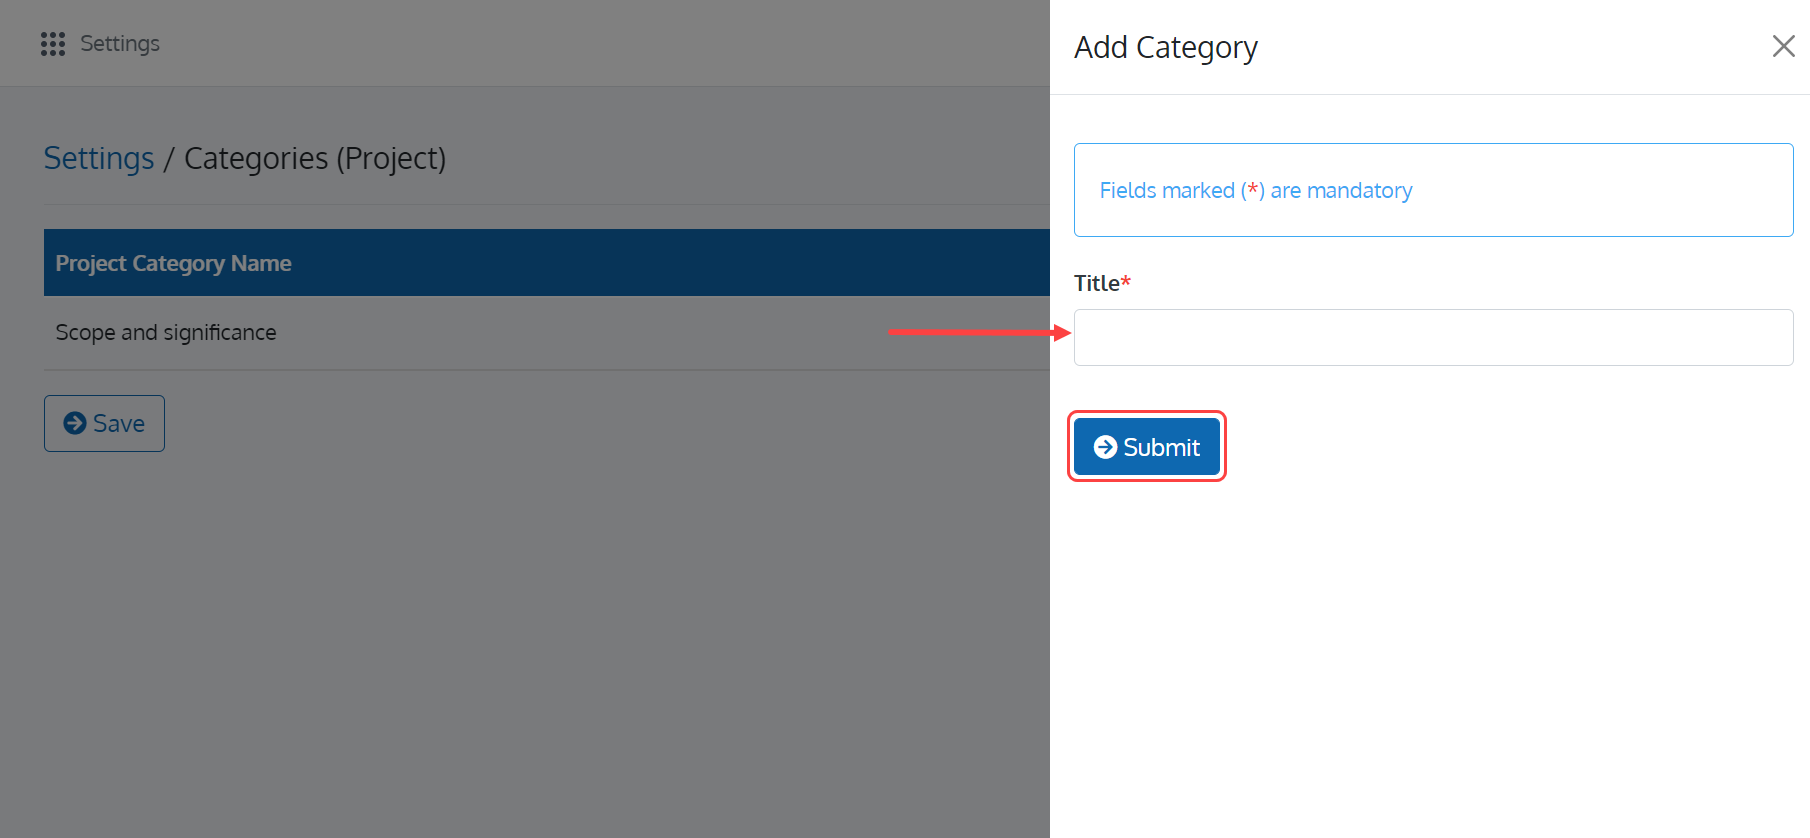
In the 'Add Category' page, enter the Title of the Category. Once you are done with, click on the 'Submit' button to save your information as shown in Figure 48.
Upon doing so, the Project Categories will appear in the 'Add/Edit Project' page.
Edit a Category
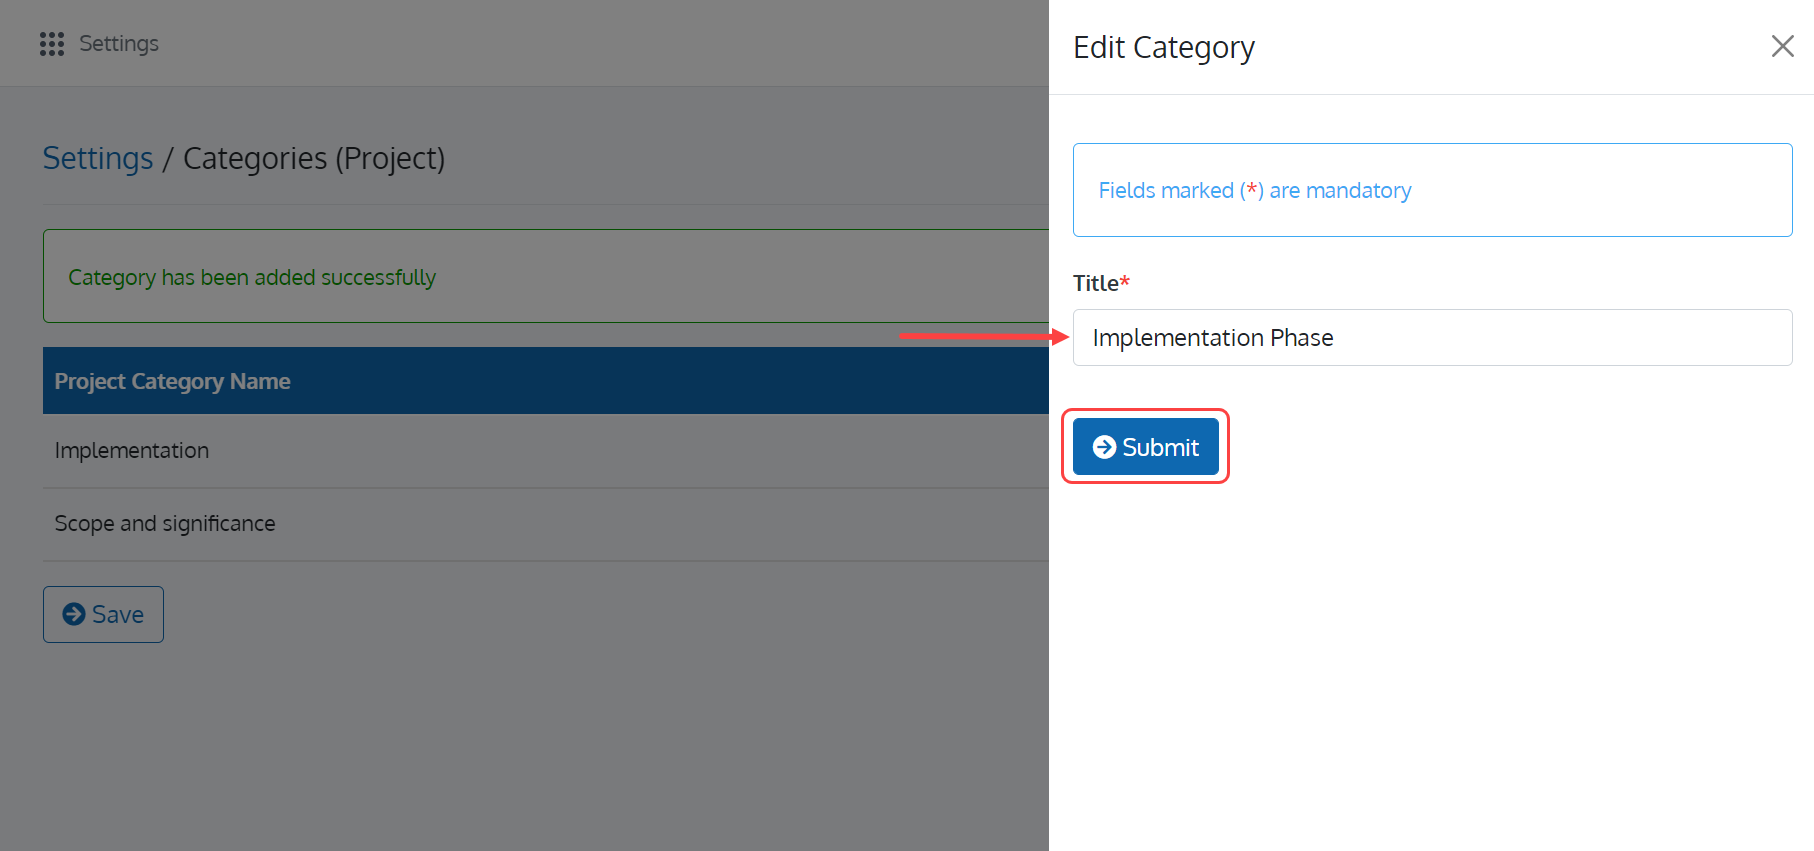
To edit a Category, click on the 'Edit Category' button appearing against each Category as shown in Figure 49.
In the 'Edit Category' page, edit the Title of the Category and click on the 'Submit' button as shown in Figure 50 to save your edit.
Archive a Category
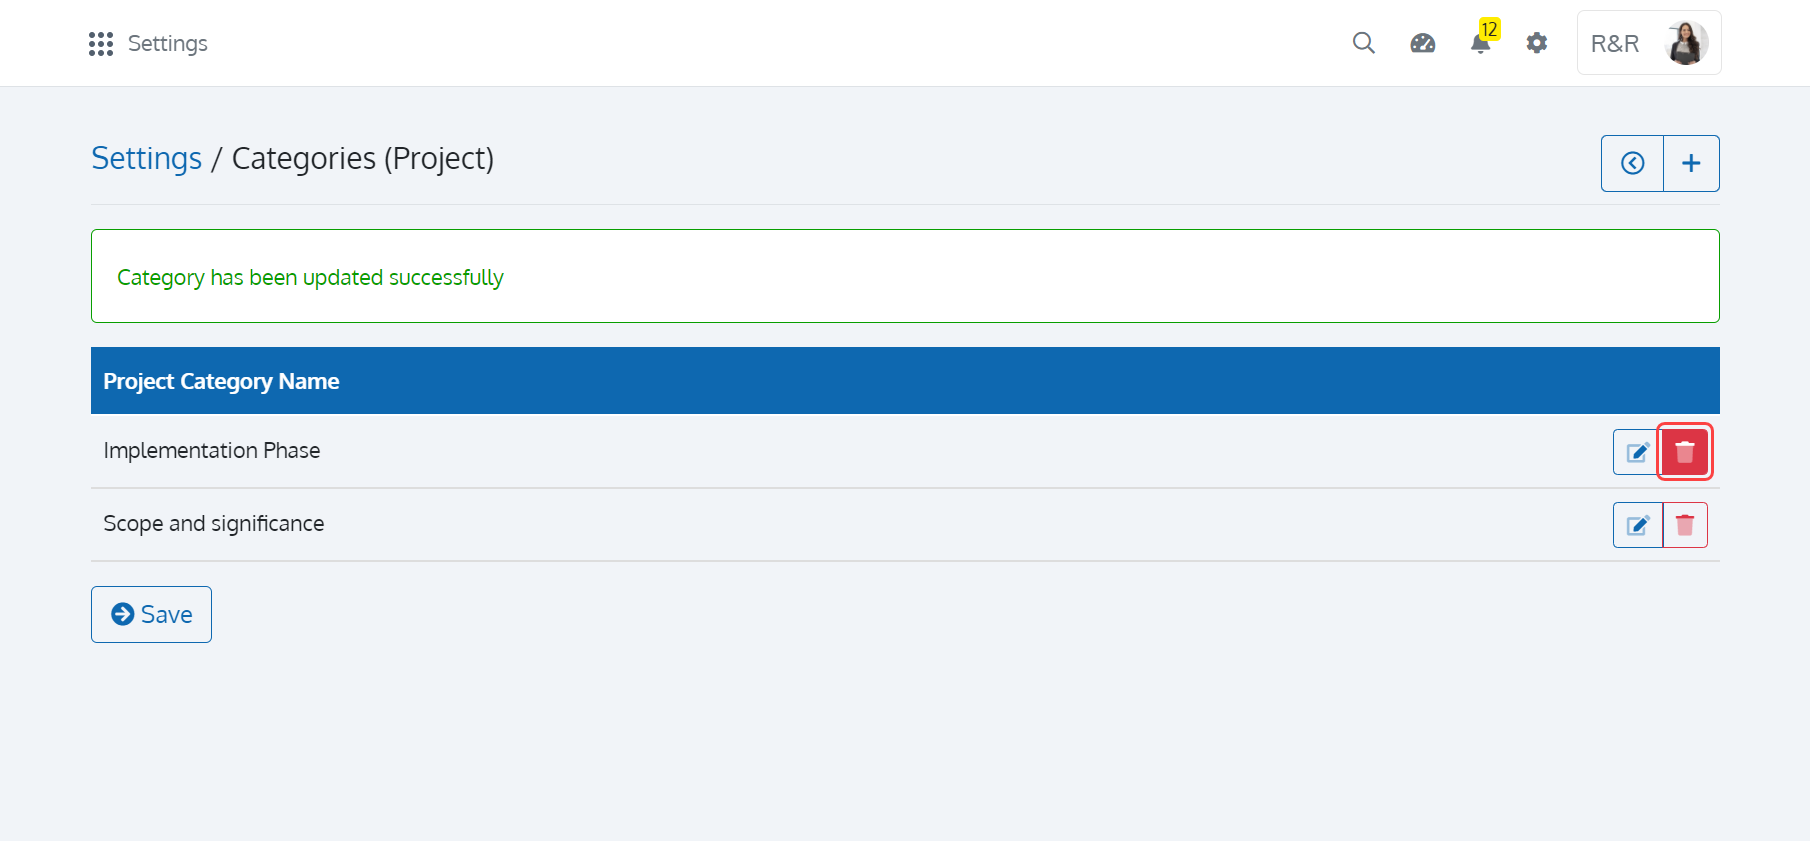
To archive a Category, click on the 'Archive Category' button appearing against each Category as shown in Figure 51.
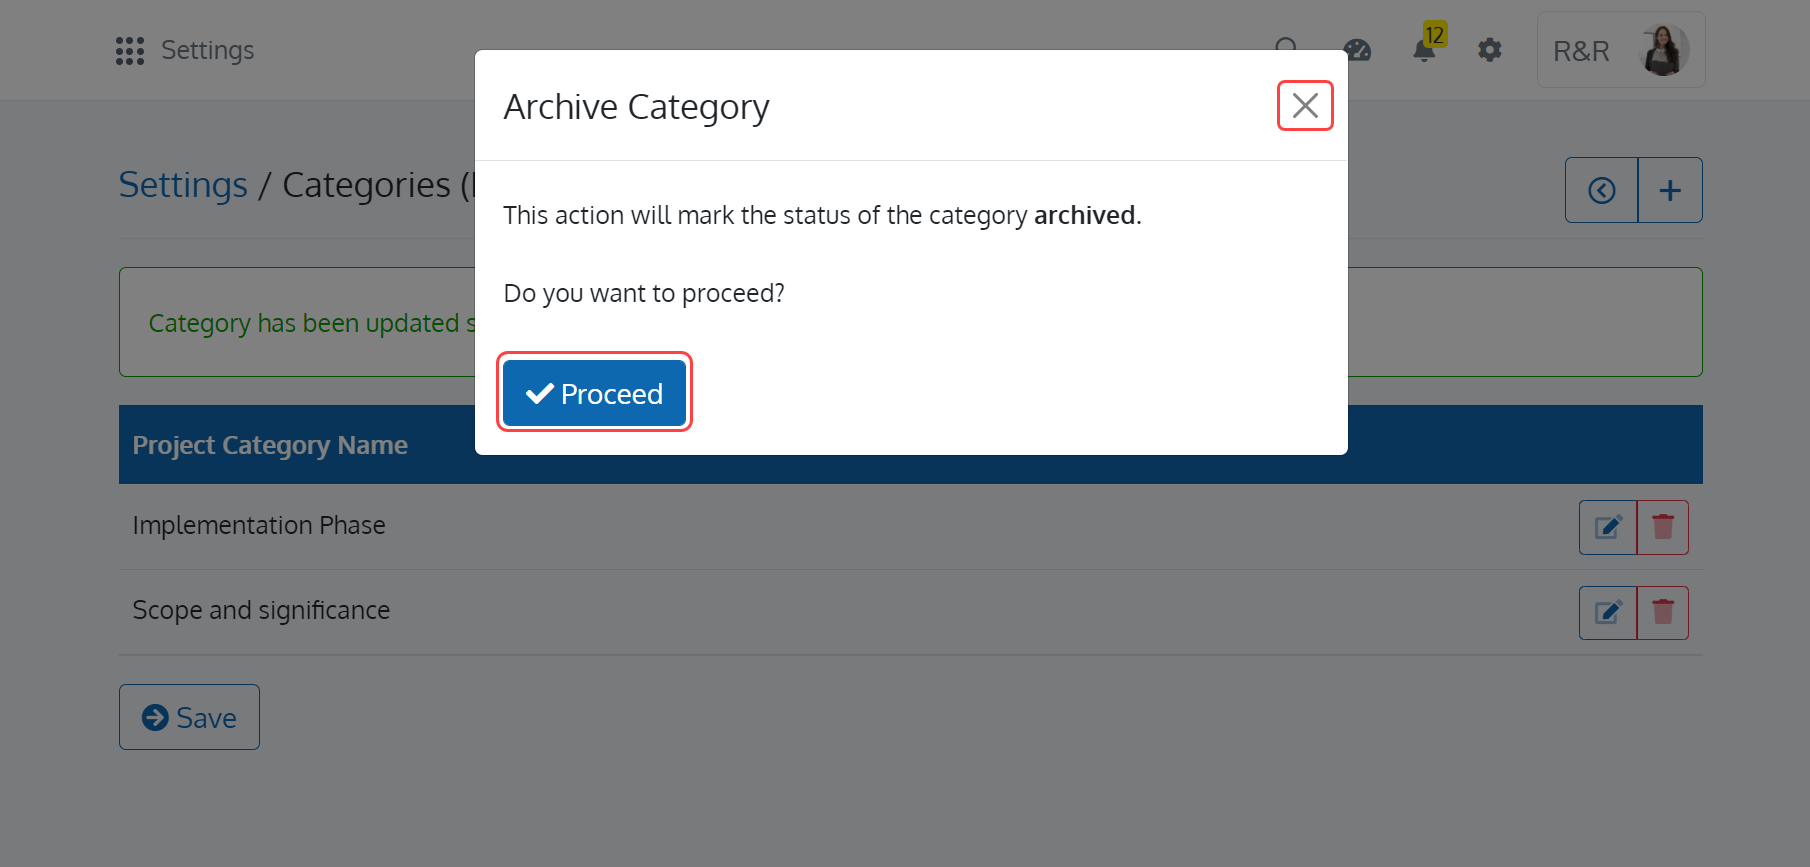
Upon doing so, the 'Archive Category' pop-up window with the buttons 'Proceed' and 'Cancel' will appear as shown in Figure 52. Click on the 'Proceed' button to archive the Category. Click on the 'Cancel' button to close the pop-up window.
To return to the 'Settings' page, click on the 'Back' button present in the 'Categories (Project)' page.
Manage Ticket Category Setting
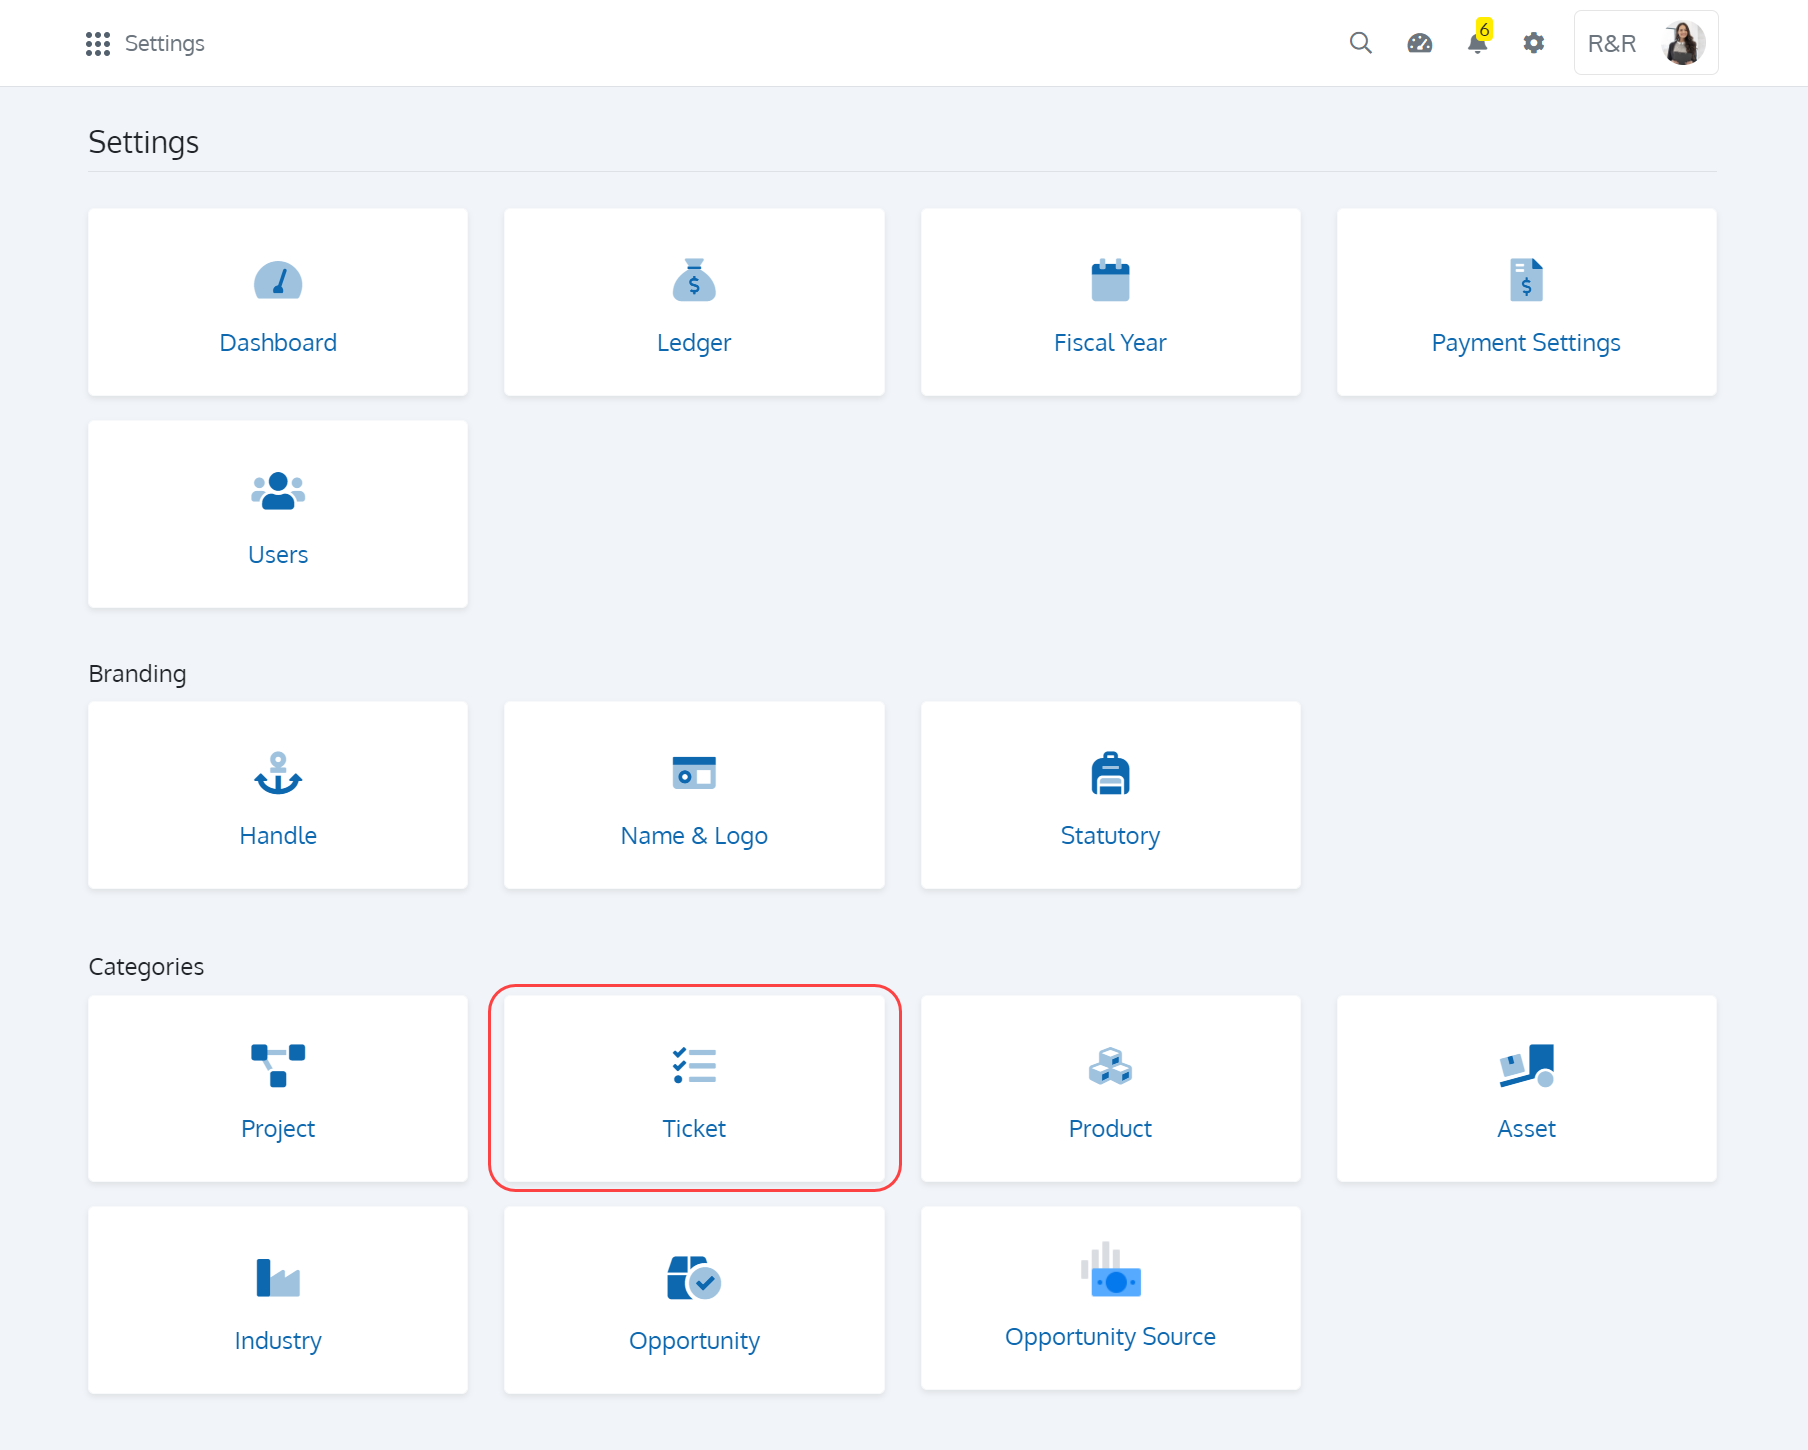
Click on 'Settings' and choose the 'Ticket' card as shown in Figure 53.
In the 'Ticket - Categories' screen, you can see a set of buttons in the toolbar with the available categories (Uncategorized by default) as shown in Figure 54. Each step shown in Figure 54 is explained in the below table.
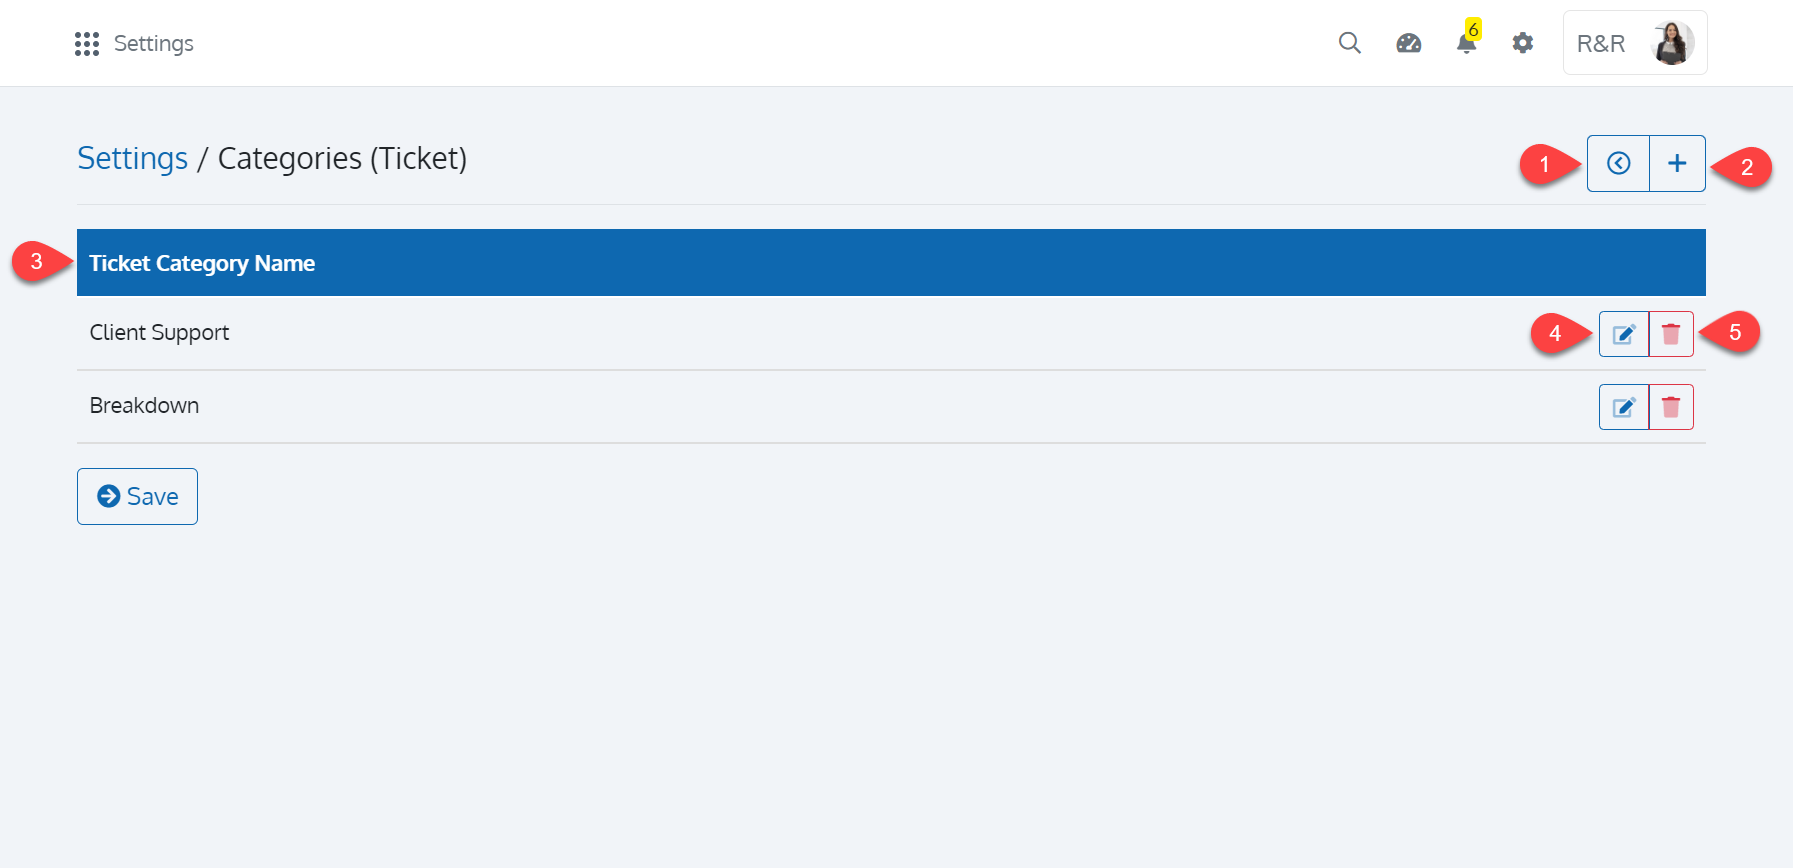
| Sl. No. | Name | Description |
|---|---|---|
| 1 | Back |
Use this button to return to the settings page |
| 2 | Add Category |
Click to add a category for Tickets |
| 3 | Ticket Category Name |
The list of available categories for Tickets |
| 4 | Edit Category |
Click to edit the category |
| 5 | Archive Category |
Click to archive the category |
Add Category
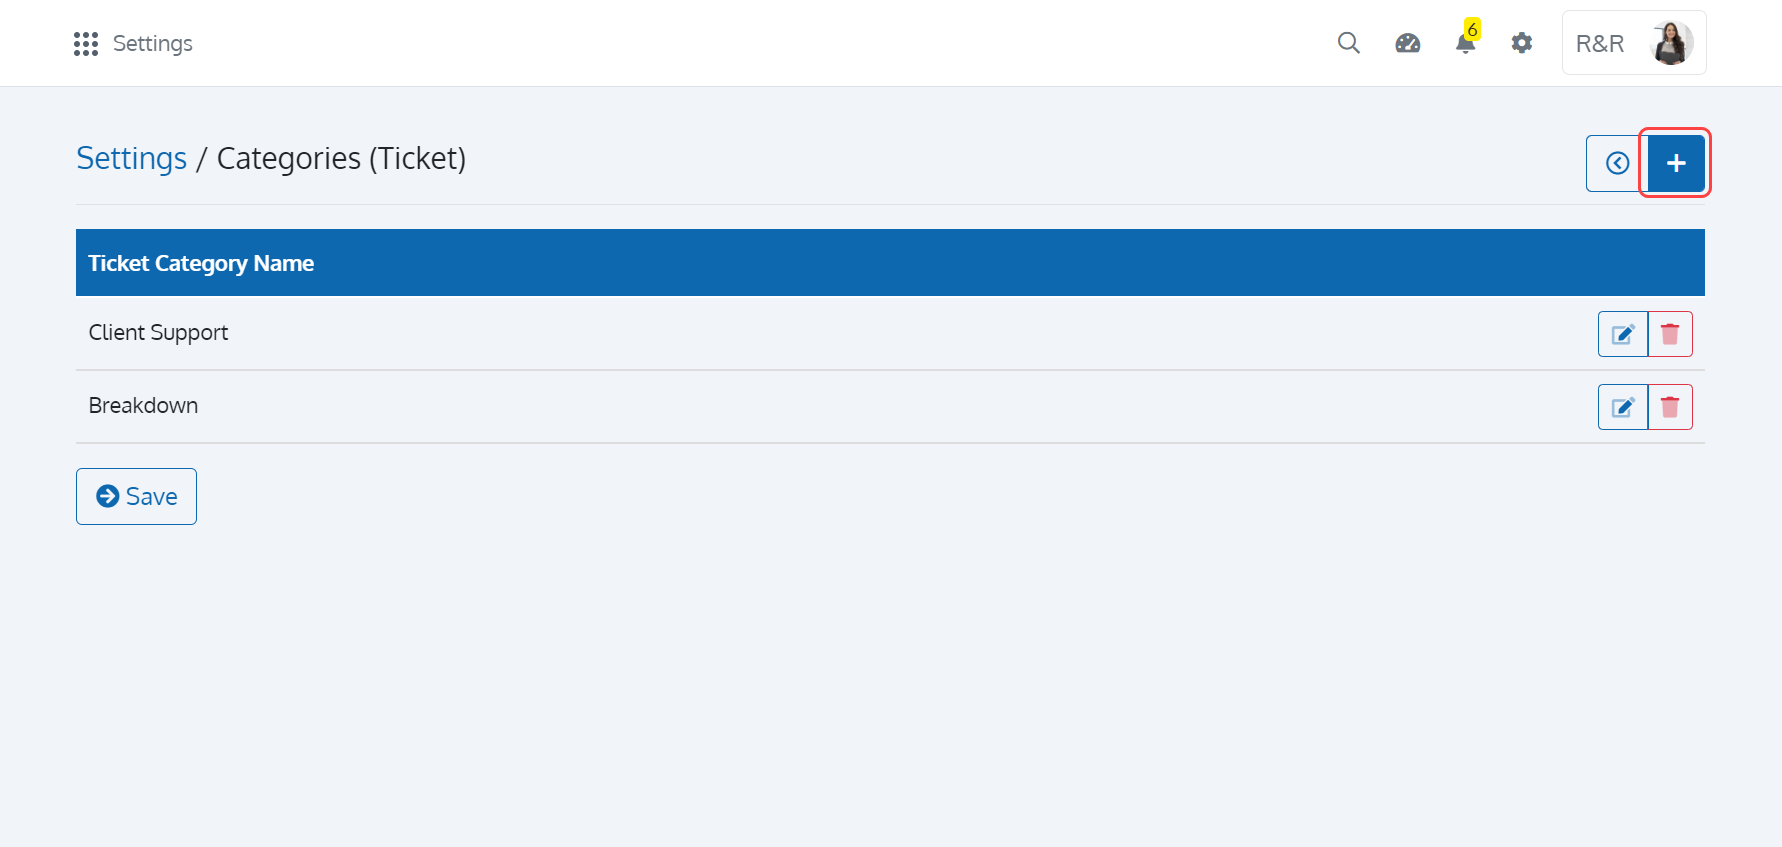
To add a Category for a Ticket, click on the '+' button as shown in Figure 55.
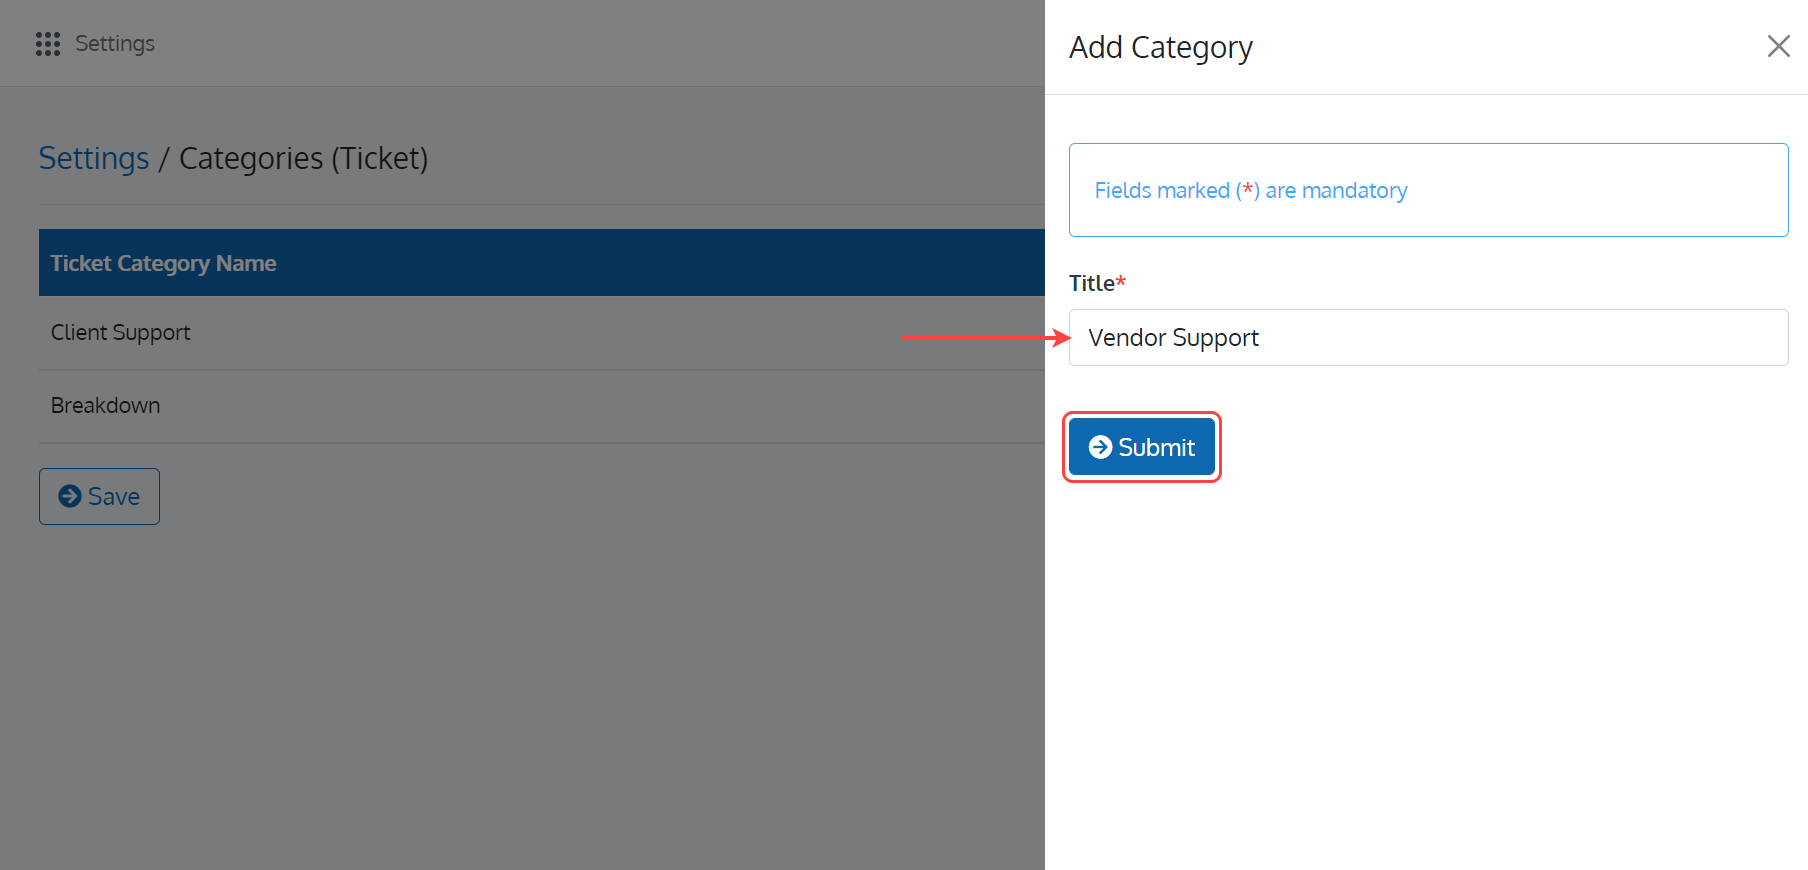
In the 'Add Category' page, enter the Title of the Category. Once you are done with, click on the 'Submit' button to save your information as shown in Figure 56.
Upon doing so, the Ticket Categories will appear in the 'Add/Edit Ticket' page.
Edit a Category
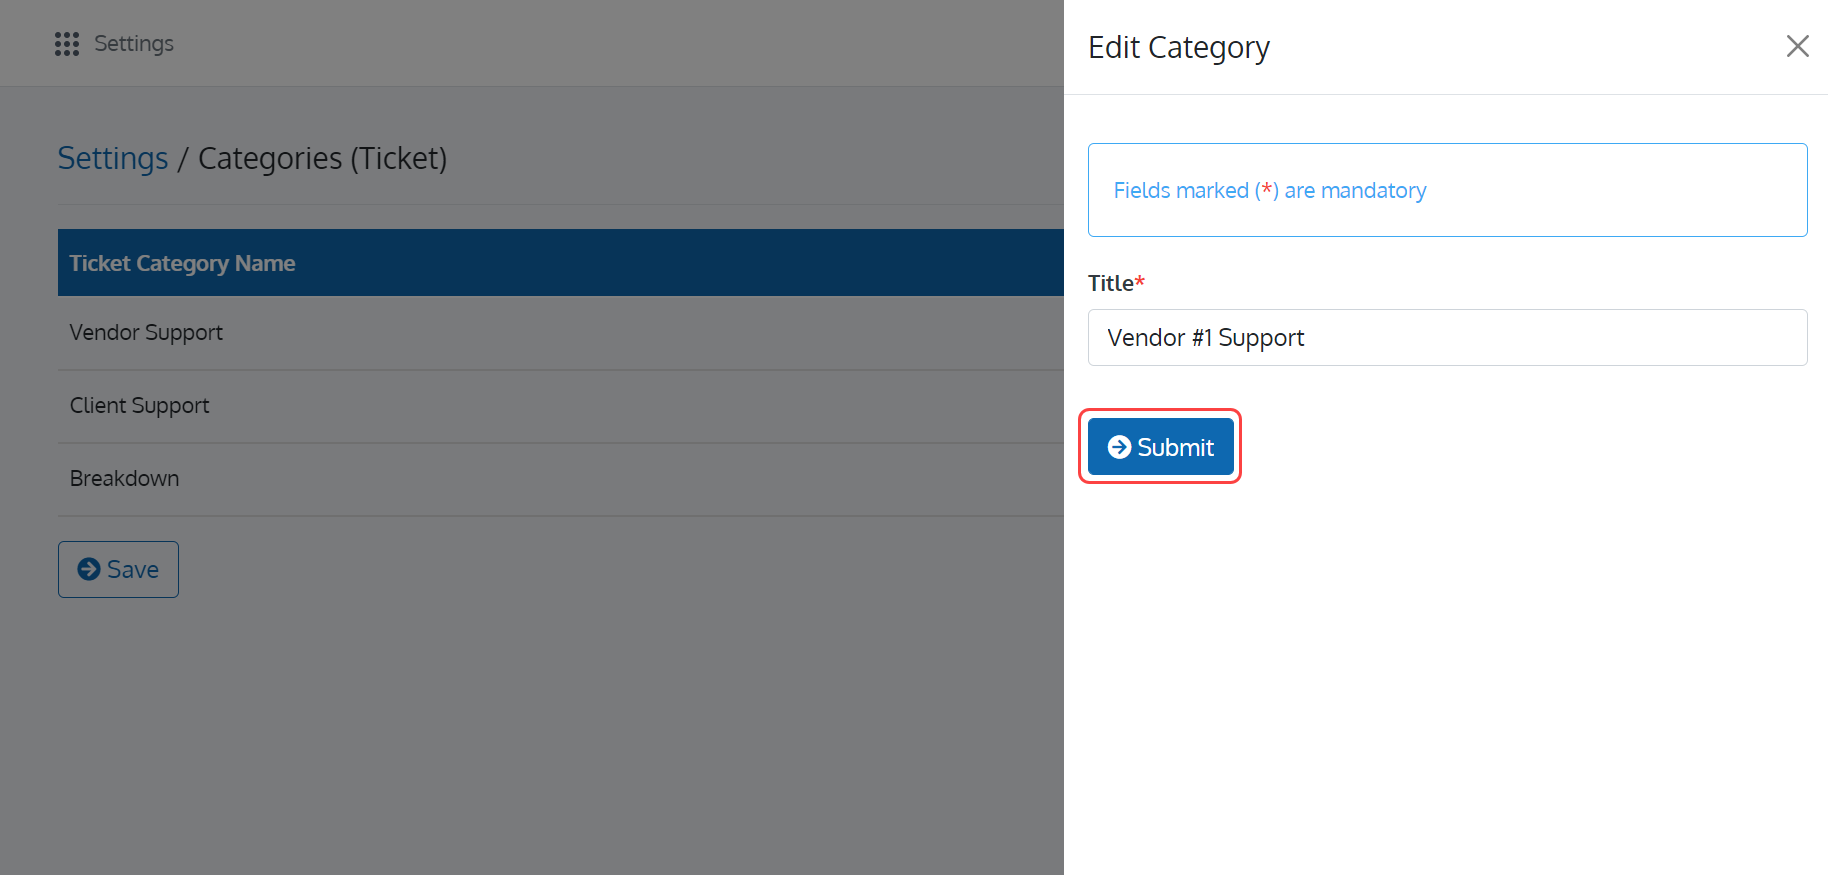
To edit a Category, click on the 'Edit Category' button as shown in Figure 57.
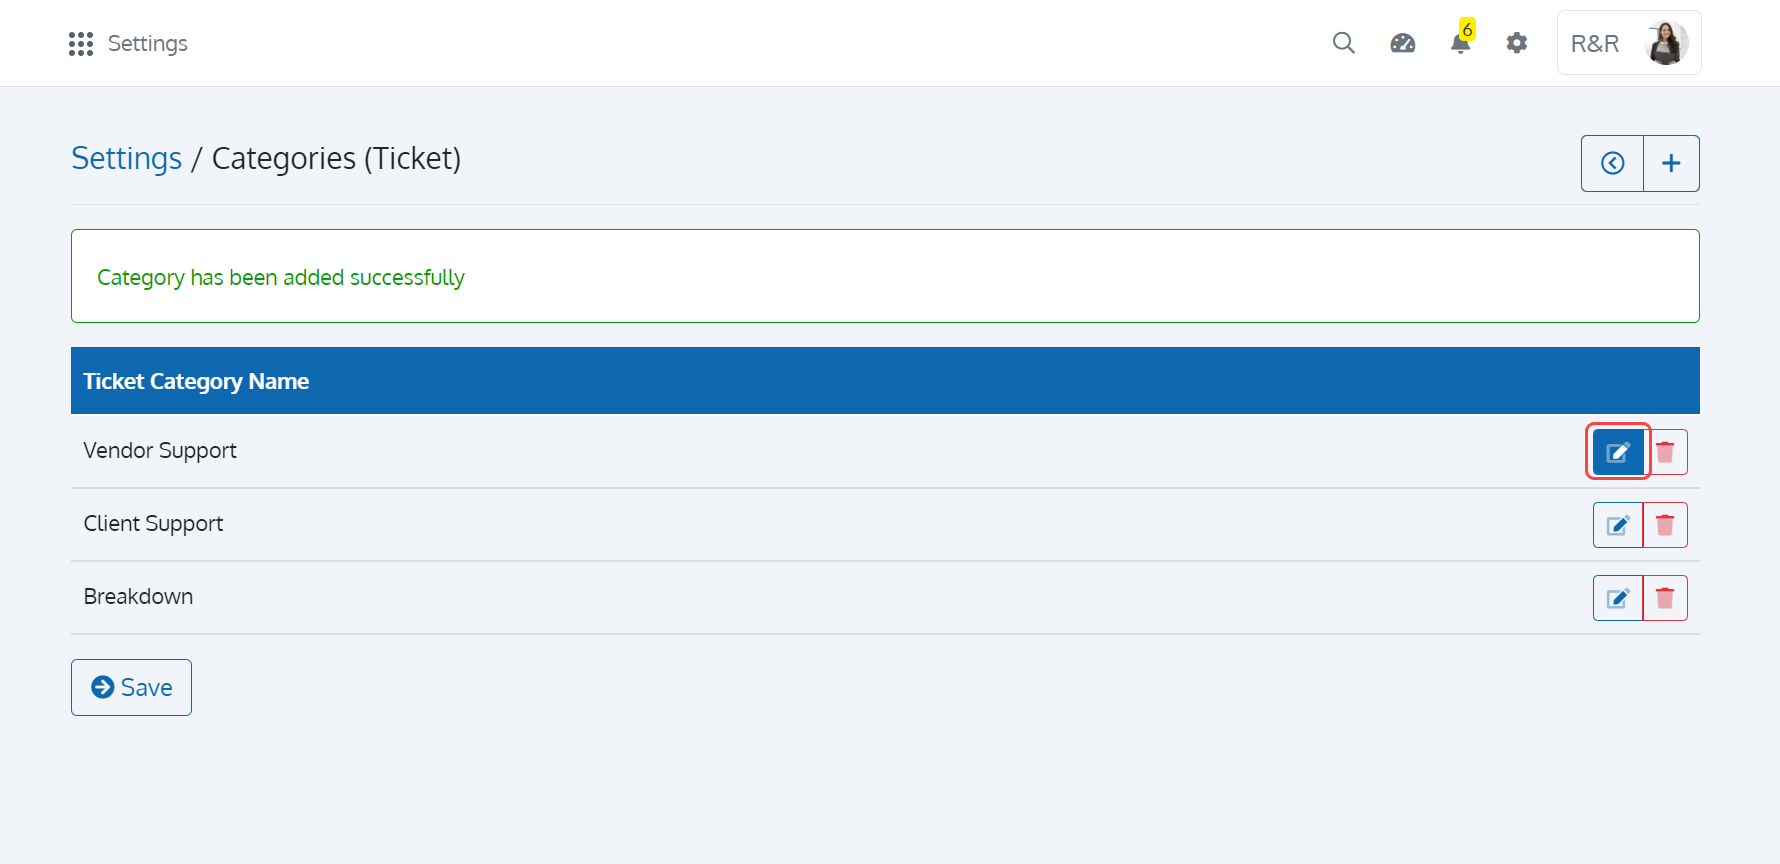
In the 'Edit Category' page, edit the Title of the Category and click on the 'Submit' button as shown in Figure 58 to save your edit.
Archive a Category
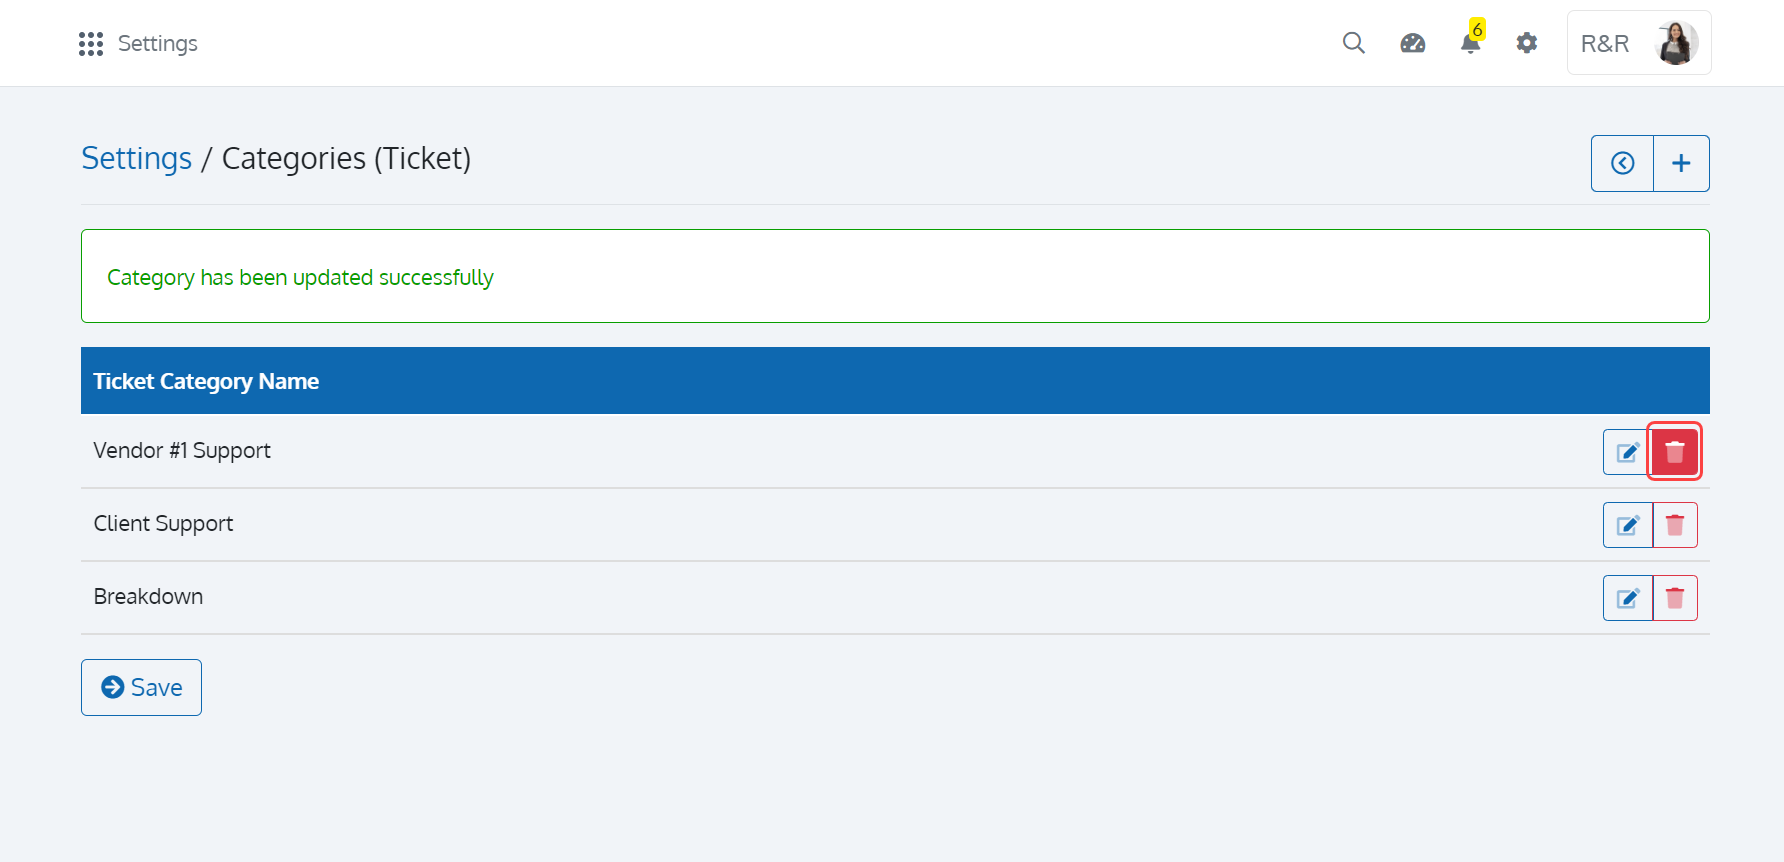
To archive a Category, click on the 'Archive Category' button as shown in Figure 59.
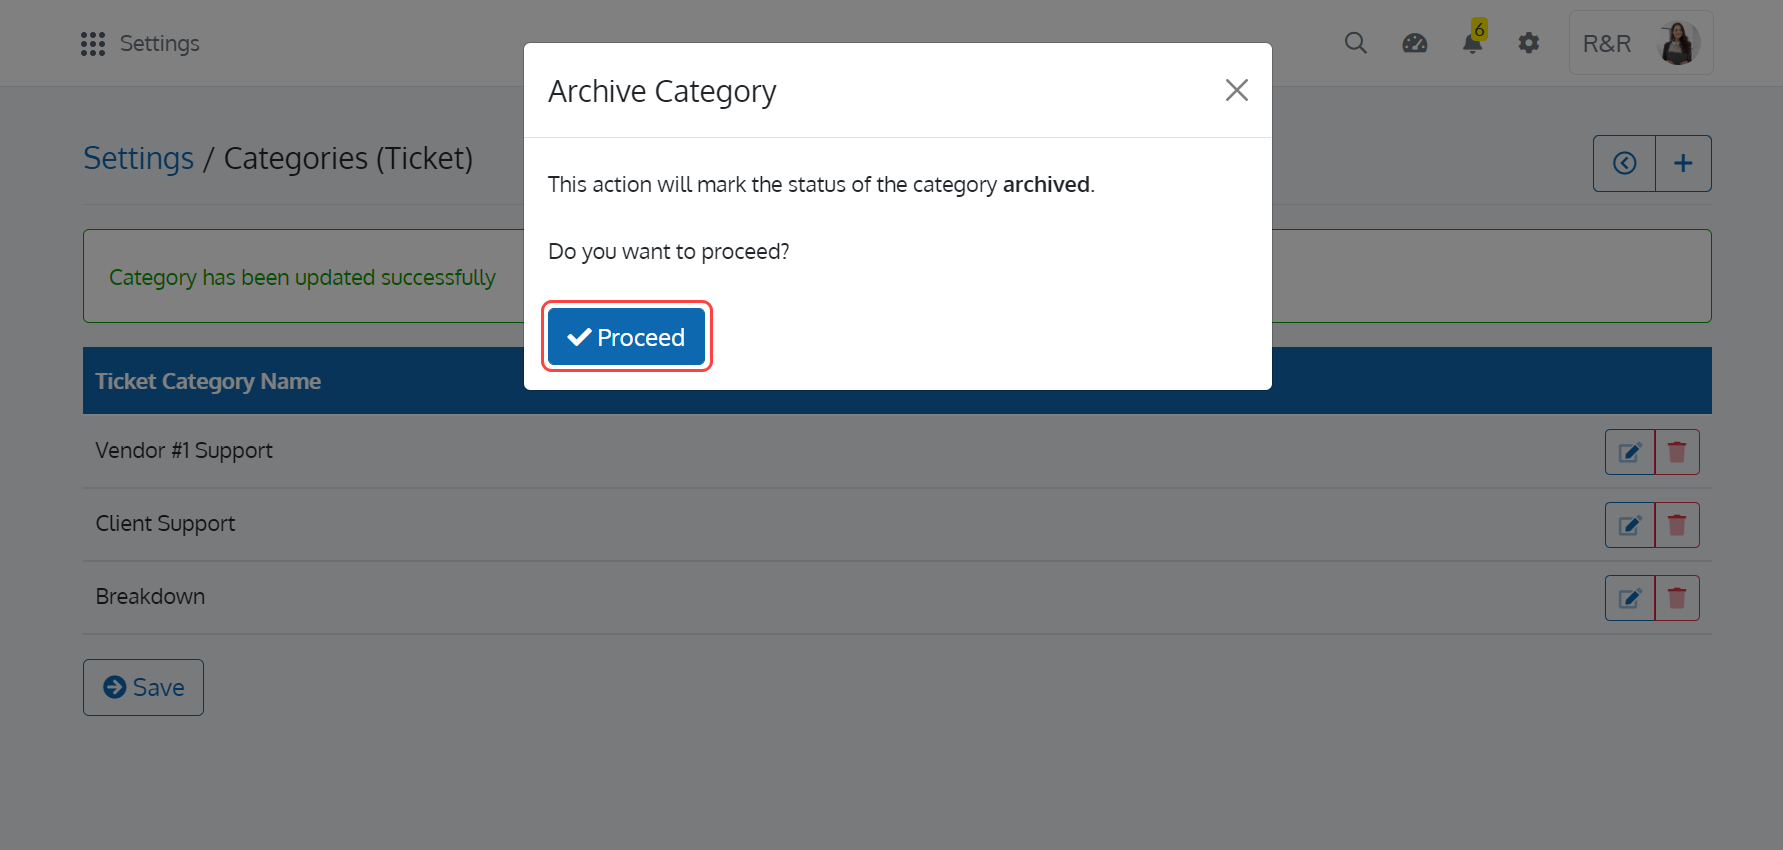
Upon doing so, the 'Archive Category' pop-up window with the buttons 'Proceed' and 'Cancel' will appear as shown in Figure 60. Click on the 'Proceed' button to archive the Category. Click on the 'Cancel' button to close the pop-up window.
To return to the 'Settings' page, click on the 'Back' button present in the 'Categories (Ticket)' page.
Manage OfficeOps Category Setting
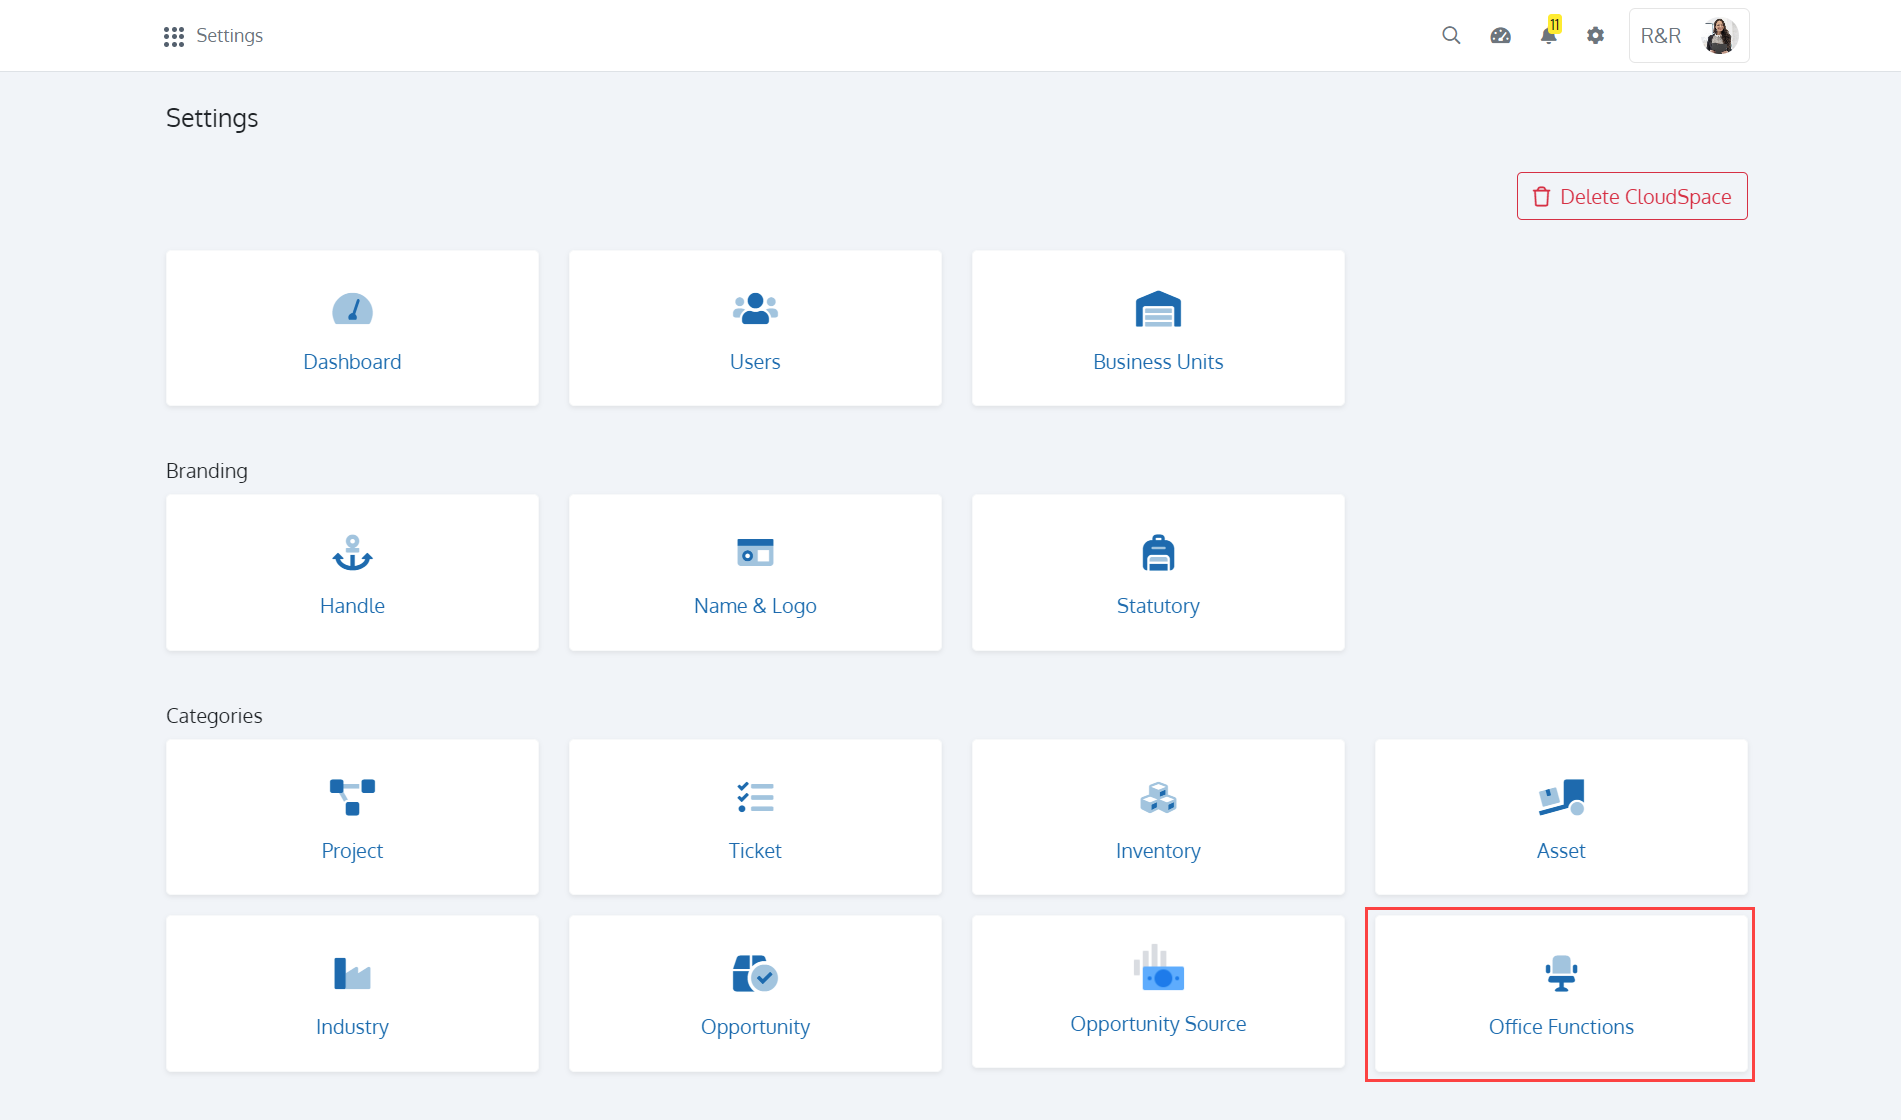
Click on 'Settings' and choose the 'Office Functions' card as shown in Figure 61.
In the 'OfficeOps - Categories' screen, you can see a set of buttons in the toolbar with the available categories (Uncategorized by default) as shown in Figure 62. Each step shown in Figure 62 is explained in the below table.
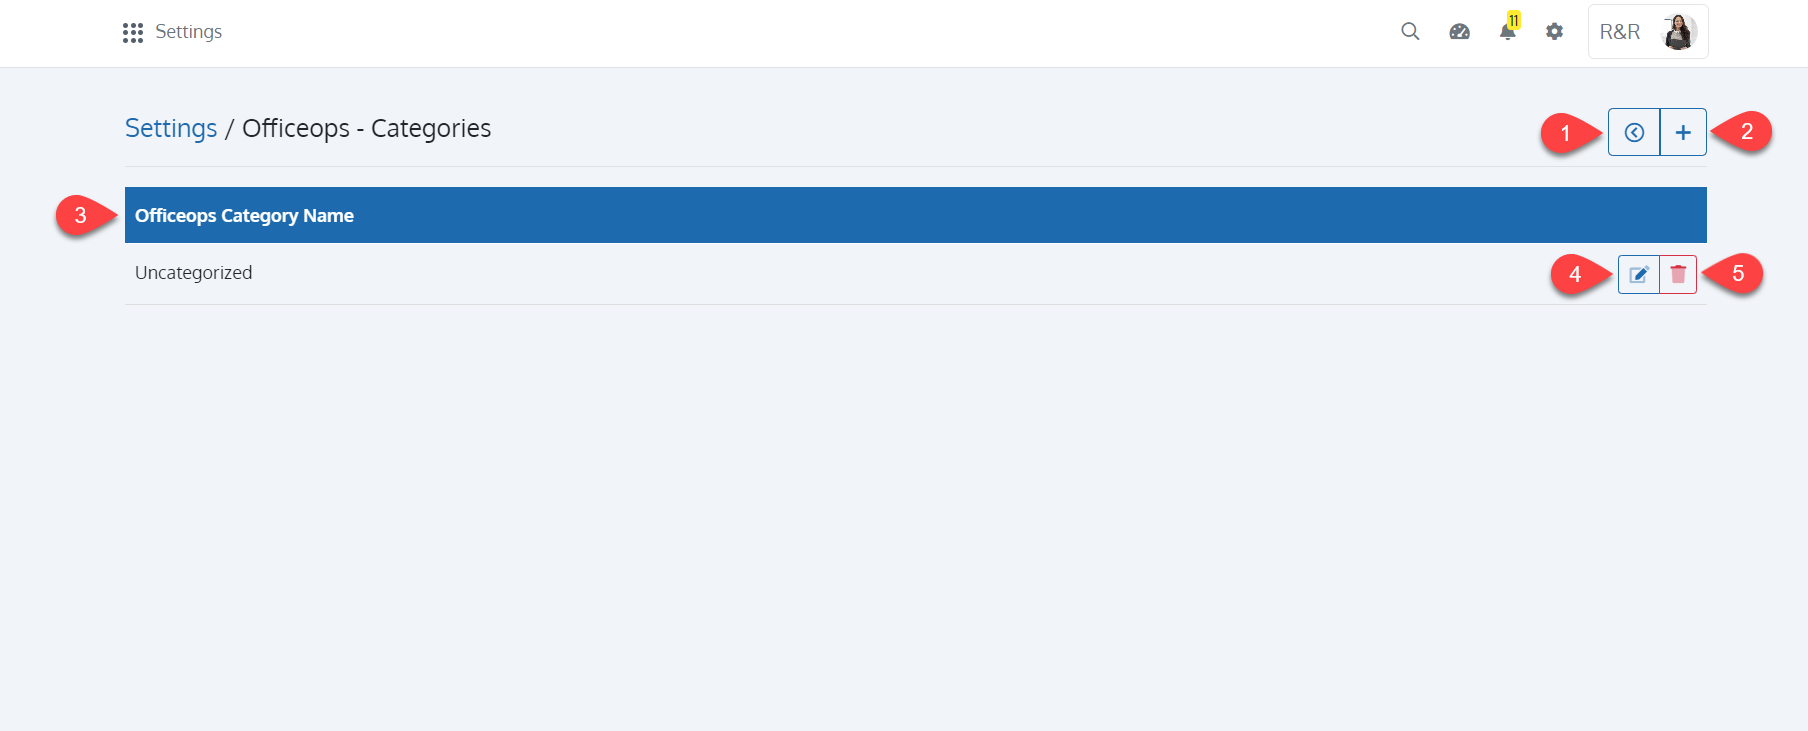
| Sl. No. | Name | Description |
|---|---|---|
| 1 | Back |
Use this button to return to the settings page |
| 2 | Add Category |
Click to add a category for OfficeOps |
| 3 | OfficeOps Category Name |
The list of available categories for OfficeOps |
| 4 | Edit Category |
Click to edit the category |
| 5 | Archive Category |
Click to archive the category |
Add Category
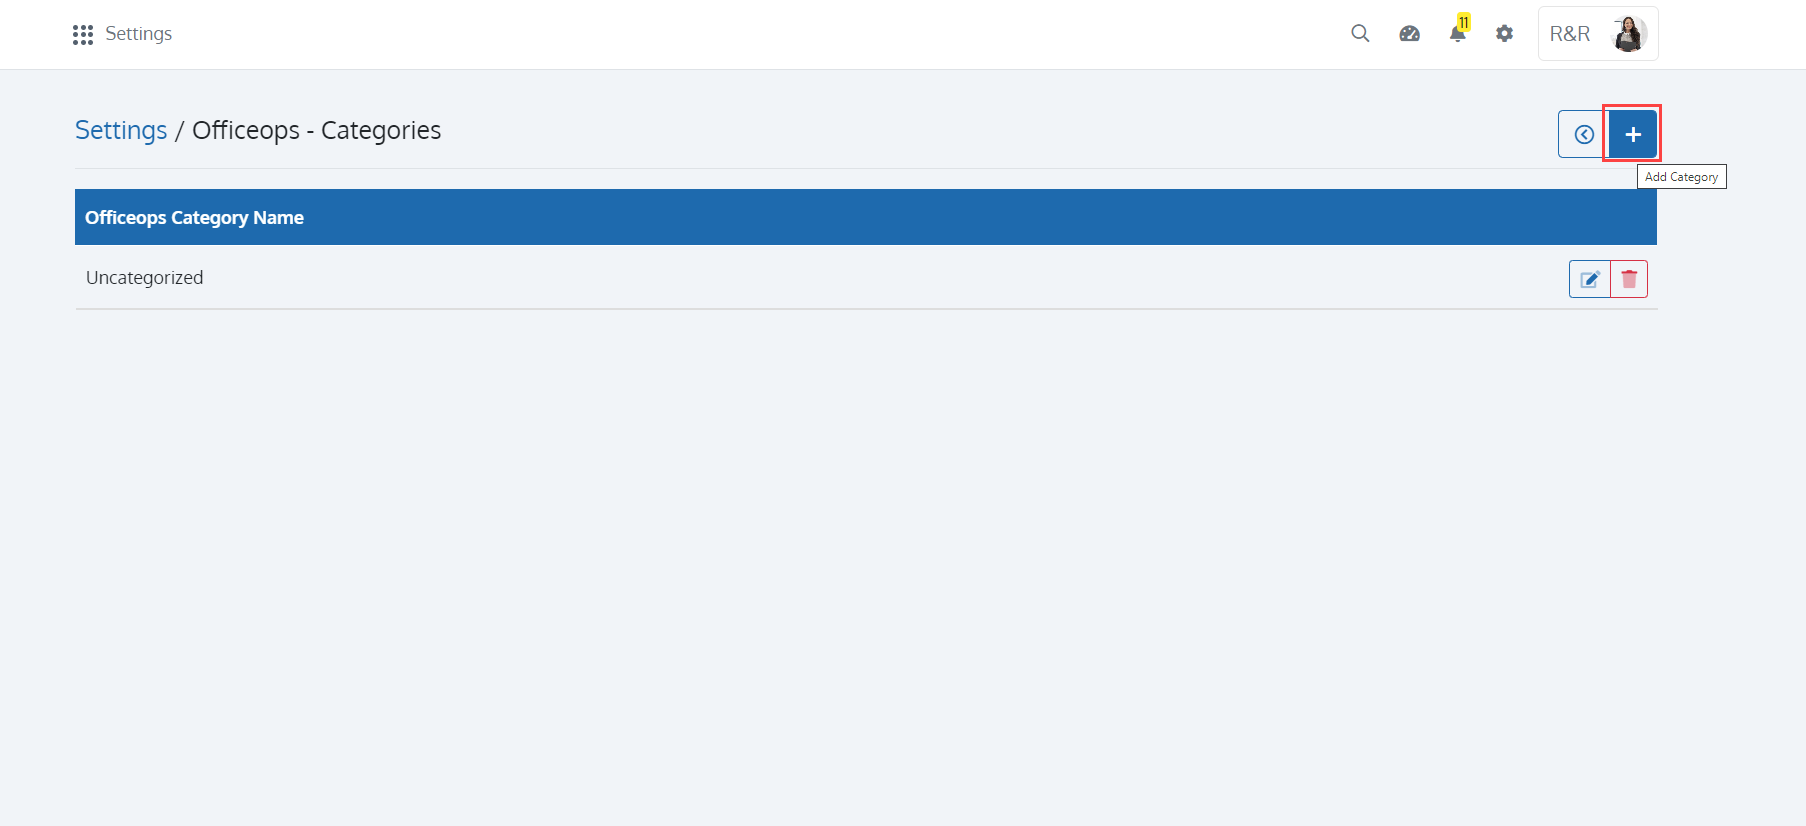
To add a Category for OfficeOps, click on the '+' button as shown in Figure 63.
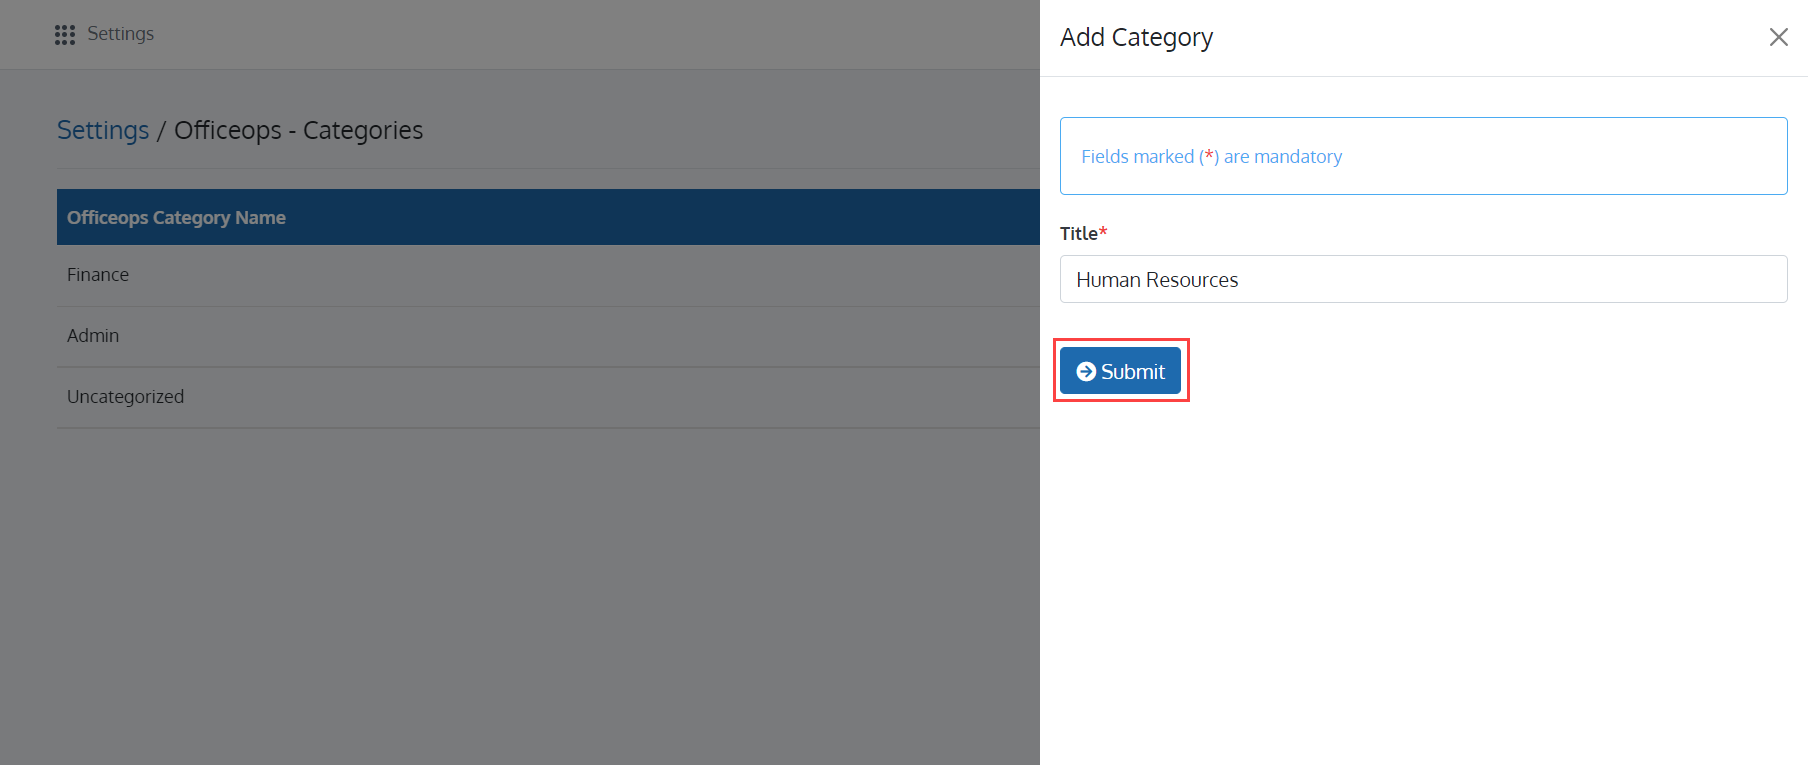
In the 'Add Category' page, enter the Title of the Category. Once you are done with, click on the 'Submit' button to save your information as shown in Figure 64.
Upon doing so, the OfficeOps Categories will appear in the 'Add/Edit Office Functions' page.
Edit a Category
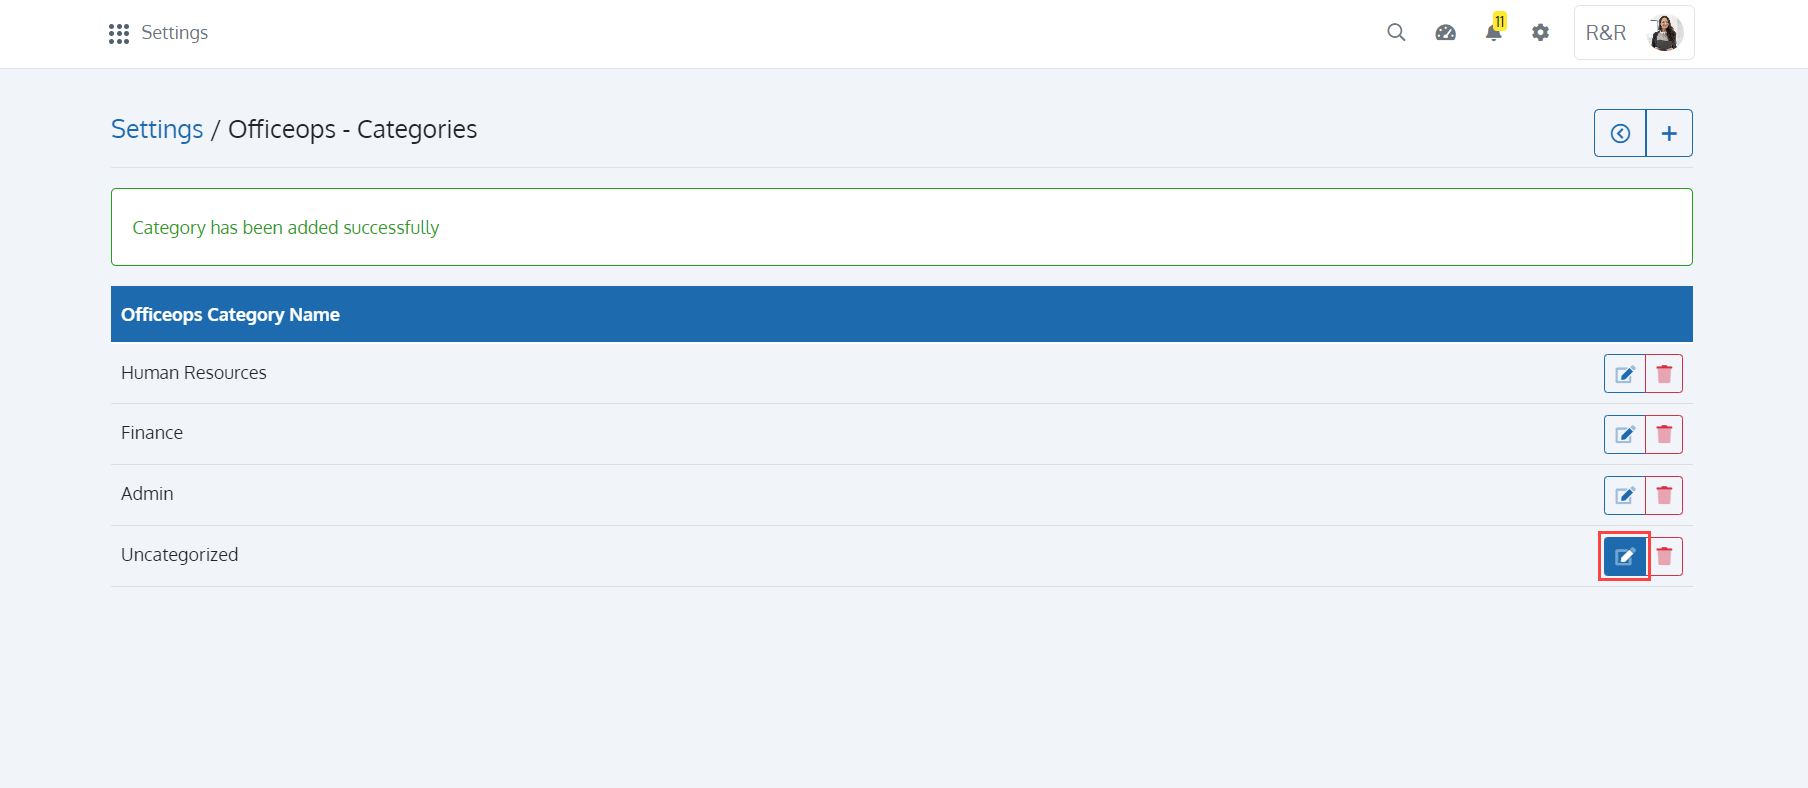
To edit a Category, click on the 'Edit Category' button as shown in Figure 65.
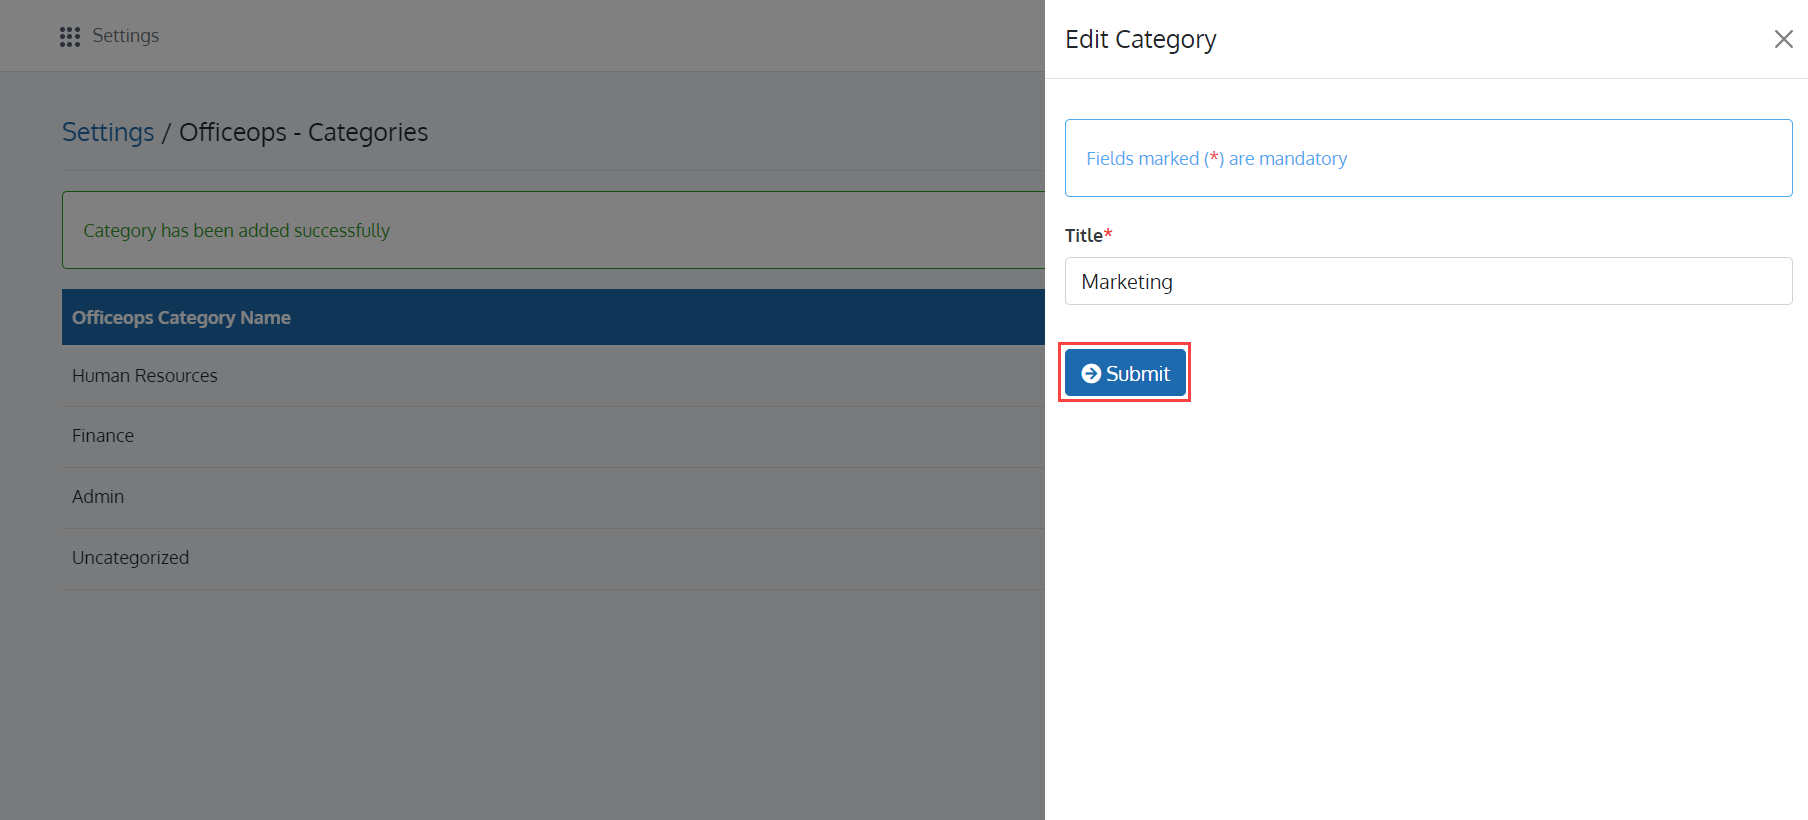
In the 'Edit Category' page, edit the Title of the Category and click on the 'Submit' button as shown in Figure 66 to save your edit.
Archive a Category
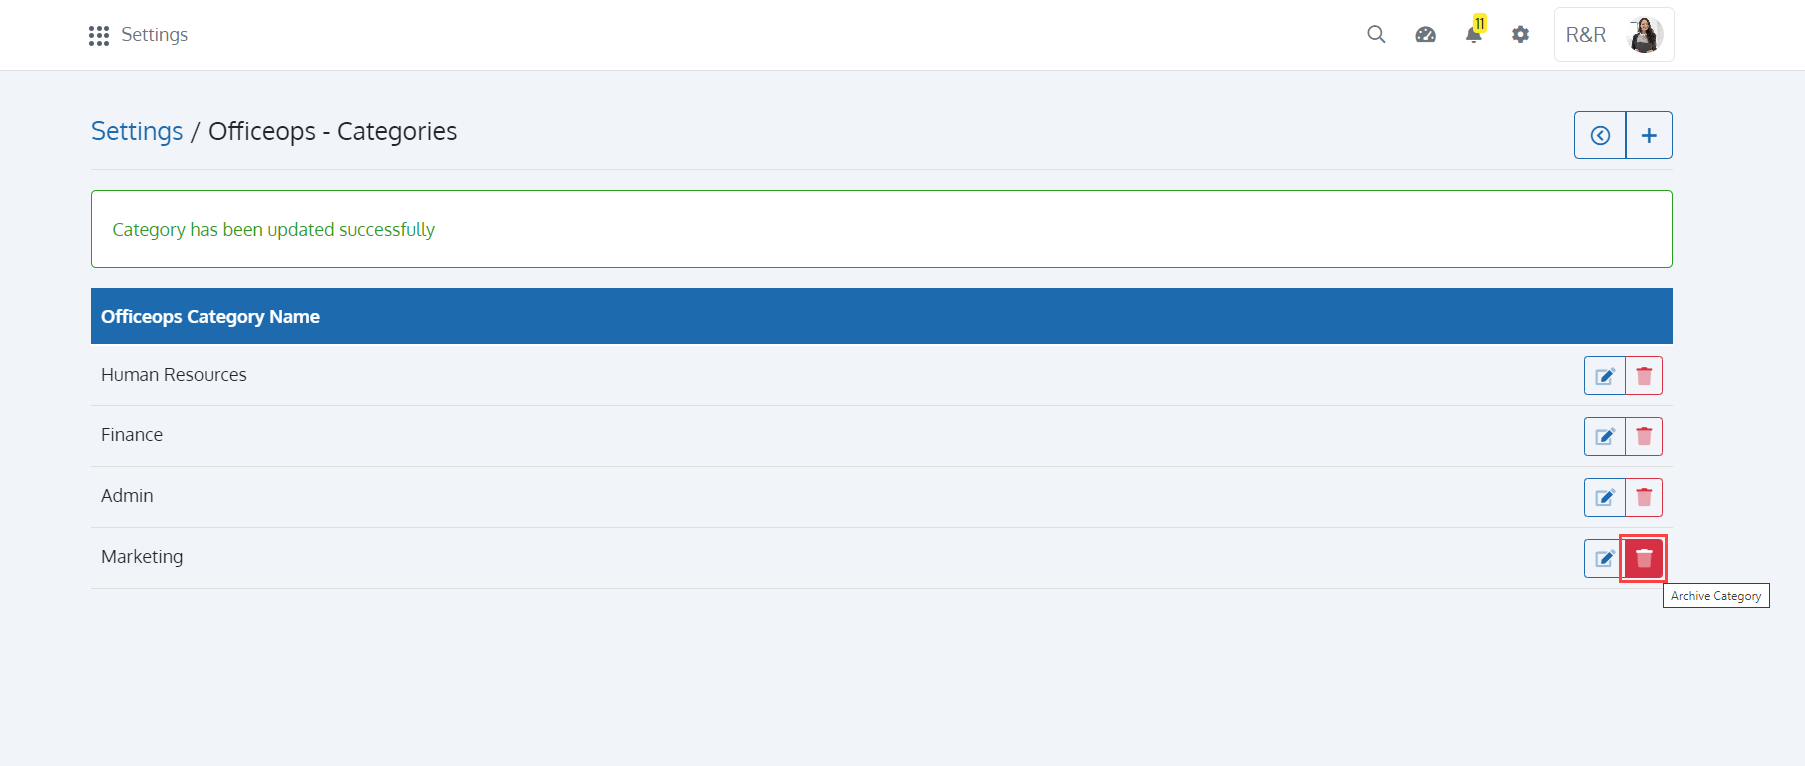
To archive a Category, click on the 'Archive Category' button as shown in Figure 67.
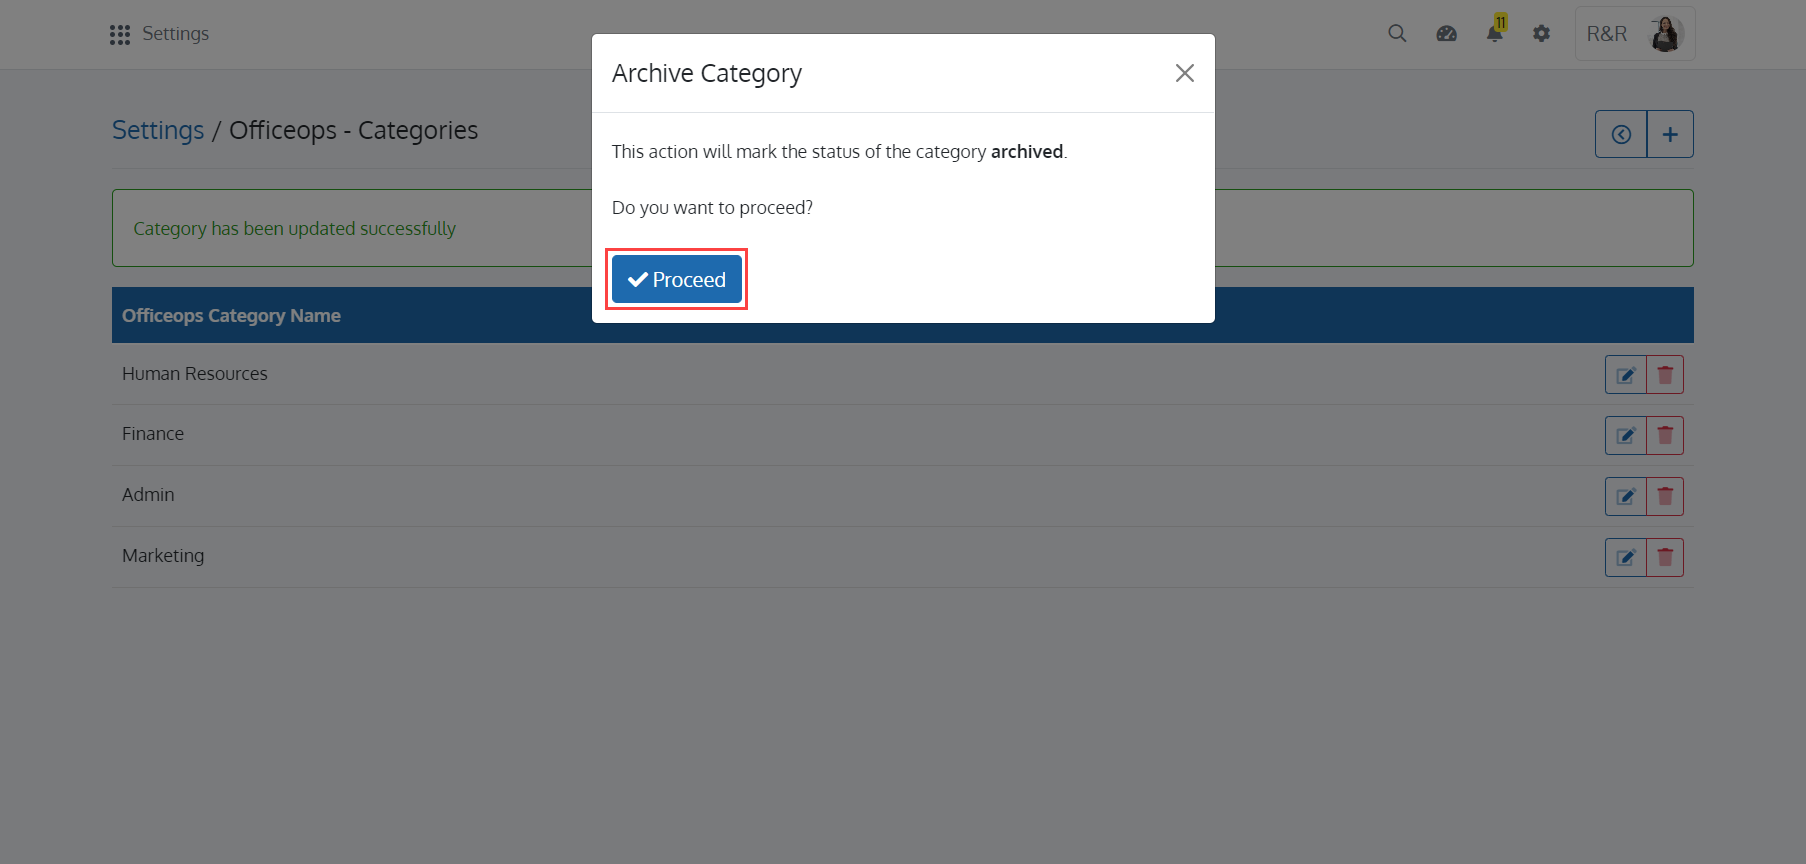
Upon doing so, the 'Archive Category' pop-up window with the buttons 'Proceed' and 'Cancel' will appear as shown in Figure 68. Click on the 'Proceed' button to archive the Category. Click on the 'Cancel' button to close the pop-up window.
To return to the 'Settings' page, click on the 'Back' button present in the 'OfficeOps - Categories' page.